Complete Guide to 3D Printing with Nylon: Settings, Tips, and Best Brands
Nylon is a strong and versatile material for 3D printing, but it can be challenging to work with. This guide provides all the necessary settings, tips, and brand recommendations to master your Nylon prints.

Chalo, let's talk about nylon. Honestly, when I first started my 3D printing journey here in India, battling with PLA and PETG was one thing, but nylon? Man, that was a whole different beast. It felt like trying to tame a wild horse with just a piece of string. But once you get the hang of it, once you understand its quirks, it's like nothing else. Nylon is a superstar, a workhorse material that can handle so much punishment, and itâs become absolutely essential for so many of the custom parts and functional prototypes I print for my clients. If you've been intimidated by it, trust me, you're not alone. But you're about to unlock a whole new level of strength and durability in your prints. So, grab a chai, let's dive deep into the world of 3D printing with nylon!
Why Even Bother with Nylon, Yaar?
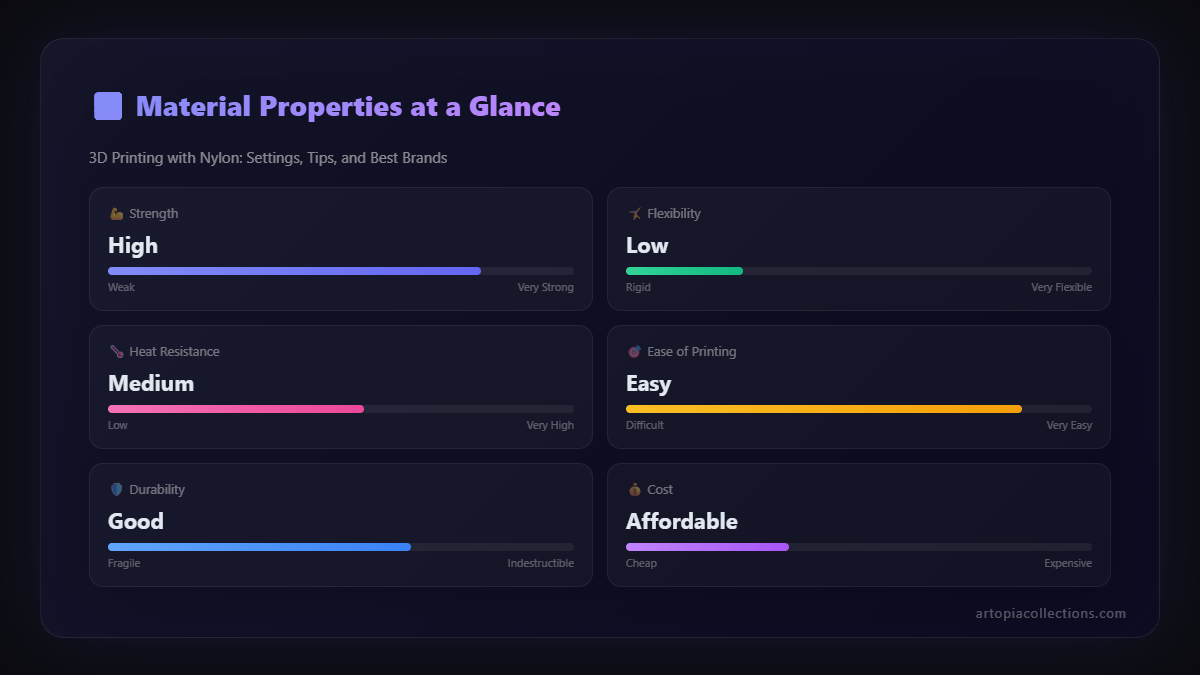
That's a fair question, right? Especially when PLA is so easy to print and PETG offers decent strength. But nylon, my friends, brings a unique set of superpowers to the table. It's not just strong; it's incredibly durable, flexible without being brittle, has fantastic impact resistance, and boasts excellent abrasion resistance. Think about gears, tools, drone parts, jigs, fixtures, anything that needs to withstand constant wear and tear or repetitive stress. Nylon just shrugs it off.
I've used it for clients who needed custom drone landing gear that could take a beating, industrial prototypes that needed to fit snugly without snapping, and even for some incredibly tough cosplay props that needed to survive conventions. And let's not forget its low coefficient of friction, which makes it ideal for moving parts. Plus, some variants are quite heat resistant. It's the kind of material that turns a "good" print into an "indestructible" one. It's basically the superhero of the filament world.
The Elephant in the Room: The "Nylon Challenge"
Okay, I'm not gonna lie to you. Nylon isn't a walk in the park. It's got a reputation for being tricky, and that reputation is well-earned. But the "difficulty" mostly boils down to two main things: moisture and warping. Once you get those two under control, the rest is just standard dialing-in.
My first nylon print was a disaster, honestly. I'd just bought a spool of what I *thought* was a good deal â around â¹2800 for 1kg â threw it on my Creality Ender 3 Pro, and hit print. It looked okay for the first few layers, and then BAM! It started lifting off the bed like it was trying to escape, and the layers looked terrible, all bubbly and weak. I was ready to throw the whole spool out the window. But then, I did my research, spoke to some experienced folks, and realised I was making rookie mistakes. And here's the deal: you don't have to make them.
Pre-Printing Essentials: The Foundation of Success
Before you even think about hitting that "print" button, you need to set yourself up for success. This isn't optional with nylon; it's absolutely critical.
1. Filament Drying: Your Absolute Top Priority
This is it, folks. This is the single biggest reason most people fail with nylon. Nylon is incredibly hygroscopic, meaning it loves to absorb moisture from the air. Like, *really* loves it. Even a brand-new, sealed spool might have absorbed some moisture during shipping or storage. And once it's wet, your prints will be brittle, have poor layer adhesion, produce tons of stringing, and look like Swiss cheese with bubbles. It's a mess.
How to dry it:
- Filament Dryer Box: This is my go-to for my business. I use something like this filament dryer on Amazon.in. It keeps the filament dry *during* printing too, which is a huge bonus. You just set the temperature (usually 60-70°C for nylon) and let it bake for several hours, sometimes even 8-12 hours for really wet spools.
- Food Dehydrator: If you have one, these work great. Just make sure it's *only* for filament now, not food, for obvious reasons. Again, 60-70°C for several hours.
- Oven: This is a last resort and requires extreme caution. Ovens aren't precise, and you can easily overheat and melt your filament. If you do this, use the lowest possible temperature setting (around 60-80°C), preheat it properly, and monitor it constantly with an external thermometer if possible. Leave the door slightly ajar to let moisture escape. I've warped more than one spool trying this in a hurry, so be warned!
And remember, once dried, keep it dry! Store it in airtight containers with desiccant packs when not in use. I personally use large airtight tubs from Tupperware or Borosil, and toss in fresh silica gel packets.
2. Printer Enclosure: Keeping it Warm and Cozy
Nylon, especially the pure PA6 or PA6/66 types, hates drafts and temperature fluctuations. It wants to be warm and stable throughout the print. An enclosure helps maintain a consistent ambient temperature around the print, which is crucial for preventing warping and improving layer adhesion.
You don't need a fancy industrial enclosure. For my Ender 3, I initially used a DIY one made from an IKEA Lack table and some acrylic sheets. Now, I have a more professional Creality enclosure that works wonders. Even a simple cardboard box (careful with fire hazards!) can make a difference if you're just experimenting. The key is to keep those cold air currents away from your print.
3. Build Plate Adhesion: Sticking Like Glue (Literally!)
Warping is nylon's second biggest challenge. It shrinks as it cools, and if your print isn't absolutely glued to the bed, it will lift, curl, and ruin your day. Here are a few things that have worked for me:
- PVA Gluestick: The old reliable. A thick, even coat of a good quality PVA gluestick (like Fevicol MR or even just generic office gluestick) on a glass or smooth PEI bed works wonders. Reapply for each print.
- Garolite / FR-4: This is what many pros swear by for nylon. Itâs a phenolic paper or glass composite material. You can often find sheets of it online or at electronics stores. Just clip it to your heated bed, no adhesive usually needed. I haven't personally tried this yet, but it's on my list!
- Textured PEI: On my Prusa MK3S+, the textured PEI sheet with a thin layer of gluestick sometimes works, but I usually get better results on a smooth sheet with gluestick for pure nylon.
- Bed Temperature: This is crucial. More on this in the settings, but typically high.
Slicing Settings: The Nitty-Gritty Details
Once your filament is dry and your printer is enclosed, itâs time to tweak those settings in Cura, PrusaSlicer, or whatever you use.
1. Nozzle Temperature (Extruder Temperature)
Nylon generally likes it hot. Really hot. The exact temperature will vary depending on the specific nylon type (PA6, PA12, PA-CF, etc.) and brand. Always check the manufacturer's recommendations first! But generally, you'll be looking at:
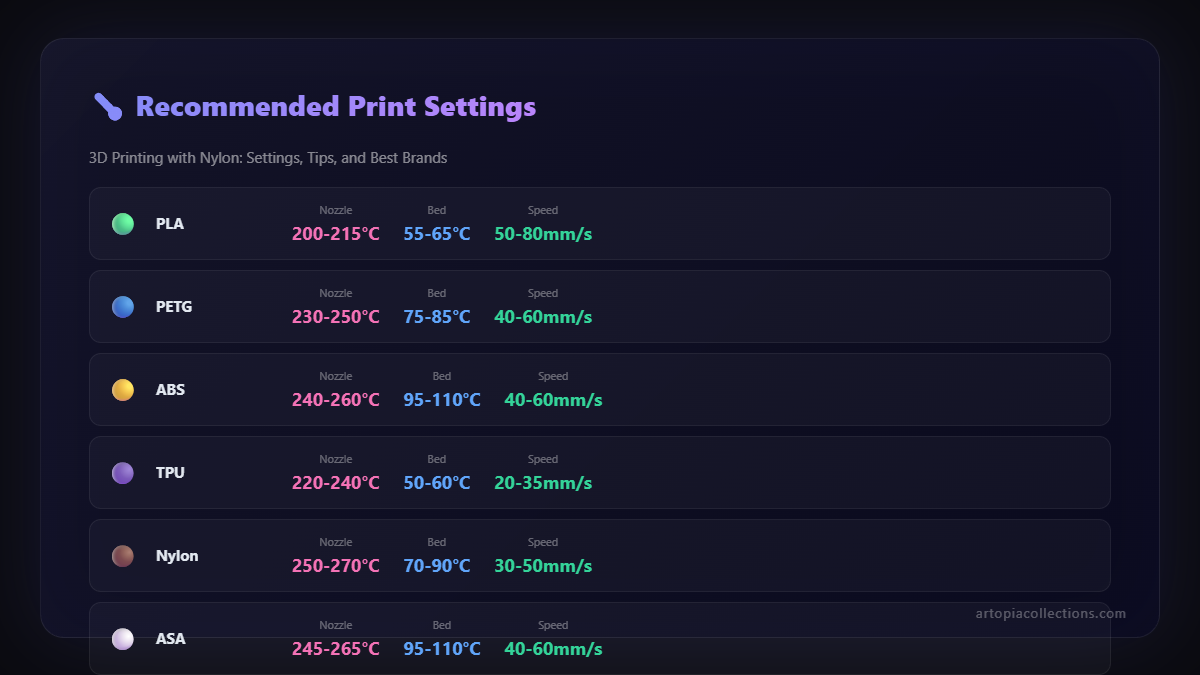
- 240°C - 260°C for pure Nylon (PA6, PA12)
- 250°C - 280°C for Nylon Carbon Fiber (PA-CF) or Glass Fiber (PA-GF) filled
Start in the middle of the recommended range and do a temperature tower if you're feeling adventurous. Too low and you'll get poor layer adhesion and underextrusion; too high and you'll see bubbling, stringing, and potentially degradation of the material. I usually run my eSUN PA-CF at 265°C on my hardened steel nozzle.
Important Note: If you're going above 240°C, make sure your hotend can handle it. Stock PTFE-lined hotends (like on many budget printers) can degrade at these temperatures and release toxic fumes. Upgrade to an all-metal hotend for safe, consistent high-temp printing. It's a worthwhile investment, especially if you plan to print with materials like PC or PEEK later on.
2. Bed Temperature
This goes hand-in-hand with bed adhesion. A hot bed helps keep the base of the print warm, reducing the temperature differential that causes warping. Again, check manufacturer specs, but expect:
- 60°C - 80°C for pure Nylon
- 70°C - 90°C for Nylon Composites (PA-CF, PA-GF)
I often run my bed at 85°C for PA-CF with a thick gluestick layer. Make sure your first layer is squished just right â not too much, not too little.
3. Print Speed
Patience is a virtue, my friend, especially with nylon. Slower is almost always better, especially for functional parts where strength is key. It gives the layers more time to properly fuse and cool uniformly.
- Typical Speed: 30-60 mm/s
- First Layer Speed: 15-20 mm/s (even slower!)
For walls and intricate details, I'll often drop it down to 30mm/s. Infill can sometimes go a bit faster, but don't push it too much.
4. Retraction Settings
Nylon can be a bit stringy, so retraction is important. However, itâs also quite viscous, so too much retraction can lead to clogs or underextrusion. This will require some fine-tuning:
- Retraction Distance: 0.5 - 2 mm for direct drive, 4-6 mm for Bowden setups.
- Retraction Speed: 25 - 45 mm/s.
Start with conservative settings and gradually increase if you see stringing. Don't go overboard; nylon doesn't respond well to rapid, aggressive retraction moves.
5. Cooling (Part Cooling Fan)
This is a big one. For almost all nylon prints, you want minimal to NO part cooling. The fan causes rapid cooling, which leads to warping and poor layer adhesion. It also reduces overall strength.
- For pure nylon: 0% fan speed.
- For nylon composites (PA-CF, PA-GF): 0-10% fan speed, if absolutely necessary for bridging or overhangs.
Let the print cool naturally within your enclosure. This is vital for robust parts.
6. Layer Height and Infill
These are pretty standard, but worth mentioning:
- Layer Height: 0.15mm - 0.25mm works well for most functional prints. Thicker layers generally mean stronger prints but less detail.
- Infill: For strong parts, don't shy away from higher infill. 40-100% is common for functional nylon prints. Grid, rectilinear, or gyroid patterns are good choices. I often use gyroid at 50% for good balance of strength and material usage.
Troubleshooting Common Nylon Issues
Even with the best preparation, things can go wrong. Here's how to tackle them:
- Warping: Dry your filament again! Increase bed temperature. Use an enclosure. Apply more gluestick. Ensure no drafts.
- Poor Layer Adhesion/Brittle Prints: Filament is wet! Increase nozzle temperature. Slow down print speed. Ensure minimal cooling.
- Stringing/Blobs: Dry your filament (yes, again!). Tune retraction settings (distance and speed). Lower nozzle temperature slightly.
- Clogging: Make sure your hotend is all-metal for high temps. Check for heat creep. Ensure retraction isn't too aggressive. Clean your nozzle periodically, especially with abrasive CF/GF filled nylons.
Best Nylon Filament Brands (Available in India)
In my experience running my small business, getting consistent, good quality filament is half the battle. Here are some brands Iâve used or seen highly recommended in the Indian 3D printing community:
1. eSUN
eSUN is often my go-to for a good balance of quality and accessibility. Their eSUN PA-Nylon is decent, but their eSUN PA-CF (Nylon Carbon Fiber) and PA-GF (Nylon Glass Fiber) are fantastic. They offer incredible stiffness and strength, perfect for structural components. Expect to pay anywhere from â¹3500 to â¹5500 for a 1kg spool of their composites. Availability on Amazon.in is usually good.
2. Polymaker
Polymaker's PolyMide series (PolyMide CoPA, PolyMide PA6-CF, PA6-GF) are premium options. These are some of the best nylons you can get for FDM printing. Their CoPA is a copolymer of PA6 and PA66, designed to be less prone to warping. Their CF and GF versions are just beasts. They can be a bit harder to find in stock consistently in India and typically come at a premium price, sometimes upwards of â¹6000-â¹8000 for a 750g or 1kg spool, but they are absolutely worth it if your project demands the best performance.
3. Hatchbox / Overture
Sometimes you can find these brands on Amazon.in or through specialty resellers. Their pure nylon offerings are generally good quality and more affordable than Polymaker, often in the â¹2500-â¹4000 range. Always double-check reviews and ensure it's from a reputable seller.
Honestly, when you're starting out with nylon, don't cheap out too much on the filament. A slightly more expensive, reputable brand will save you so many headaches in troubleshooting, and you'll get a better idea of how the material should *actually* perform.
My Personal Experience and Why I Love Nylon
Like I said, my first nylon print was a nightmare. But then I invested in a proper filament dryer, got an enclosure, and really dialled in my settings. The first time I pulled off a perfectly dimensionally accurate, incredibly strong nylon part â a custom bracket for a client's machinery â it felt like a triumph. The client was blown away by its durability, and it opened up a whole new category of projects for my business.
Now, I pretty much exclusively use nylon for any part that needs serious strength, impact resistance, or thermal stability. I've designed and printed some functional art pieces and industrial prototypes using it, and the results are just unmatched by other common filaments. It feels good knowing that the parts I create for my clients won't just look good, but will actually *work* and last a long time, even under harsh conditions.
Wrapping It Up: Go Forth and Print!
So, there you have it â my complete guide to 3D printing with nylon. Yes, it has its challenges, but don't let that scare you away. With proper filament drying, a stable print environment (enclosure), good bed adhesion, and carefully dialled-in settings, you can absolutely conquer this incredible material. The rewards â in terms of print strength, durability, and functionality â are absolutely worth the effort. It's truly a game-changer for functional parts and professional applications. So, go on, give it a try! You might just find your new favorite filament. And if you ever need any custom nylon prints, you know who to call!