
Ever pull a fresh spool of filament out of its packaging, load it up, and then spend the next hour tearing your hair out because your perfect print suddenly looks like it went ten rounds with a mischievous poltergeist? Stringing everywhere, layers delaminating, weird bubbles popping up, and a general sense of your amazing design just⦠failing? Yeah, I know that feeling. Iâve been there, staring at a half-finished print destined for a client, wondering what dark magic had possessed my trusty Ender 3. And honestly, for the longest time, I blamed everything: my slicer settings, my nozzle, the alignment of the stars. But a few years into running ArtOPIa Collections, my small 3D printing business here in India, I figured out the real culprit for a good 80% of those headaches. The invisible enemy: moisture.
You see, folks, that brand new filament isnât always as "dry" as you think it is, even straight out of the vacuum-sealed bag. And if itâs been sitting on your shelf for a few weeks or months, especially in our lovely, often humid Indian climate, you can bet your bottom rupee itâs absorbed some atmospheric moisture. And trust me, that moisture is a silent print killer.
Why Wet Filament is Your Worst Enemy
So, what exactly happens when you try to print with wet filament? Basically, itâs a tiny explosion festival happening right inside your hotend. The moisture in the plastic heats up rapidly, turns into steam, and expands. This causes all sorts of chaos:
- Bubbles and Popping Sounds: Hear a subtle crackling or popping from your hotend? Thatâs the sound of water turning into steam. Those tiny bubbles get trapped in your extrusion, leading to weak, porous prints.
- Stringing and Oozing: The sudden pressure changes from the steam bursts make it harder for your printer to retract properly, leading to unsightly strings and blobs all over your model.
- Weak Layer Adhesion: Remember those bubbles? They disrupt the molten plastic flow, preventing layers from bonding properly. Your prints will become brittle and easily snap. Not ideal for functional parts or anything that needs to last!
- Inconsistent Extrusion: The steam bursts cause uneven plastic flow, meaning some areas get too much material, others not enough. This leads to rough surfaces and dimensionally inaccurate parts.
- Poor Surface Quality: Blobby, inconsistent, rough surfaces are a dead giveaway of wet filament. Good luck getting that smooth finish you were aiming for.
- Clogged Nozzles: In extreme cases, especially with materials like Nylon, the steam and degraded plastic can even cause partial or full nozzle clogs. And nobody likes unclogging a nozzle, do they?
For me, running a business where print quality is paramount, these issues aren't just annoying; they directly impact my reputation and my bottom line. Wasting filament, wasting electricity, wasting my time â it all adds up. I've had projects where I couldn't figure out why a particular batch of PETG was just refusing to print cleanly, only to pop it into a dryer for a few hours and watch it print like magic afterward. Itâs infuriating when you donât know, and incredibly satisfying when you fix it.
And hereâs the thing: different filaments absorb moisture at different rates. PLA, our everyday workhorse, is pretty absorbent. PETG is even worse. ABS and Nylon? Oh boy, theyâre like sponges, practically sucking the humidity out of the air. So, if youâre printing with anything beyond basic PLA, drying your filament isnât just a good idea; itâs absolutely essential.
How to Spot a Wet Filament (Before You Even Print)
Sometimes, you can tell just by looking. If your clear filament looks foggy or has tiny visible bubbles, itâs probably soaked. But often, the signs are more subtle. The best way to tell is during the print itself: those tell-tale popping sounds, excessive stringing, or a generally awful finish that just doesn't make sense given your usual settings.

So, now that weâve established why it matters, letâs talk about how to deal with this sneaky saboteur.
The Drying Arsenal: Methods to Reclaim Your Filament
There are a few ways to dry your filament, ranging from dedicated machines to household hacks. I've tried most of them, and I've definitely got my favourites.
1. Dedicated Filament Dryer Boxes (My Personal Favourite)
These are purpose-built devices designed specifically for drying filament. They typically have a heating element, a fan, and often a hygrometer (humidity sensor) to show you how much moisture is in the air inside the box. Most models hold one or two spools, and some even let you print directly from the box, which is super convenient for those really hygroscopic filaments like Nylon or even some PETGs.
Pros:
- Optimal Control: Designed for filament, so they maintain precise, low temperatures that won't melt your plastic.
- Convenience: Just pop your spool in, set the temp and time, and forget about it. Many can run while printing.
- Safety: Much safer than using an oven.
- Built-in Features: Hygrometers, timers, and sometimes even fan settings are common.
Cons:
- Cost: This is the biggest hurdle for many. Good ones can range from â¹4,000 to â¹8,000 or even more. But trust me, it's an investment that pays for itself in saved filament and sanity. I use one for my business, and itâs invaluable.
- Capacity: Most only hold one or two spools.
Brands like Sunlu, Creality, and eSUN make excellent filament dryers. If you're serious about your prints, especially with engineering filaments, this is where you should put your money. Hereâs a link to check out some options on Amazon.in:
Check out 3D Printer Filament Dryers on Amazon.in!
2. Food Dehydrators (The Budget-Friendly Workhorse)
Before I invested in a dedicated filament dryer, I used a food dehydrator. They work on a similar principle: a low-temperature heating element and a fan to circulate warm air, slowly drawing out moisture. Many of them operate at temperatures ideal for filament drying (around 40-70°C).
Pros:
- Affordable: You can find decent food dehydrators for â¹2,000 to â¹5,000. Much cheaper than some filament dryers.
- Effective: They do a great job of drying filament.
- Multi-purpose: If you're into making dried fruit or jerky (though I recommend having a separate one for filament, unless you want your prints smelling faintly of mango!).
Cons:
- Modification Needed: Most food dehydrators have trays that are too small for a standard 1kg filament spool. Youâll likely need to cut out the centre of a few trays to make space. Not a huge deal, but something to keep in mind.
- Less Precise Control: Temperature settings might be less accurate than dedicated dryers.
- No Printing While Drying: You can't usually print directly from a food dehydrator.
I personally used a simple Havells food dehydrator for a while, and after a little DIY modification, it served me well. Just make sure the temperature goes low enough and is reasonably consistent.
3. Your Kitchen Oven (Use with Extreme Caution!)
Okay, so this is probably the most controversial method, and I only recommend it if you absolutely, positively have no other choice, and you are prepared to babysit it like a newborn. The biggest risk here is melting your filament into a useless plastic blob, or worse, releasing unpleasant fumes if you overheat it.
Pros:
- Accessibility: Most homes have an oven.
- Free (apart from electricity): No extra purchase necessary.
Cons:
- High Risk: Ovens are designed for cooking, not precision low-temperature drying. Their thermostats are often inaccurate at lower ranges.
- Melting Hazard: Even a slight overshoot in temperature can warp or melt your spool.
- Fumes: Overheating some plastics (like ABS) can release toxic fumes. Ventilate heavily if you attempt this.
- Inconsistent Temperatures: Ovens often cycle their heating elements, leading to temperature fluctuations.
If you absolutely must use an oven:
- Use the lowest possible setting. For most ovens, this might be around 50-60°C.
- Use an external oven thermometer. Do NOT trust your oven's dial. Place an accurate thermometer near the filament.
- Prop the door slightly ajar. This helps prevent overheating and allows moisture to escape.
- Set a timer. Never leave it unattended.
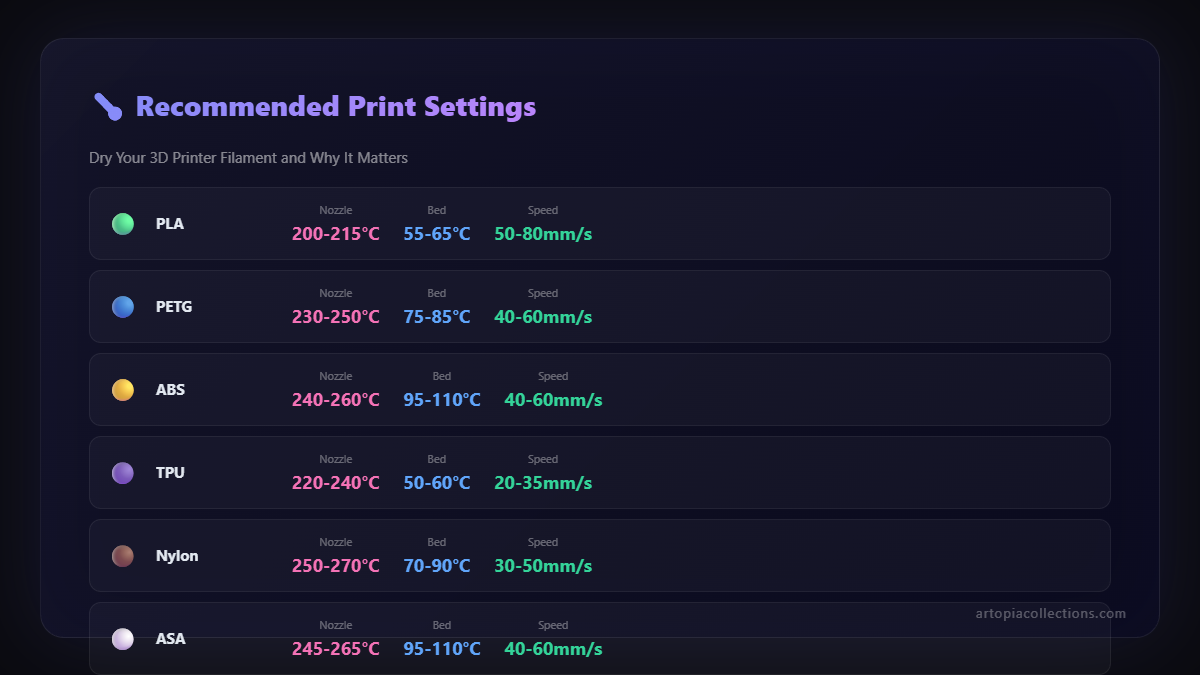
- PLA: 40-45°C for 4-6 hours.
- PETG: 60-65°C for 6-8 hours.
- ABS: 70-80°C for 8-12 hours.
- Nylon: 70-80°C for 12+ hours (Nylon needs a lot of love).
Honestly, I'd rather spend a bit on a cheap food dehydrator than risk ruining an expensive spool of filament or my oven. Just saying.
4. Desiccants and Sealed Containers (For Maintenance, Not Resuscitation)
This method is more about prevention and storage than actively drying already wet filament. Storing your filament in airtight containers or vacuum bags with desiccant packets (like silica gel) is crucial for keeping it dry once it's been dried. It won't fix a thoroughly soaked spool, but it will prevent a dry spool from getting wet again.
Pros:
- Cheap: Silica gel packets are relatively inexpensive.
- Easy: Just toss them in with your spool.
- Effective for storage: Great for maintaining dryness.
Cons:
- Passive: Very slow, not for actively drying.
- Limited Capacity: Desiccants need to be reactivated (dried out) periodically, usually by baking them in a low oven.
My Drying Routine and Why It's Crucial for ArtOPIa
For ArtOPIa Collections, quality is everything. My clients expect high-quality prints, whether it's a custom prototype, a cosplay prop, or an intricate art piece. I simply can't afford print failures due to something as preventable as wet filament. So, my routine is pretty strict now.
Any new spool, especially PETG or ABS, gets at least 4-6 hours in my dedicated filament dryer before its first print. If a spool has been sitting out for more than a couple of days, especially during monsoon season in Pune (which, let's be real, feels like most of the year), it goes straight into the dryer for a few hours. I even keep a few desiccants in my printer enclosure just as an extra layer of protection while printing. It adds a little extra time to the setup, but the saved material, electricity, and frustration are well worth it. Trust me, itâs a small investment of time for a huge gain in print reliability.
And when I finish a project or change a spool, it immediately goes into an airtight container with a couple of large silica gel packets. Iâve even got some vacuum bags for longer-term storage of less frequently used spools. Prevention is always better than cure, right?
Final Thoughts and a Little Encouragement
Drying your 3D printer filament might seem like an extra chore, but it's one of those fundamental practices that can dramatically improve your print quality and save you from countless headaches. Itâs not just about avoiding ugly prints; itâs about getting stronger, more reliable parts and avoiding wasted time and material.
So, if youâre struggling with inconsistent prints, excessive stringing, or weak layer adhesion, don't immediately blame your printer or your slicer settings. Take a moment, consider your filament, and give it a good dry. You'll be amazed at the difference it makes. It definitely changed the game for me and my business, helping me deliver the quality products that you can see right here on our ArtOPIa Collections products page.
Happy printing, and may your filaments always be dry!
And hey, if you're looking for some fresh, good quality PLA to experiment with (and then keep dry!), here's a link to some options on Amazon.in:


