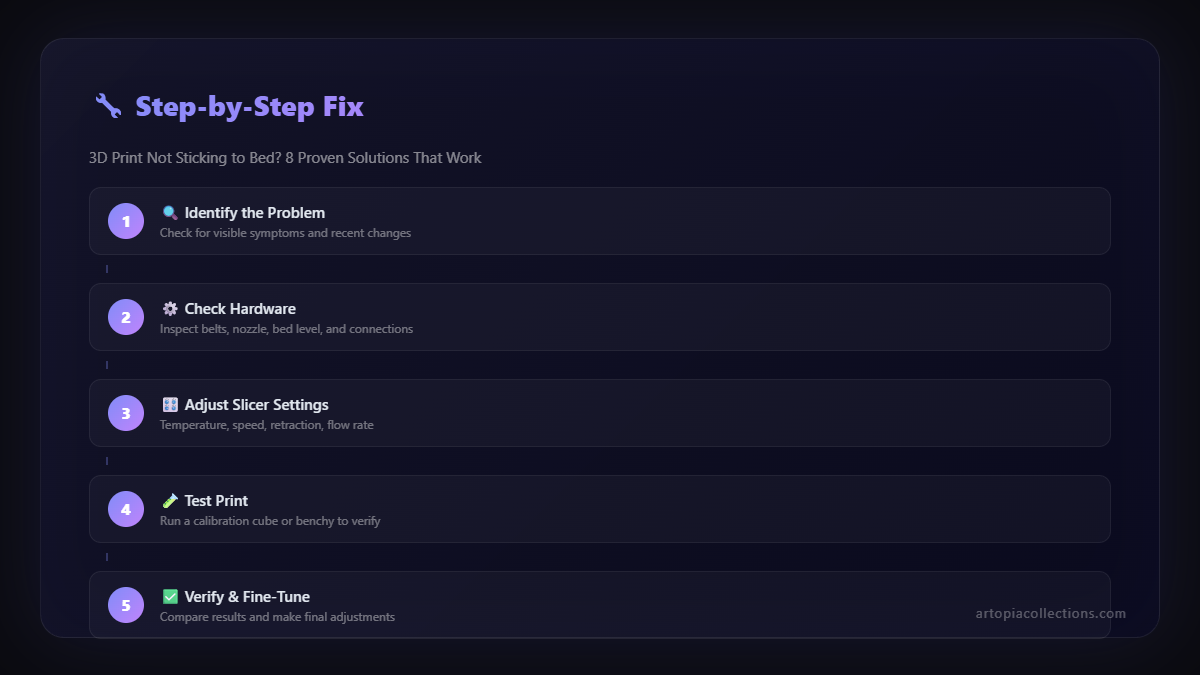
3D Print Not Sticking to Bed? 8 Proven Solutions That Work
Your 3D prints won't stick to the build plate, leading to frustrating failures? This guide provides 8 proven solutions to common bed adhesion problems, helping you achieve perfect first layers every time.

The Sticky Situation: Why Your 3D Print Isn't Sticking (and 8 Fixes That *Actually* Work!)
Oh, the pure, unadulterated rage that bubbles up when you walk over to your printer, full of anticipation, only to find your beautiful first layer has decided to pack its bags and warp away from the build plate. Or worse, itâs become a tangled mess of spaghetti, mocking your dreams of that perfect print. Sound familiar? If youâve spent more hours than you care to admit staring blankly at a failed print, wondering what ancient curse youâve invoked, then my friend, youâre in the right place. Iâm Vidyut, and here at Artopia Collections, we live and breathe 3D printing â and believe me, Iâve had my fair share of "non-stick" moments. It's probably the most common, and frankly, most frustrating issue new (and even experienced!) users face. But don't you worry, I've battled this beast many, many times, and I've got 8 rock-solid solutions that'll get your prints sticking like superglue to... well, to anything, really!
1. Level Your Bed Like Your Life Depends On It (Because Your Print Does!)
Honestly, this is the first thing I'll ask anyone who messages me about adhesion issues. "Have you leveled your bed?" And more often than not, the answer is a hesitant "Uh, yeah, I think so?" Well, 'thinking so' isn't going to cut it, boss. Bed leveling is *foundational*. It dictates the gap between your nozzle and the print surface, and if that gap isn't uniform and just right across the entire bed, your print is doomed from the start. A paper thickness gap is generally the go-to, but some folks prefer a slightly tighter 'feel' â you'll develop your own preference. I personally use a â¹100 note (since I always have one handy!) on my Creality Ender 3 and Anycubic Kobra, and I've found it gives me a pretty consistent first layer. Do it slowly, do it methodically, and do it again if you're not getting good results. Auto-bed leveling (ABL) systems like CR-Touch or BL-Touch definitely help, but even with those, a good manual level or tramming before you run your ABL mesh is still crucial. Trust me, it's worth the extra five minutes.
2. Get That Bed Temperature Dialed In
This is a biggie, especially here in India where ambient temperatures can fluctuate like crazy. Different filaments need different bed temperatures to stick properly. Think about it: the hot bed helps the plastic soften and bond with the surface as it cools. Too cold, and it'll just pop right off. Too hot, and it might become too pliable and warp. For standard PLA, I usually run my bed at 60°C. For PETG, I'll bump it up to 70-80°C. ABS? We're talking 90-110°C, and that's a whole other ballgame with enclosures and fumes, but you get the idea. My advice? Start with the filament manufacturer's recommendations printed on the spool or box. They've done the testing! And then, don't be afraid to experiment a little, maybe go up or down 5 degrees until you find that sweet spot for your specific printer and environment. The thing is, even the same filament brand might behave slightly differently batch-to-batch.
3. The Goldilocks Zone: Perfect Nozzle-to-Bed Gap (The "First Layer Squish")
Okay, so you've leveled your bed. Great! But are you *really* getting that perfect first layer? This ties into leveling, but it's more about the actual distance your nozzle is from the bed when it starts printing. You want what we call "squish." Not too much, not too little. Too high, and the filament won't adhere because it's basically just laying on the surface. Too low, and the nozzle will scrape the bed, starve your extrusion, or even damage your print surface. When it's just right, the first layer of filament should look slightly flattened, like a perfect, thin ribbon, with no gaps between the lines and no ridges. It should almost look like a single, solid sheet of plastic. You can usually fine-tune this on the fly with your printer's Z-offset setting while your first layer is printing. Thatâs a game-changer. I always start my prints and immediately hover over the Z-offset, ready to tweak it.
4. The Unsung Hero: Clean Your Build Plate!
This sounds so simple, right? Yet, itâs one of the most overlooked solutions. Every time you touch your build plate, you leave behind natural oils from your fingers. Dust settles. Filament residue builds up. All of these act as release agents, making it harder for your new print to stick. So, whatâs the secret? Cleanliness! For most surfaces like glass, PEI, or magnetic plates, a simple wipe down with isopropyl alcohol (IPA) on a clean microfibre cloth works wonders. You can get a liter of IPA from your local hardware store or online for around â¹300-â¹500. Some folks even use warm water and dish soap for a deeper clean, especially if theyâve used gluestick for a while and itâs built up. Just make sure to rinse *thoroughly* and let it dry completely. I make it a habit to clean my build plate before every print session. It takes literally 30 seconds and saves hours of headaches.
5. Adhesion Aids: Bring Out the Sticky Stuff!
Sometimes, even with a perfectly level, clean, and warm bed, you just need a little extra help. That's where adhesion aids come in. And honestly, for a long time, these were my go-to solutions when I was first starting out. They're cheap, effective, and readily available.
- PVP Gluesticks: The humble school gluestick is a legend in 3D printing. A thin, even layer of something like a Camlin or Fevicol gluestick (the purple ones that dry clear are great!) on your build plate creates a temporary, sticky surface. It's fantastic for PLA and PETG on glass. Just make sure itâs a *PVP* gluestick â check the ingredients. You can grab a pack for maybe â¹50-â¹100.
- Hairspray: Yes, hairspray! The trick is to use one that contains polymers, like a strong-hold, unscented hairspray. Spray a thin, even coat onto your *cold* build plate (away from the printer if possible to avoid overspray on components!). It creates a fine, tacky film. My friends swear by Godrej Professional or Livon for this, which you can find for around â¹150-â¹250.
- Painter's Tape: Blue painter's tape, like the kind from 3M (easily available for â¹150-â¹300 a roll), works incredibly well for PLA, especially on printers with non-heated beds or if you're struggling with smooth surfaces. Apply strips carefully, making sure there are no overlaps or bubbles. The texture of the tape gives the filament something extra to grip onto.
6. Tweak Those First Layer Slicer Settings
Your slicer (Cura, PrusaSlicer, Simplify3D) isnât just for turning models into G-code; it's a powerful tool for fine-tuning your print's performance. And the first layer settings are *critical* for bed adhesion.
- First Layer Speed: SLOW IT DOWN! Seriously, this is probably the most impactful setting. I usually print my first layer at 15-20mm/s, even if the rest of the print is at 60mm/s. Giving the plastic more time to bond with the build plate is a no-brainer.
- First Layer Extrusion Width: A slightly wider first layer line (e.g., 0.48mm for a 0.4mm nozzle) can increase the surface area contact with the bed, creating a stronger bond.
- First Layer Height: A slightly thicker first layer (e.g., 0.25mm or 0.3mm for a 0.2mm layer height print) can also help with adhesion by increasing the volume of plastic that's pushed onto the bed.
- Brims and Rafts: These are sacrificial layers that increase the footprint of your print on the bed. A brim adds a single-layer skirt around your part, while a raft prints a whole base layer underneath it. They're lifesavers for small parts or objects with minimal bed contact.
7. Your Filament Matters More Than You Think
Sometimes, the problem isn't your printer or your settings, but the material you're trying to print with.
- Filament Quality: Not all filaments are created equal. Cheap, low-quality filament can have inconsistent diameters, impurities, and poor flow characteristics, all of which affect adhesion. Invest a bit more in good quality filament. Brands like eSUN, FlashForge, Overture, or even some of the better Indian brands like 3DM are usually reliable. You can find good PLA filament on Amazon.in. I've personally had great experiences with high-quality PLA filament from reliable sellers on Amazon. It's often worth the slightly higher price, around â¹1200-â¹1800 for a 1kg spool.
- Moisture: Filament is hygroscopic, meaning it absorbs moisture from the air. Moist filament prints poorly â it can bubble, spit, and generally lead to weak prints and terrible adhesion. If your filament has been sitting out for a while, try drying it in a food dehydrator (around â¹2000-â¹3000), a dedicated filament dryer (â¹3000-â¹5000), or even your oven at a very low temperature (be careful!).
- Specific Filament Types: Some filaments are just notoriously difficult. TPU is flexible and can be a pain. ABS shrinks a lot, leading to warping if not properly managed. If you're struggling with a specific exotic filament, research its unique requirements.
8. Upgrade Your Build Surface (My Personal Favourite Solution!)
Okay, so you've tried all the above, and you're still wrestling with prints that won't stick. Or maybe you just want a more consistent, less finicky experience. That's when it's time to consider upgrading your build surface. This, for me, has been the biggest game-changer.
- PEI Spring Steel Sheets: If there's one upgrade I'd recommend to everyone, it's a PEI (Polyetherimide) coated spring steel sheet. These are fantastic! They offer amazing adhesion when heated (especially for PLA and PETG), and once the bed cools down, the prints literally just pop off with a gentle flex of the sheet. No scraping, no prying, no broken parts. You can find good quality magnetic PEI sheets for popular printers like the Ender 3 or Anycubic Kobra for around â¹1000-â¹1800 on Amazon.in. I use one on my main production printer, and itâs a dream. Seriously, check out something like this magnetic PEI build plate for your printer; it's a huge quality-of-life improvement.
- Glass Beds: If you're still on a basic aluminium or flimsy magnetic sheet, a tempered glass bed is a huge upgrade for flatness and consistency. Combine it with gluestick or hairspray, and you'll get fantastic adhesion and a wonderfully smooth bottom surface. A good quality glass bed for an Ender 3 size printer might cost you â¹800-â¹1200.
- Textured Surfaces: Some PEI sheets come textured, offering a matte, textured finish to your print's first layer. Others, like Garolite (G10), are also popular for specific materials like Nylon. Experiment to find what works best for your needs.
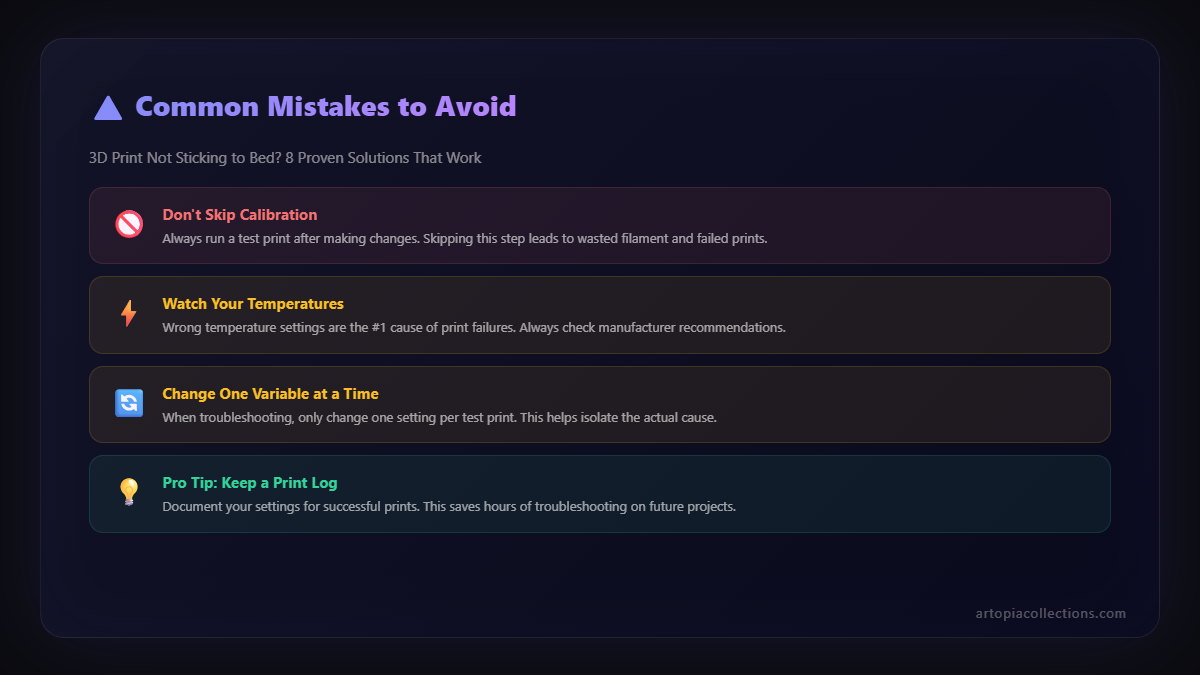
Don't Give Up!
Look, 3D printing is an amazing hobby and a powerful tool for creation, but it comes with its fair share of quirks. Bed adhesion is often the first major hurdle people encounter, and it can feel like you're banging your head against a wall. But trust me, with a bit of patience, methodical troubleshooting, and trying out these proven solutions, you'll overcome it. It's all part of the learning curve, and honestly, the satisfaction of a perfect first layer is unmatched!
Here at Artopia Collections, we've fine-tuned our processes to ensure every single print that leaves our workshop has perfect adhesion and quality. We apply these very principles to everything we create, from custom prototypes to unique decor. If you're curious about what we print, or if you need something special made, feel free to check out our creations at our product page. We're always happy to help fellow makers and bring ideas to life.
So, go forth, tweak those settings, clean that bed, and get those prints to stick! Happy printing, my friends!