How to Add WiFi to Any 3D Printer Using ESP32
Transform your 3D printer into a smart, connected device with this easy-to-follow guide. Discover how to use an ESP32 to add WiFi, enabling remote control and monitoring of your prints.

Alright, my fellow makers and print farm enthusiasts, let's be real for a minute. You know that feeling, right? You've just finished a killer design, sliced it up perfectly, and now you're faced with the ancient ritual: taking out the microSD card, walking to your computer, copying the G-code, walking back, putting the card into the printer, finding the file, and finally hitting print. And then, God forbid, you realize you forgot to change a setting or the bed isn't quite right. Repeat. Honestly, sometimes it feels like I'm doing more cardio than actual 3D printing! I mean, here in India, where every minute counts, especially when you're running a small business like mine, ArtoPia Collections, this constant back-and-forth can be a real productivity killer.
Goodbye SD Cards, Hello Freedom: Why WiFi on Your 3D Printer is a Game-Changer
For ages, I put up with it. My trusty Ender 3 V2, and even the Anycubic Kobra 2 Neo I recently got, are fantastic machines, absolute workhorses. But that microSD card slot? It's like a tiny, analog bottleneck in an otherwise digital wonderland. I'd dream of starting a print from my phone while sipping chai, or checking the print status from my laptop without having to hover over the machine. And the thing is, I knew solutions existed. OctoPrint, for instance, is brilliant, but it usually needs a Raspberry Pi, which, let's be honest, can be a bit pricey and sometimes hard to source reliably here in India, plus it's a whole extra computer basically. I wanted something simpler, something more integrated, and definitely something more budget-friendly.
Then, I stumbled upon the magic of the ESP32. Oh, man, this little chip is a powerhouse! It's a tiny, inexpensive microcontroller with built-in Wi-Fi and Bluetooth, and it's perfect for adding smart capabilities to almost anything. I've used them for smart home projects, sensor networks, you name it. And then a thought hit me: what if I could use this humble little board to give my 3D printer the Wi-Fi superpower it deserved, without breaking the bank or needing a whole separate server?
Spoiler alert: You totally can. And it's not even that hard. In my experience, once you get past the initial "oh god, I'm modifying my printer" jitters, it's actually quite straightforward. This isn't just about convenience, mind you. For my business, being able to remotely queue prints, monitor them from anywhere in my workshop, or even from home if I'm checking on a long overnight job, has been revolutionary. No more missed deadlines because a print stopped unexpectedly and I wasn't around to catch it. That's real money saved, real stress avoided.
The Mighty ESP32: Your Printer's New Best Friend
So, what exactly are we doing here? Basically, we're going to give your 3D printer a brain transplant – a tiny, WiFi-enabled brain – that lets it talk to your network. We'll be using a firmware called ESP3D, which is specifically designed to act as a web interface for your printer's mainboard. It communicates with your printer using its serial (UART) port, which nearly every 3D printer mainboard has. This means you can upload G-code files directly from your browser, start prints, pause them, monitor temperatures, and even jog the print head, all wirelessly. How cool is that?
What You'll Need for This DIY Adventure
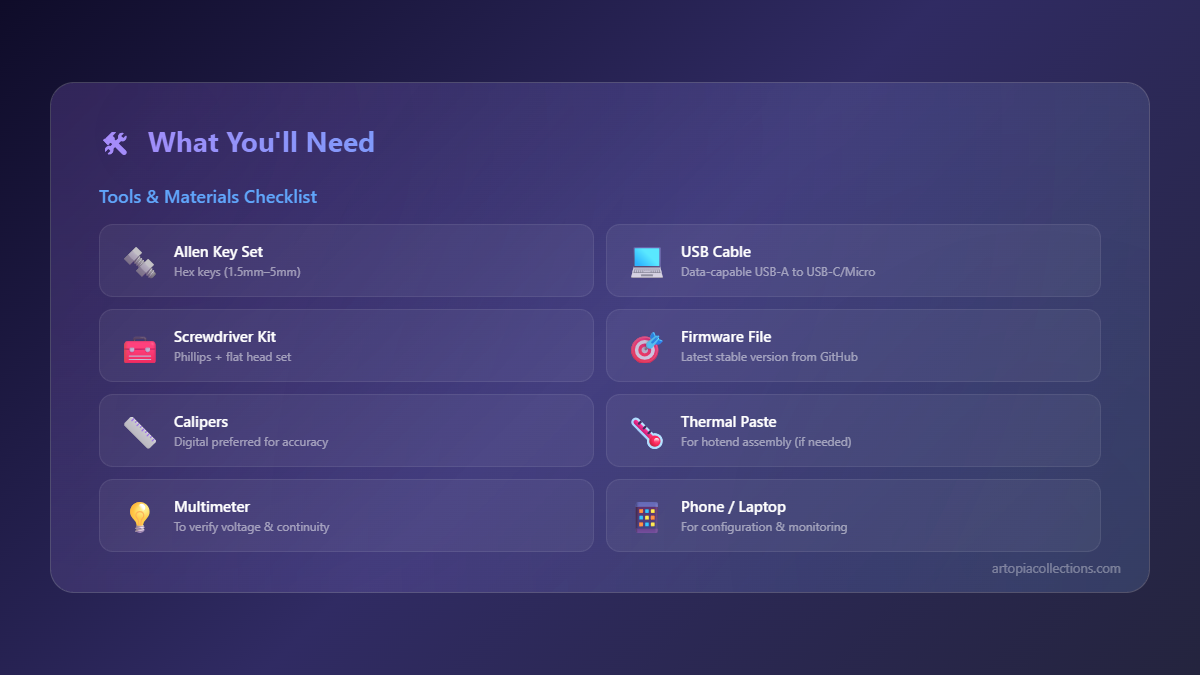
Before we dive into the nitty-gritty, let's gather our arsenal. Don't worry, most of these things are pretty easy to find online or at your local electronics shop.
- An ESP32 Development Board: This is the star of the show. You can find these for anywhere from ₹300 to ₹600, depending on the model and where you buy it. I personally prefer the ESP32 DEVKIT V1 or the NodeMCU-32S. Just make sure it's a genuine ESP32 board. You can find various ESP32 boards on Amazon.in here.
- Jumper Wires (Female-to-Female, Male-to-Male, and Male-to-Female): For connecting the ESP32 to your printer's mainboard. A pack of these usually costs around ₹150-₹250.
- Soldering Iron and Solder: Depending on your printer's mainboard, you might need to solder header pins or directly solder wires. If you're new to soldering, this is a great low-stakes project to practice! A basic soldering kit can be picked up for ₹500-₹1000.
- USB-A to Micro-USB or USB-C Cable: To power the ESP32 and flash its firmware. Make sure it's a data cable, not just a charging cable.
- Your 3D Printer: Obviously! Make sure it's running Marlin firmware (most budget printers do, like the Creality Ender series, Anycubic, etc.) or something compatible that uses standard G-code commands.
- A Computer: To flash the ESP32 firmware and access the web interface.
- (Optional but Recommended) A Breadboard: Great for testing connections before making them permanent.
- (Optional) A Small Enclosure: To protect your ESP32 once it's installed. I just used some spare PLA and printed a quick case for mine – you can find tons of designs on Printables or Thingiverse!
The Software Side: Flashing ESP3D to Your ESP32
This is where we give the ESP32 its smarts.
- Install Drivers: First, you might need to install drivers for your ESP32 board's USB-to-serial chip (usually CP210x or CH340G). Just search online for "CP210x driver" or "CH340G driver" and install them for your operating system. Without these, your computer won't recognize the ESP32.
-
Download ESP3D: Head over to the ESP3D GitHub releases page. You'll want the latest stable release. Look for the "binaries" or "firmware" files for ESP32. Download the one that matches your ESP32's flash size (usually 4MB). You'll typically find a file like
esp3d-webui-v3.x.x.binor similar. -
Flash the Firmware: There are a couple of ways to do this. The easiest for beginners is often using a tool like ESP-Flasher or NodeMCU-Flasher (for older boards, but works well).
- Connect your ESP32 to your computer via USB.
- Open the flashing tool.
- Select the correct COM port for your ESP32.
- Browse and select the ESP3D .bin file you downloaded.
- Click "Flash" or "Start." It'll take a minute or two. Once done, you're good to go!
Sometimes you have to hold down the "BOOT" button on the ESP32 while plugging it in or while clicking flash for it to enter flashing mode. Don't panic if it doesn't work the first time; it's a common quirky thing with these boards. Just try again!
Hardware Connection: Wiring the ESP32 to Your Printer
Now for the fun part – hooking it up to your printer. THIS IS THE MOST CRITICAL STEP. PLEASE, PLEASE, PLEASE DOUBLE-CHECK YOUR PRINTER'S MAINBOARD SCHEMATICS. IMPROPER WIRING CAN DAMAGE YOUR PRINTER OR THE ESP32. I can't stress this enough. Every printer is a little different.
Most 3D printer mainboards have a UART (Universal Asynchronous Receiver-Transmitter) port, which is basically how they talk to other serial devices. This is often labeled as a dedicated UART header or sometimes it shares pins with the TFT screen connector. You'll be looking for four essential pins:
- VCC (Voltage): To power the ESP32. This is usually 3.3V or 5V.
- GND (Ground): The common ground connection.
- TX (Transmit): This pin on your printer mainboard sends data.
- RX (Receive): This pin on your printer mainboard receives data.
Here's how you connect them:
- Power: Connect the VCC (3.3V or 5V, depending on your ESP32 and printer board) pin from your printer's mainboard to the VIN (or 5V) pin on your ESP32, and the GND pin from your printer to a GND pin on the ESP32. Careful here! Some ESP32 boards prefer 3.3V, others can handle 5V. Check your ESP32's datasheet. If your printer only provides 5V and your ESP32 needs 3.3V, you might need a small voltage regulator (like an AMS1117). Many ESP32 boards have an onboard 3.3V regulator though, so feeding 5V to VIN is usually fine.
-
Data (the Tricky Bit): This is where it gets confusing if you don't pay attention. The TX (transmit) pin of one device must connect to the RX (receive) pin of the other, and vice versa.
- Connect your printer's TX pin to the ESP32's RX2 (GPIO16) pin.
- Connect your printer's RX pin to the ESP32's TX2 (GPIO17) pin.
Why TX2/RX2? The ESP32 actually has multiple UARTs. UART0 is usually used for USB communication during flashing and debugging. UART2 (GPIO16/GPIO17) is a secondary UART that's perfect for this application, allowing the ESP32 to communicate with your printer independently. Again, verify these specific GPIO pins for your ESP32 board, though GPIO16/17 are standard for UART2.
-
Enable Serial Port on Printer Firmware: You might need to make a small change in your printer's Marlin firmware. Specifically, in
Configuration_adv.h, search forSERIAL_PORT_2and uncomment it, setting it to the appropriate UART (often-1for the secondary serial port, but consult Marlin documentation for your specific board). You'll also need to ensure the baud rate matches between the ESP32 and your printer (usually 115200 or 250000). You can set this in ESP3D's configuration later.
Once everything is wired up, power on your printer. The ESP32 should power up with it. You might see a blue LED blinking on the ESP32 – that's a good sign!
Configuring ESP3D: Getting Online and Printing Wirelessly
With the ESP32 powered on for the first time after flashing, it usually creates its own Wi-Fi access point.
- Connect to ESP3D WiFi: On your computer or phone, search for Wi-Fi networks. You should see one named something like "ESP3D" or "ESP3D-xxxxxx." Connect to it. There's no password initially.
-
Access the Web Interface: Open your web browser and go to
192.168.4.1. This is the default IP address for the ESP3D access point. You should see the ESP3D web interface. - Configure WiFi for Your Network: In the ESP3D interface, navigate to the "System" or "Settings" tab. You'll find a section for Wi-Fi configuration. Enter your home or workshop Wi-Fi network's SSID (name) and password. Save these settings.
- Reboot and Reconnect: After saving, the ESP32 will reboot and try to connect to your specified Wi-Fi network. Disconnect from the "ESP3D" network and reconnect your computer/phone to your regular Wi-Fi.
- Find ESP3D on Your Network: The ESP32 will now have an IP address on your network. You can usually find this through your router's administration page, or by using a network scanning tool (like Fing on your phone). Once you have its IP, you can access the web interface from any device on your network by typing that IP into your browser. Bookmark it!
- Set Baud Rate: In the ESP3D interface, go to the "Printer" settings and ensure the baud rate matches what your printer's mainboard is configured for (e.g., 115200 or 250000). This is crucial for communication.
And that's it! You now have full wireless control over your 3D printer. You can upload G-code files, start prints, monitor progress, temperatures, and even control individual axes or extruders. I mean, how cool is it to upload a G-code file for a new filament holder from my desktop and hit print without touching the printer? It's pure magic. I've even set up my phone to get notifications when a print finishes or fails. That's a huge time-saver for me when I'm working on new products for ArtoPia Collections, like our custom miniatures or specialized functional prints. We use a lot of different filaments, from eSun PLA+ to some great local PETG brands, and being able to monitor prints closely without being tethered to the machine is just fantastic. If you're looking for good quality PLA filament, check out some options on Amazon.in.
My Experience and the Real-World Benefits
Honestly, integrating the ESP32 into my Ender 3 V2 was one of the best upgrades I've made. It completely changed my workflow. Before, I'd often postpone a small print if I was in the middle of something else because of the SD card hassle. Now, I just upload, hit print, and carry on. For longer prints, like some of the larger statues or intricate lithophanes we do at ArtoPia Collections (hey, why not check out some of our cool stuff at artopiacollections.com/products?), I can monitor the print from my phone while I'm out getting supplies or even just relaxing in another room. The peace of mind is invaluable.
One time, I started a 15-hour print and went home. About halfway through, I got a notification that the hotend temperature was fluctuating wildly. I was able to log in, see the issue, and decide whether to abort the print remotely or keep an eye on it. Turns out, my thermistor cable was a bit loose. Caught it before a huge spaghetti mess! That kind of remote oversight is critical for any serious maker or small business.
It's not just about convenience; it's about efficiency and reducing waste. Being able to pause a print if something looks off, or just having better control, means less wasted filament and fewer failed prints. That's a direct saving in materials, which adds up, especially with filament prices fluctuating. And speaking of prices, the whole setup cost me less than ₹1000 for the ESP32 and wires. Compare that to a Raspberry Pi Zero W setup for OctoPrint, which can easily run you ₹2000-₹3000 here in India, even if you can find one. This is a true 'jugaad' solution that delivers serious value.
A Few Troubleshooting Tips
- "No printer attached" or "Serial error": This is usually a baud rate mismatch or incorrect wiring of TX/RX. Double-check your connections and the baud rate setting in ESP3D against your Marlin configuration.
- ESP32 won't connect to my home WiFi: Make sure your SSID and password are correct. Also, some ESP32s can be finicky with 5GHz Wi-Fi networks; try a 2.4GHz network if you have one.
- Printer freezes or misbehaves: Rare, but can happen if the serial communication is unstable. Ensure good quality wires, proper voltage, and a stable power supply for the ESP32. Sometimes a bad SD card in the printer's slot can also cause issues (just remove it, you don't need it anymore!).
- Can't access 192.168.4.1: Make sure you're connected to the ESP3D access point and not your home Wi-Fi.
And a little parenthetical note, just something I learned the hard way – if your printer's mainboard has a 'service' port or 'expansion' port, sometimes those have exposed UART pins. Don't be afraid to dig into your printer's schematics online. Usually, the manufacturer will provide them, especially for open-source boards like Creality's.
Go On, Get Connected!
So, there you have it. If you're tired of the SD card shuffle and want to bring your 3D printer into the 21st century without shelling out a fortune, the ESP32 and ESP3D are your best friends. It’s a rewarding project, gives you a deeper understanding of your printer, and fundamentally transforms your printing experience. For a small business like mine, it’s been a game-changer for productivity and peace of mind.
Give it a try! You'll wonder how you ever managed without it. Happy printing, my friends! And hey, if you end up with some awesome prints because you're now super efficient, feel free to show them off!