How to Fix Layer Shifting in 3D Prints Once and for All
Layer shifting can ruin an otherwise perfect 3D print, leading to wasted time and filament. This comprehensive guide provides actionable steps to diagnose, prevent, and eliminate layer shifting issues permanently.
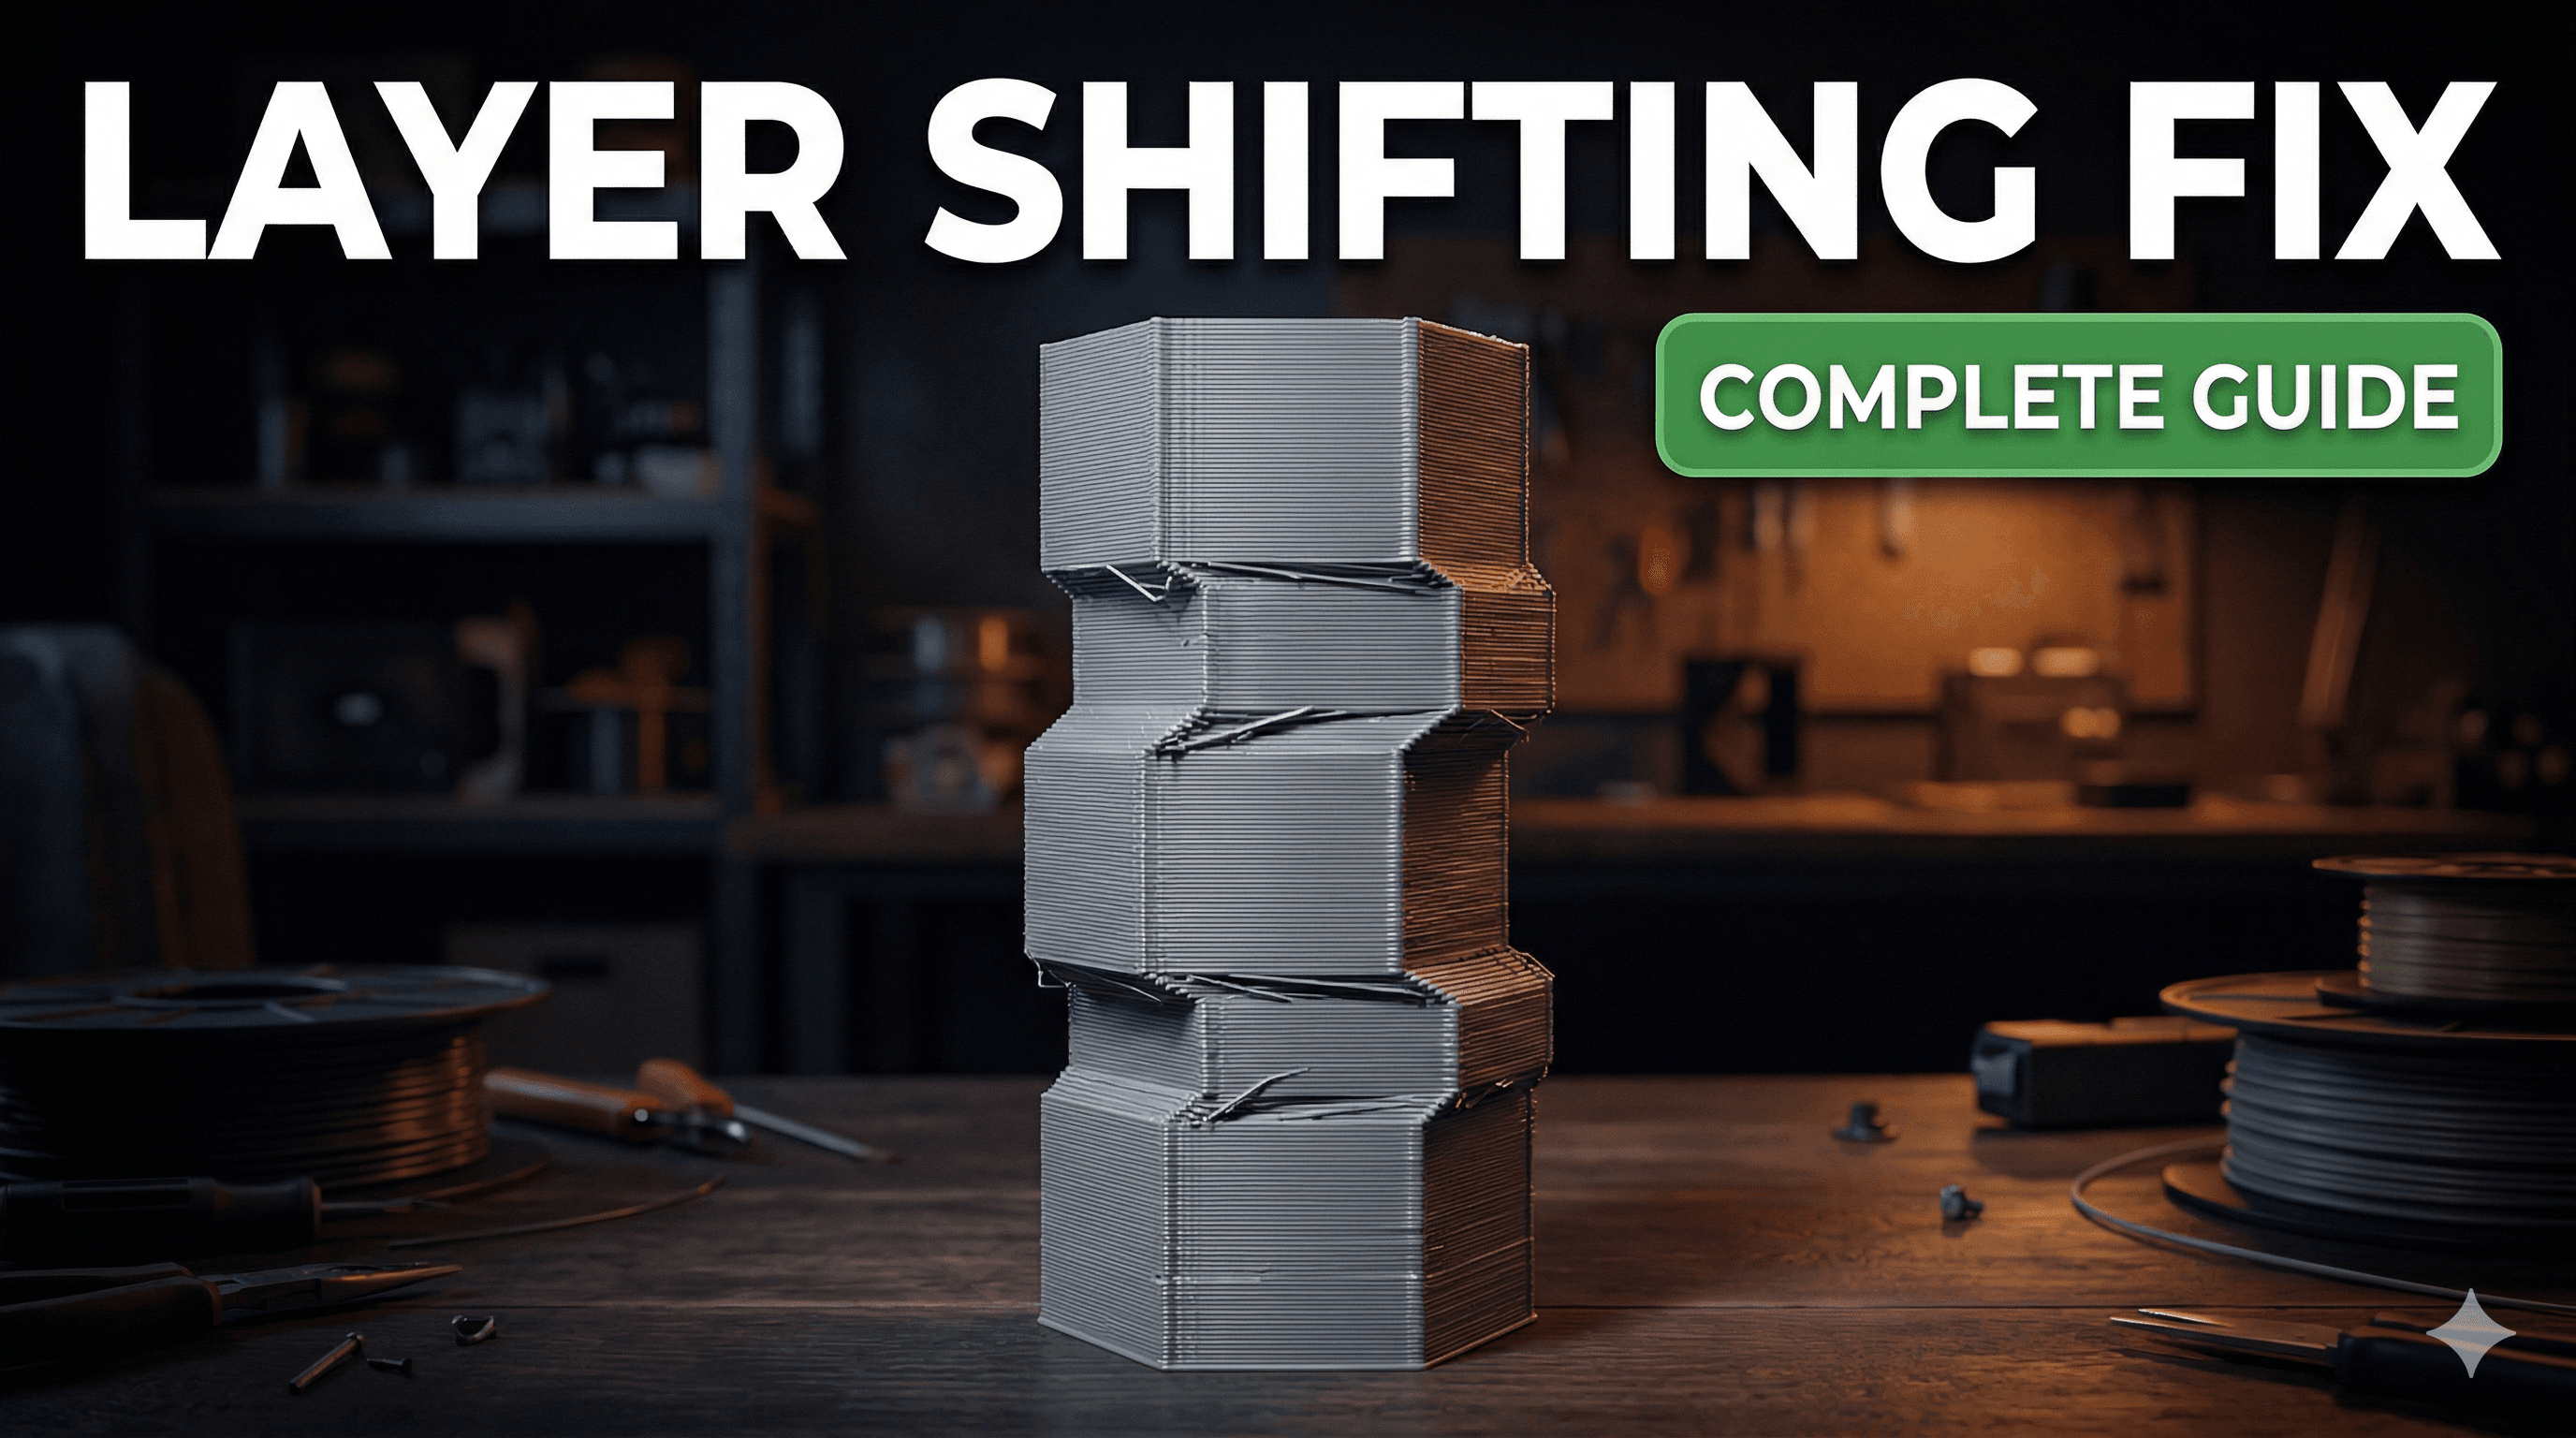
Oh man, you know that feeling? Youâve been watching your printer hum along for hours, meticulously laying down plastic, envisioning that perfect print. Maybe itâs a detailed miniature for your D&D game, or a practical part for your home, or even one of our ArtOPIA Collections pieces. You walk away for a bit, grab a cup of chai, come back, and BAM! It hits you â that dreaded, soul-crushing, utterly infuriating zig-zag shift that ruins everything. Your beautiful, smooth layers have suddenly decided to play hopscotch, and now your perfect cube looks like itâs been leaning against a wall during an earthquake. Yeah, thatâs layer shifting, and if youâve been in 3D printing for more than, oh, five minutes, youâve probably seen it. And let me tell you, it sucks. Big time.
Iâve been running ArtOPIA for a while now, printing everything from custom prototypes to intricate decor, and trust me, Iâve had my fair share of layer shifts. Early on, they used to drive me absolutely bonkers. I'd waste so much filament, so much time, just trying to figure out what went wrong. But over the years, Iâve learned a thing or two, and Iâm here to share those hard-earned lessons with you, my friend. Because we're gonna fix this. Once and for all. Or at least, we're gonna get darn close to it.
So, what is layer shifting, exactly? Basically, itâs when your printerâs X or Y axis (or sometimes both) loses its position mid-print, causing subsequent layers to be offset from the previous ones. Itâs like the printer just decided to take a small sidestep and keep going. And the thing is, it can be caused by a whole bunch of different culprits, which is why it can be such a pain to diagnose. But don't worry, we'll go through them one by one.
The Usual Suspects: Mechanical Issues
Honestly, most layer shifts boil down to something mechanical. Your printer is a machine with moving parts, and sometimes those parts get a little⦠temperamental. Letâs start with the most common ones.
1. Loose Belts (The Grandaddy of All Shifts)
This is probably the number one reason I see layer shifting, especially on popular budget printers like the Ender 3, or even some more advanced ones after a lot of use. Your X and Y axes are moved by stepper motors pulling timing belts. If those belts aren't tensioned correctly, the motor can move, but the print head might lag behind or slip. Itâs like trying to pull a cart with a loose rope â you pull, but the cart doesnât move consistently.

How to fix it:
- Check Tension: Gently pluck your X and Y belts. They should feel taut, almost like a guitar string, but not so tight that they're straining the motor or binding. You should hear a low twang. If they feel mushy or loose, they need tightening.
- Tighten Them Up: Most printers have tensioning mechanisms, often screws or eccentric nuts. On an Ender 3, for example, there are usually adjusters on the X-axis carriage and the Y-axis motor mount. Take your time, don't overtighten. Just enough so they're firm. You can often find replacement belts on Amazon.in for around â¹200-â¹500 for a set, like these GT2 timing belts. Itâs a cheap upgrade that makes a huge difference.
2. Loose Pulleys or Grub Screws
So, your belt might be tight, but what if the pulley it's attached to isn't securely fastened to the motor shaft? Inside those little metal pulleys (the ones with teeth that the belt grips) are tiny "grub screws" that clamp the pulley onto the motor shaft. If these are loose, the motor shaft can spin all it wants, but the pulley might just sit there, or worse, slip intermittently. This is sneaky because the belt will feel tight, but the whole system is still failing.
How to fix it:
- Locate and Tighten: Find the X and Y axis stepper motors. The pulleys are attached to their shafts. Look for one or two small grub screws on each pulley. Use the correct hex key (usually provided with your printer) to ensure they are snug. Don't go crazy, you don't want to strip them, but make sure they're firm. I personally check these every few months, especially if I hear any unusual noises from the motors.
3. Worn Wheels or Binding Linear Rails
Your print head and print bed don't just float around; they move on wheels (V-slot wheels on many printers like Creality machines) or linear rails (on higher-end printers like Prusa or custom builds). If these wheels are worn flat, or if the eccentric nuts holding them are too loose or too tight, they can cause jerky, inconsistent movement. Similarly, if your linear rails are dirty, unlubricated, or even bent, theyâll create resistance.
How to fix it:
- Inspect Wheels: Manually move your X and Y axes. Does it feel smooth? Or does it snag or have flat spots? Look closely at the V-slot wheels; if they have flat spots or excessive dust build-up in the V-grooves, they might need cleaning or replacement. New sets of V-slot wheels aren't too expensive, maybe â¹500-â¹800 for a pack of 10-12.
- Adjust Eccentric Nuts: These are the magical nuts that control the tension of your wheels against the aluminum extrusion. You want them just tight enough so there's no wobble, but loose enough so the carriage moves freely without binding. It's a delicate balance.
- Clean and Lubricate Rails: If you have linear rails, wipe them down with a lint-free cloth and apply a light machine oil or lithium grease, sparingly.
4. Loose Frame or Unstable Surface
Look, if your printer itself isn't stable, how can you expect precise movements? A wobbly frame or a printer sitting on a shaky table can introduce vibrations that throw off layers. I once had a client who kept getting weird shifts, and it turned out their printer was on a cardboard box that flexed every time the Y-axis moved. True story!
How to fix it:
- Tighten Frame Bolts: Go around your printer and check every visible bolt holding the frame together. Use the right hex key and snug them down.
- Stable Surface: Place your printer on a heavy, stable surface. A solid wooden table, a granite slab, or even some concrete pavers underneath can do wonders for vibration dampening.
The Electronic & Motor Dance: Stepper Shenanigans
Okay, so your mechanicals are dialed in, but you're still getting shifts? Time to look at the brains and brawn of the movement system â your stepper motors and their drivers.
5. Overheating Stepper Drivers
Stepper motors are controlled by stepper drivers (small chips on your mainboard). If these drivers get too hot, they can momentarily shut down or lose steps, causing the motor to stop responding correctly. This often manifests as random shifts that are hard to replicate consistently.
How to fix it:
- Check Cooling: Ensure the fan cooling your mainboard is working properly and isn't obstructed.
- Heatsinks: Most drivers come with small heatsinks. Make sure they're still firmly attached. If your printer board doesn't have good airflow, consider adding a small fan directly over the drivers.
- Reduce VREF (Carefully!): The VREF setting controls the current sent to the stepper motors. A higher current means more torque but also more heat. You can slightly reduce the VREF, but be very careful; too low and your motors will lose steps due to lack of power. This is an advanced tweak, so maybe look up a guide specific to your printer's board if you're considering it. For a standard NEMA 17 motor, you generally don't want to exceed 1.2V on the VREF, but it varies wildly by driver and motor.
6. Underpowered Motors or Skipping Steps due to Resistance
Sometimes, the motor just isn't strong enough to move the axis, or it's encountering too much resistance. This can happen if your print speed is too high, or if there's significant friction in the system (like those worn wheels we talked about earlier).
How to fix it:
- Reduce Print Speed: This is a simple, immediate fix. If you're printing at 100mm/s, try dropping it to 60-80mm/s. Sometimes that's all it takes. I often tell new clients to start slow, then gradually increase speed.
- Check for Binding: Manually move your print head and bed again. Does it move smoothly across the entire range of motion? Are there any points where it seems to stick or require more force? This could indicate a bent rod, a dirty linear rail, or improperly adjusted wheels.
- Increase VREF (Again, Carefully!): If you're absolutely certain everything else is perfect mechanically and your motors are still skipping, you might *slightly* increase the VREF. But, seriously, proceed with caution here. Too much current and you'll burn out your drivers or motors.
7. Loose Wiring to Motors
This is a rare one, but it happens. If the wiring connecting your stepper motors to your mainboard is loose, damaged, or poorly crimped, the signal can cut out intermittently, causing a skip.
How to fix it:
- Check Connections: Power off your printer and unplug it. Then, gently check all motor connections on both the motor end and the mainboard end. Make sure they're seated firmly.
Slicer Settings & Print-Specific Glitches
Beyond the hardware, your slicer software can sometimes be the culprit, or something specific to the print itself.
8. Excessive Print Speed, Acceleration, or Jerk Settings
Your printer isn't a race car. Pushing it too hard, too fast, can lead to issues. High acceleration and jerk settings mean the printer is trying to change direction or speed very rapidly, putting a lot of strain on the motors and belts.
How to fix it:
- Reduce Speeds: As mentioned before, dial back your print speed in your slicer. If you're slicing for an Ender 3, I'd recommend starting around 50-60mm/s for general printing, and maybe 30-40mm/s for outer walls.
- Adjust Acceleration/Jerk: In PrusaSlicer, Cura, or SuperSlicer, you'll find these settings. Default values are usually fine, but if you've been experimenting, try returning them to slightly more conservative numbers. For an Ender 3, values like 500-1000mm/s² for acceleration and 5-10mm/s for jerk are common starting points. Don't go crazy with these, they can dramatically affect print quality AND stability.
9. Nozzle Hitting the Print (Collision!)
This is a super common one that often gets overlooked. If your nozzle is bumping into your print, that sudden impact can cause the axis to momentarily lose its position, leading to a shift. Why would it hit the print?
- Warping: If your print is curling up at the edges (especially with ABS or PETG), the nozzle can catch on the raised parts.
- Over-extrusion: Too much plastic laid down can create bulges that the nozzle then drags across.
- Poor Z-axis Movement: If your Z-axis isn't moving up consistently, the nozzle might not be clearing the previous layer properly.
- Z-Hop Setting: While Z-hop is meant to prevent nozzle drag, sometimes, if set too high or if there's a Z-axis issue, it can sometimes exacerbate issues, though this is rare.
How to fix it:
- Address Warping: Use a heated bed, apply adhesion aids (like glue stick or hairspray â my favourite for PLA is a good old Fevikwik stick for â¹10-â¹20!), ensure proper bed leveling, and consider an enclosure for materials like ABS.
- Calibrate E-steps and Flow: Make sure your printer isn't over-extruding. Calibrate your E-steps first (many guides online for this), then fine-tune your flow rate in your slicer (start at 95% and adjust by 1-2%).
- Check Z-axis: Ensure your Z-axis lead screw is straight, lubricated, and the motor coupler is tight.
- Increase Z-Hop (or disable for testing): If you're getting small bumps, a slightly higher Z-hop might help, but test carefully.
10. Part Detaching from the Bed
Sometimes, the entire print just loses adhesion to the build plate. Once it's loose, the nozzle can easily push it around, causing dramatic shifts or the print failing completely.
How to fix it:
- Perfect First Layer: This is key. Level your bed meticulously. Your first layer should be squished nicely, not too thin, not too thick.
- Clean Build Plate: Greasy fingerprints are the enemy of adhesion. Clean your build plate with isopropyl alcohol (easily available at your local hardware store or chemist for â¹100-â¹200 for a small bottle) before every print.
- Adhesion Aids: Glue stick, hairspray (my personal preference is Livon hairspray â works like a charm and smells nice!), or specialized build surface materials like PEI sheets. A good PEI sheet can be a game-changer, costing around â¹1500-â¹2500 depending on the size, but it lasts ages.
- Brims/Rafts: For prints with small bed contact areas, use a brim or raft in your slicer to increase adhesion.
My Personal Troubleshooting Workflow (ArtOPIA Style!)
When a layer shift rears its ugly head at ArtOPIA, I donât panic. (Okay, maybe a little, especially if itâs a client order!) But then I follow a systematic approach:
- Identify the Axis: Is it an X-shift, a Y-shift, or both? This immediately narrows down the problem. If it's mostly Y, I focus on the Y-axis belt, motor, wheels. If X, then the X-axis. If it's messy on both, it might be a general instability or a really bad collision.
- Check Belts & Pulleys FIRST: Seriously, 90% of the time, it's one of these. Loose belt, loose grub screw. Takes five minutes to check and tighten.
- Manual Movement Test: Power off the printer. Manually move the print head and bed along their full range. Does it feel smooth? Any binding? Any unusual noises?
- Observe the Print: Watch the first few layers like a hawk. Is the nozzle hitting the print? Is the first layer adhering perfectly? Any signs of warping?
- Slicer Settings Check: If hardware seems fine, I'll go back to the slicer. Reduce speed, acceleration, and jerk. Print a small test cube.
- Test Print: I always print a small, fast test cube (a 20mm calibration cube, takes like 15-20 minutes) after making adjustments. No point in wasting hours on a big print if the problem persists.
Wrapping Up
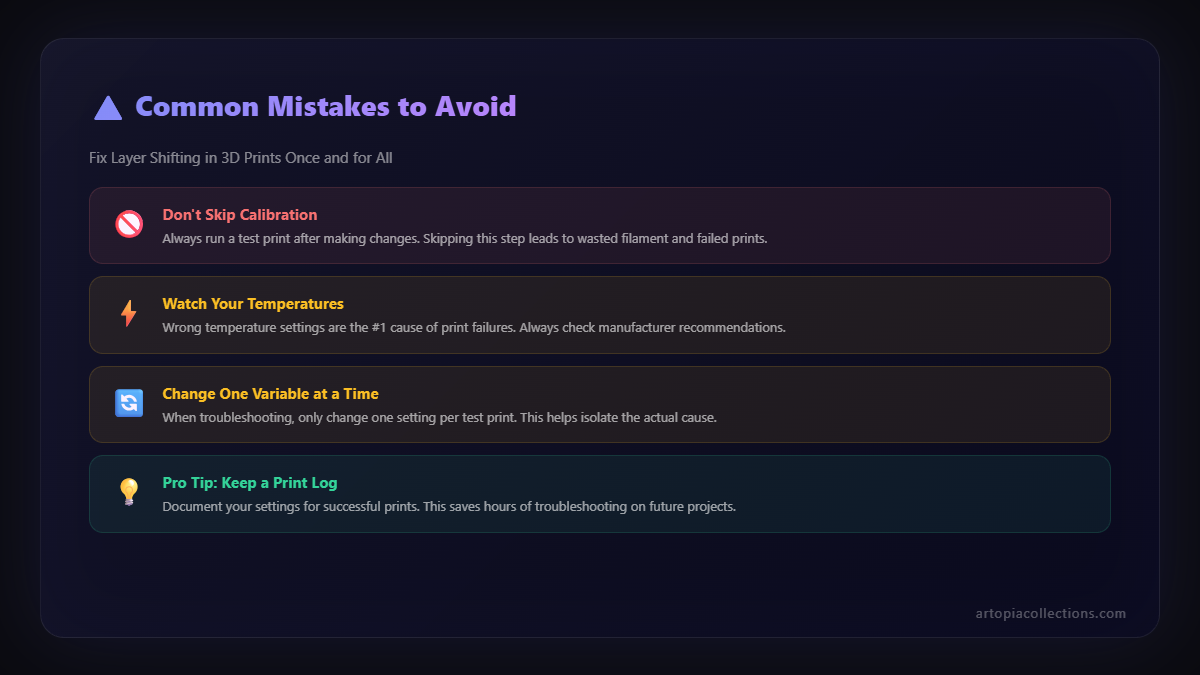
Layer shifting is one of those annoying rites of passage in 3D printing. Itâs frustrating, it makes you want to throw your printer out the window (don't do it, they're expensive!), but it's almost always fixable. The key is patience, systematic troubleshooting, and starting with the most common culprits. Don't try to fix everything at once; make one change, test it, then move on.
And remember, sometimes, even with everything perfect, a weird piece of filament or a rogue dust bunny can cause a hiccup. That's just part of the journey. But armed with these tips, you're much better equipped to diagnose and fix those shifts, saving yourself filament, time, and a whole lot of headaches. Happy printing, my friends! If you ever need custom prints or just want to chat 3D printing, you know where to find us at ArtOPIA. We're always tinkering!
Oh, and one last thing: if you're ever looking to upgrade your setup or just need some reliable filament, definitely check out Amazon.in's range of PLA filament. I've found some great deals there, and good filament definitely helps reduce print issues. For instance, I've had really consistent results with eSun and Overture PLA, which you can usually find for around â¹1000-â¹1800 per kg roll here in India, depending on the colour and brand. Itâs worth spending a little extra for quality, trust me.