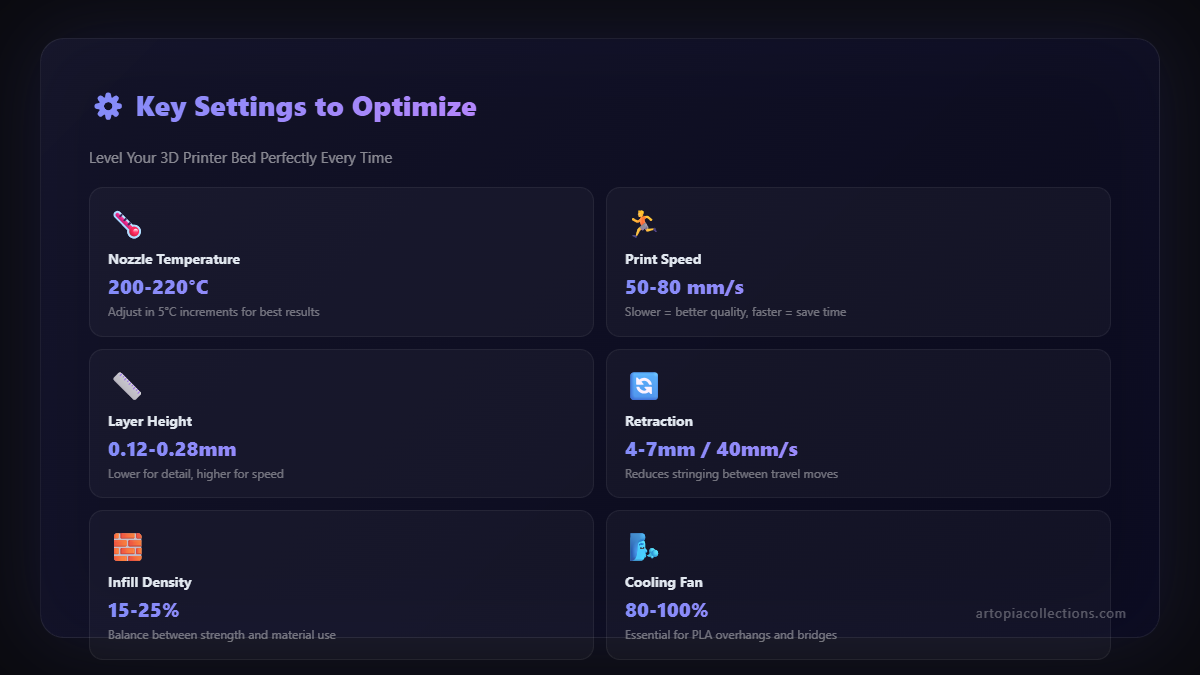
How to Level Your 3D Printer Bed Perfectly Every Time (And Save Your Sanity!)
Look, weâÂÂve all been there, right? You spend hours designing a killer model, or download that amazing STL youâÂÂve been eyeing, slice it up, hit print, and then⦠disaster. The first layer decides it wants to play hopscotch with your print bed. It curls, it squiggles, it detaches, or worse, it just smears itself into a plasticky mess that resembles a particularly unfortunate noodle dish. And then you stare at that beautiful spaghetti monster, your dreams of a perfect print shattered, wondering where it all went wrong.
Honestly, more often than not, the culprit isn't your design, your filament, or even your printer itself. ItâÂÂs that fundamental, often overlooked, yet absolutely critical step: bed leveling. Yeah, I know, it sounds boring. It's not as exciting as talking about hotends or fancy new firmware. But trust me, as someone who runs a small 3D printing business right here in India, relying on these machines day in and day out to create amazing stuff for my Artopia Collections customers, a perfectly leveled bed is the bedrock (pun intended!) of consistent, high-quality prints. Without it, you're just throwing filament and frustration into the wind.
Why Bed Leveling Isn't Just Important, It's Everything
The
thing is, your 3D printer needs a flawless first layer to succeed. That initial layer is what grabs onto your build plate, forming the foundation for everything that comes after. If that foundation isn't perfectly flat and consistent, your print is doomed from the start. You'll get warped corners, delamination, stringing, and prints that just pop off the bed mid-way through, turning hours of printing into a waste of time and precious filament (and let's be real, good quality filament isn't exactly cheap here in India, even for brands like eSUN or Overture, which can set you back â¹1800-â¹2500 per kg).
IâÂÂve personally seen countless frustrated beginners almost give up on 3D printing entirely, only to find out their "unreliable" printer was perfectly fine â it just needed a little love in the bed leveling department. ItâÂÂs like trying to build a multi-story building on a lopsided foundation; itâÂÂs just not going to stand properly. So, letâÂÂs get you sorted, so you can stop fighting your printer and start creating masterpieces.
The Tools of the Trade: What You'll Need
Before we dive into the how-to, let's talk about what you need. ItâÂÂs not much, thankfully:
1.
A piece of paper: A standard A4 sheet, usually 80gsm. This is the classic, free, and surprisingly effective method.
2.
Feeler gauges (optional, but highly recommended): If you want to get *really* precise, a set of feeler gauges is a game-changer. They give you a consistent measurement, eliminating the guesswork of the "paper drag" method. You can find a decent set online for about â¹300-â¹500. I personally use one thatâÂÂs 0.1mm thick for most of my printers, like my trusty Ender 3s and Anycubics. You can grab a good set of feeler gauges on Amazon.in if you're serious about precision:
Check out feeler gauge sets on Amazon.in.
3.
Isopropyl alcohol (IPA) and a clean cloth: Crucial for cleaning your bed. WeâÂÂll get to why in a bit.
4.
Your 3D printer: Obviously! Make sure itâÂÂs plugged in and powered on.
Preparation is Key: Don't Skip These Steps!
Bef

ore you even think about turning those little adjustment knobs, a few preparatory steps will save you a lot of headache.
1. Clean Your Bed Like Your Life Depends On It
Seriously, this is non-negotiable. Fingerprints, dust, old filament residue, grease â anything on your build plate will prevent your first layer from sticking properly. Take a clean microfiber cloth and some
isopropyl alcohol (70% or higher is fine). Wipe down your entire build surface thoroughly. You want it squeaky clean. I usually do this before every major print or every few small prints. A clean bed is a happy bed, and itâÂÂs one less variable to worry about.
2. Pre-Heat Your Bed and Nozzle
This is super important, especially if you have a printer with a heated bed (which most modern FDM printers do). Materials expand when heated, and your print bed is no exception. If you level your cold bed, it might not be perfectly level once it reaches printing temperature. So, pre-heat your bed to your typical printing temperature (e.g., 60ðC for PLA, 80-100ðC for PETG) and your nozzle to its printing temp too (e.g., 200ðC for PLA, 230ðC for PETG). Let it sit at temperature for a few minutes to stabilize.
3. Check for Wobbly Bits
While the printer is heating up, give your print bed a gentle wiggle. Does it feel loose? Are the eccentric nuts (those hexagonal nuts on the V-wheels under your bed) too loose or too tight? The bed should glide smoothly but have no perceptible wobble. Same goes for your print head (gantry). If anything is wobbly, tighten it up. A loose component can throw off your leveling big time. I mean, itâÂÂs not just about the distance to the nozzle; itâÂÂs about that distance *staying* consistent.
The Manual Bed Leveling Process: Let's Get Hands-On!
Okay, all prepped? Good. HereâÂÂs how I level my printers, step-by-step. This method works for most cartesian printers like the popular
Creality Ender 3 or Anycubic Mega-S, which are very common here in India.
1. Auto Home Your Printer
First things first, tell your printer to go to its home position (usually X0, Y0, Z0). You can do this through the printer's menu: "Prepare" -> "Auto Home" or "Home All." This will move the print head and bed to their starting points and bring the Z-axis end stop into play.
2. Disable Steppers
Once homed, you need to be able to move the print head and bed freely. In your printer's menu, go to "Prepare" -> "Disable Steppers" (or "Disable Stepper Motors"). This will release the motors, allowing you to manually slide the print head and bed around.
3. The Four Corners Method (And Then The Middle!)
This is the tried-and-true method. You'll work your way around the bed, adjusting each corner until the nozzle is the perfect distance from the surface.
*
Start at a corner: I usually start with the front-left corner, just because that's where I happen to be standing. Move the print head directly over one of the bed adjustment screws.
*
Get the feel: Grab your piece of paper (or feeler gauge). Slide it between the nozzle and the print bed. Now, slowly turn the adjustment knob *under* that corner of the bed.
* If the paper slides freely with no resistance, the nozzle is too high. Turn the knob counter-clockwise (or "lefty-loosey") to raise the bed slightly.
* If you can't get the paper under the nozzle, it's too low. Turn the knob clockwise (or "righty-tighty") to lower the bed.
*
The sweet spot: You're looking for a slight drag on the paper. It shouldn't be clamped tight, but you should feel a distinct resistance when you try to pull it out. It's like feeling a gentle caress, not a tight squeeze. If you're using a 0.1mm feeler gauge, it should slide under with a consistent, light friction.
*
Repeat for all corners: Once you've got that first corner perfect, move the print head to the next corner (front-right), adjust it, then to the back-right, and finally the back-left.
*
The Iteration Dance: Here's the kicker â adjusting one corner often affects the others. So, you can't just do one pass and call it a day. Go back to your first corner and check it again. You'll likely find it's slightly off. Re-adjust it, then move to the next, and so on. You'll probably do 2-3 full passes around all four corners until they are all consistent. This is normal! It's an iterative process, like tuning a guitar.
*
Don't forget the center: Once the corners are good, manually move the print head to the very center of your print bed. Check the distance there with your paper or feeler gauge. If it's significantly off, you might have a warped bed (more on that in advanced tips), but a slight difference is often okay if the corners are perfect. You can sometimes compensate with your Z-offset if you have an auto-leveling sensor, but primarily, focus on those corners.
4. Set Your Z-Offset (Especially with Auto-Leveling)
If you have an auto-leveling sensor like a
BLTouch or
CRTouch (which, let's be real, are almost essential for consistent prints on many printers, and you can get a good one for around â¹2500-â¹4000), you're not done yet. The sensor maps the bed's contours, but you still need to tell the printer how far the *nozzle* is from the bed once the sensor triggers. This is your Z-offset.
After your mesh is created (usually done by the printer running a "Bed Leveling" routine), you'll need to print a test first layer. As it starts printing, go into your printer's "Tune" or "Control" menu and adjust the Z-offset (usually an option like "Z-Offset" or "Babystepping Z").
* If your first layer isn't sticking and looks too thin or transparent, your nozzle is too high â reduce the Z-offset (make it more negative, e.g., -1.8 to -1.9).
* If your nozzle is dragging on the bed, scraping, or not extruding enough, it's too low â increase the Z-offset (make it less negative, e.g., -1.9 to -1.8).
The goal is a beautiful, slightly squished first layer that's uniform and opaque, like a perfect line of toothpaste.
Advanced Tips & Troubleshooting for the Next-Level Printer
Okay, so you've got the basics down. But what if you're still fighting it? Here are some pro tips and common issues I've encountered running Artopia Collections:
1. Upgrade Your Bed Springs
Honestly, if you're still using the stock springs that came with your printer (especially on an
Ender 3), they're probably too weak. They lose tension over time, leading to constant re-leveling. Spend â¹100-â¹200 on a set of stiffer yellow or blue springs. This is probably the cheapest and most effective upgrade you can make for bed leveling stability. They hold their adjustment much, much better.
2. Consider a Better Build Surface
While glass or the magnetic build sheets that come with many printers are decent, upgrading can make a huge difference in adhesion and print removal.
*
PEI Sheets: My personal favourite. A good textured or smooth
PEI sheet offers fantastic adhesion when hot and releases prints like magic when cool. You can find them for â¹800-â¹1500. They're durable and generally very reliable.
*
Textured Glass (Carborundum): Some printers come with these. They offer good adhesion but can sometimes be *too* adhesive, making print removal tricky without cooling.
Choosing the right surface for your specific filament and needs is key. You can find various 3D printer build surfaces on Amazon.in:
Explore build surfaces on Amazon.in.
3. Dealing with a Warped Bed
This is a nightmare scenario, but it happens. Some beds aren't perfectly flat from the factory.
*
Glass Plate: Adding a thick glass plate (like a cheap mirror tile) to your heated bed can help. Glass is usually very flat.
*
Shimming: If you have a dip, you can place small pieces of aluminum foil or Kapton tape *under* your build surface in the depressed areas to subtly raise them. It's a bit of a "jugaad" solution, but it works!
*
Auto-leveling sensor: This is where a
BLTouch or CRTouch really shines. While you still need to manually level the corners roughly, the sensor will compensate for minor warps across the bed by creating a mesh. It won't magically make a terribly warped bed perfect, but it will certainly improve prints dramatically.
4. First Layer Test Print
After every major leveling or anytime I'm tweaking settings, I always print a small single-layer test pattern. There are tons of free ones on Thingiverse â just search for "first layer test." It's usually a large square or a grid pattern. This allows you to visually inspect how your first layer is going down in different areas of the bed without wasting a lot of filament on a full print. Look for consistent squish, no gaps between lines, and no dragging.
When to Level Your Bed?
"Perfectly every time" doesn't mean you do it once and forget it. HereâÂÂs a rough guide:
*
Every few prints: If you're printing frequently, especially if you remove prints roughly or use strong adhesion, give it a quick check.
*
After moving the printer: Any time you physically move your printer, re-level it. Vibration can easily throw things off.
*
After changing your nozzle: A new nozzle can have a slightly different length, requiring a re-level.
*
If your prints suddenly start failing: If everything was fine, and now it's not, bed leveling is usually the first thing to check.
*
If youâÂÂve adjusted your bed hardware: New springs, new build surface, tightened eccentric nuts â all warrant a re-level.
My Business Depends On It!
Here at Artopia Collections, we craft custom 3D printed items and unique gifts. From intricate sculptures to functional prototypes, the quality of our prints is paramount. And guess what? Every single successful print, every happy customer, starts with a perfectly leveled bed. It saves us time, reduces material waste, and ensures our products are top-notch. So, if you're ever curious to see what consistent 3D printing can achieve, feel free to check out some of our creations:
Explore Artopia Collections Products.
Embrace the Leveling Journey
Mastering bed leveling might seem tedious at first, but it's genuinely the most fundamental skill you can develop in 3D printing. Once you get that perfect first layer consistently, a whole new world of reliable, beautiful prints opens up. You'll save filament, reduce stress, and most importantly, you'll actually enjoy the creative process of 3D printing rather than fighting with your machine.
So, go forth, clean your bed, pre-heat, and get leveling. Your future self (and your filament spool) will thank you! Happy printing, my friends!