How to Use Tree Supports in Cura and OrcaSlicer for Cleaner Prints
Master tree supports in Cura and OrcaSlicer for significantly cleaner 3D prints. This guide teaches you how to optimize settings and removal for superior results.
Chalo, let's talk about something that used to give me actual headaches, something that almost made me throw my favourite Ender 3 Pro out the window more times than I can count: supports. Man, oh man, the struggle was real! I mean, who hasn't spent an hour carefully crafting a beautiful print, only to spend another hour chiseling away at rock-hard supports, leaving behind a scarred, ugly mess? I know I have, and honestly, for my little business, ArtoPia Collections, that's just not good enough. But then, like a ray of sunshine breaking through Mumbai's monsoon clouds, I discovered tree supports. And let me tell you, friends, they've been an absolute game-changer. They're not just a feature; they're a revolution for cleaner prints, less waste, and a whole lot less frustration.
Goodbye Traditional Supports, Hello Tree Huggers!
For the longest time, we were stuck with those brick-wall supports â you know, the ones that build straight up from the build plate or previous layers, forming a dense, often impossible-to-remove lattice under your overhangs. They worked, sure, in a brute-force kind of way, but the post-processing was a nightmare. You'd need a utility knife, sometimes even pliers, and a whole lot of patience. And then there's the waste! All that extra filament just to hold up a tiny overhang? My filament bill was getting a bit out of hand, especially with good quality stuff like eSun PLA+ costing me â¹1500-â¹1800 a spool these days.
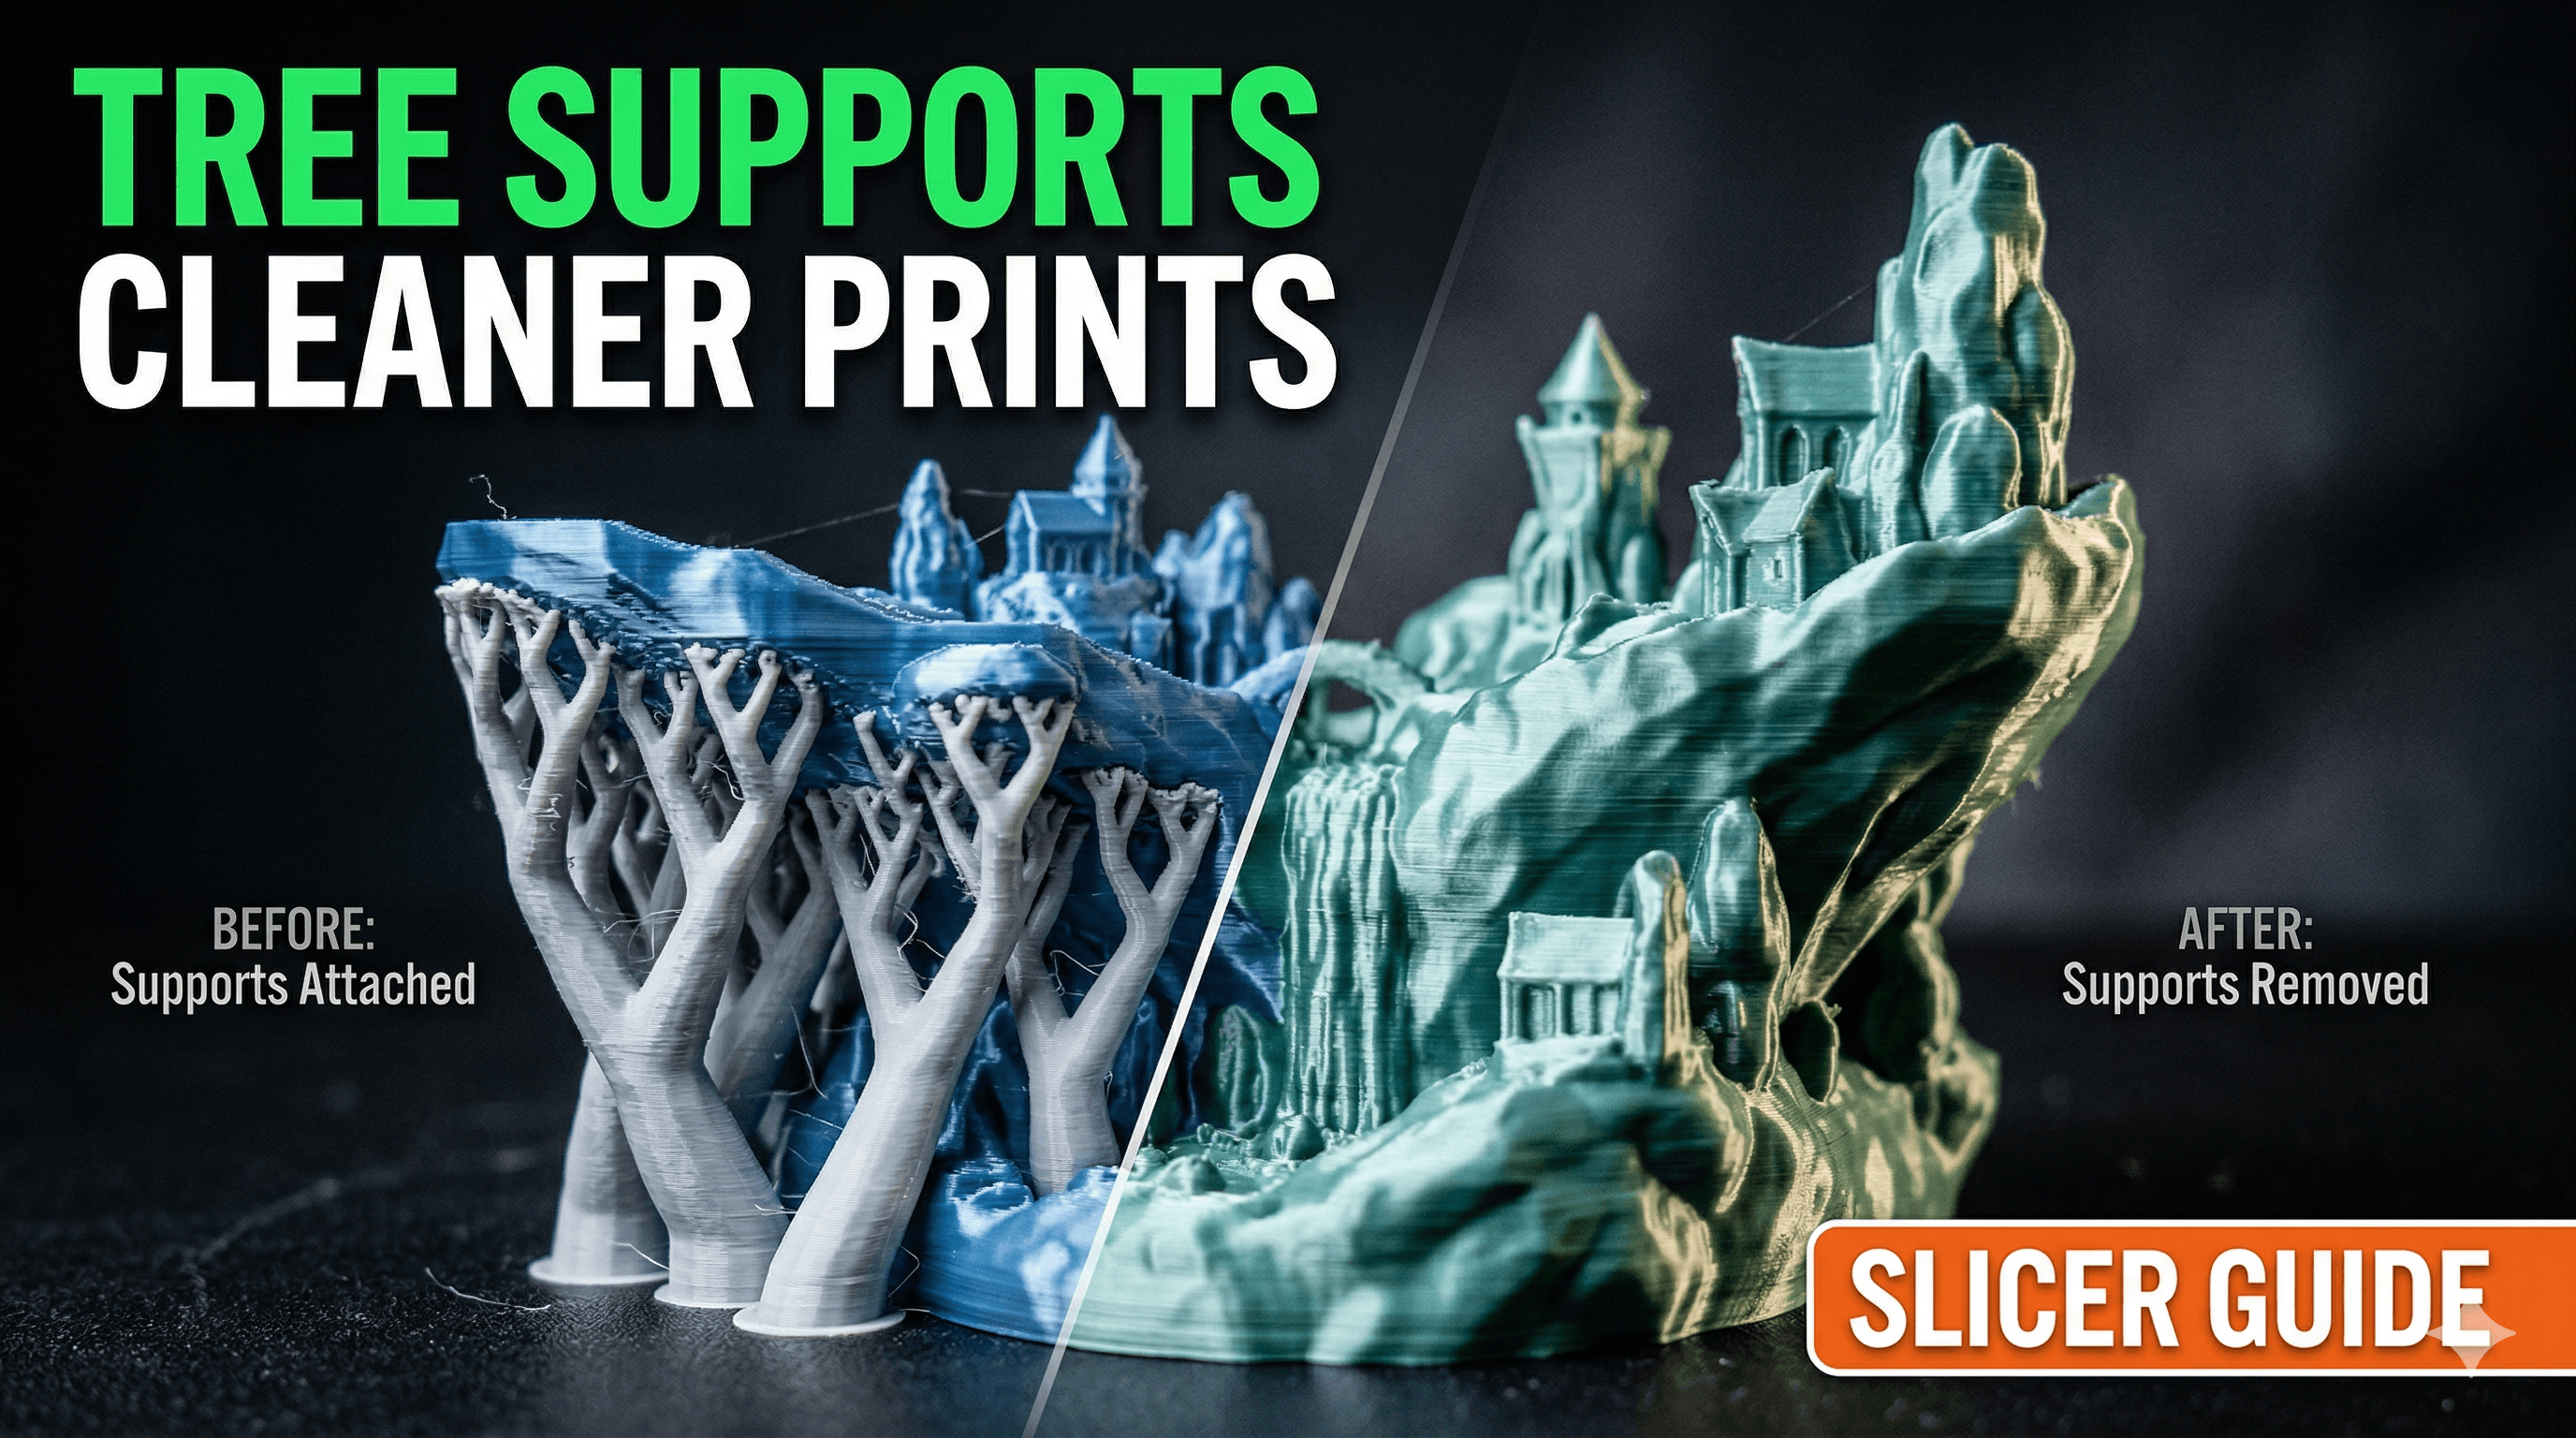
Tree supports, on the other hand, are like elegant, organic structures. Instead of building solid walls, they sprout branches from a main trunk, reaching up only where they're absolutely needed to support your model. Think of a banyan tree, its aerial roots providing support exactly where required. That's basically what your slicer is doing, creating these beautiful, minimal structures that touch your model at fewer points, making them a breeze to remove. And because they're less dense and only touch at specific points, the surface finish on the supported areas? Chef's kiss, my friend. It's often so clean you barely need to touch it up.
So, whether you're rocking Cura or have moved to the more advanced OrcaSlicer (especially if you're like me and love Klipper and faster speeds on your Anycubic Kobra 2), understanding how to harness the power of tree supports is essential. Let's dive in, shall we?
Mastering Tree Supports in Cura
Cura has been my trusty companion for years, and its tree support implementation has gotten seriously good. If you're using Cura, here's where you need to look and what to tweak:
Enabling Tree Supports
- First things first, make sure you have "Supports" enabled under your print settings.
- Then, under the "Support Structure" dropdown, select "Tree". That's your golden ticket right there.
Key Cura Settings to Tweak:
Once you enable tree supports, a bunch of new settings will appear. Don't get overwhelmed; most of them you can leave as default initially, but these are the ones I usually play with:

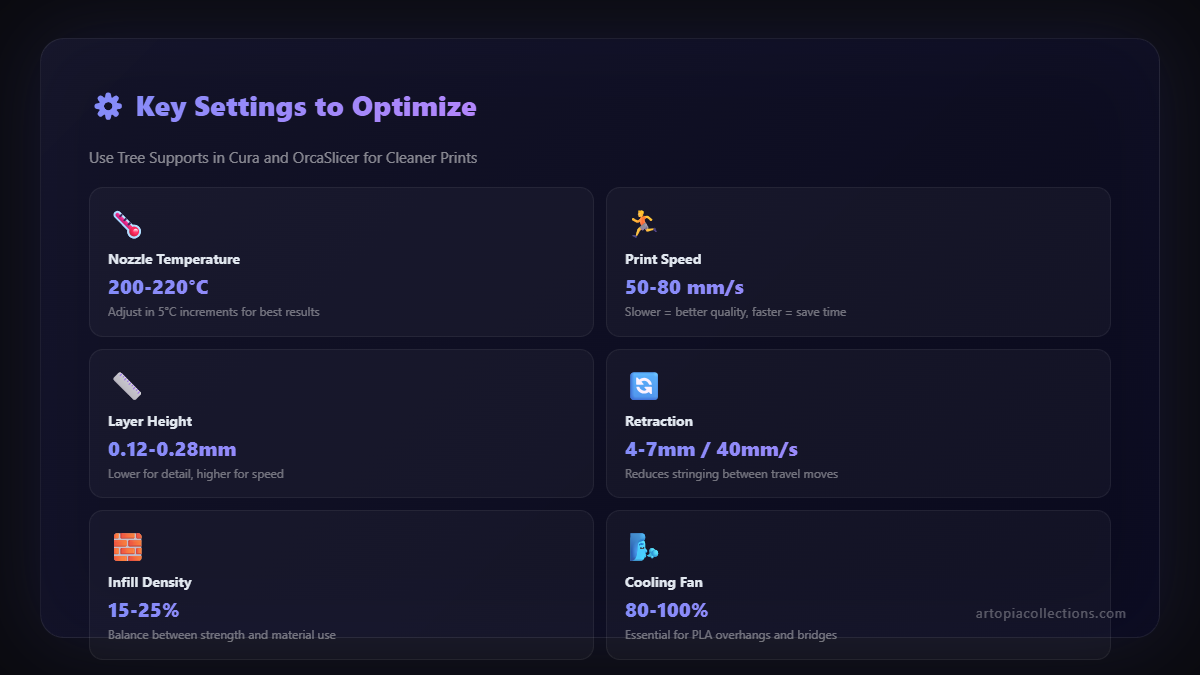
- Support Z Distance: This is HUGE. It controls the vertical gap between the top of your support and the bottom of your model. A smaller gap (like 0.16mm or 0.2mm for a 0.4mm nozzle) means better support but harder removal. A larger gap means easier removal but potentially rougher surfaces. I personally start with 0.2mm and adjust from there.
- Support X/Y Distance: This dictates the horizontal distance between the support and the model. A larger value (e.g., 0.8mm) makes removal easier but can leave overhangs unsupported if they're too close to a vertical wall. Smaller (e.g., 0.4mm) for more precise support. I generally keep this around 0.4mm - 0.6mm.
- Tree Support Branch Angle: This controls how steep the branches can grow. A lower angle (e.g., 30-45 degrees) makes them spread out more, potentially covering more area or reaching further. A higher angle (e.g., 60-70 degrees) makes them grow straighter. I find 45-50 degrees to be a sweet spot for most prints.
- Tree Support Branch Diameter: This is the thickness of the individual branches. Thicker branches are stronger but use more filament and can be a bit harder to snap off. Thinner branches are fragile but super easy to remove. I usually stick with 1.5mm-2.5mm here.
- Tree Support Wall Line Count: This is like the shell for your branches. More walls mean stronger branches. I usually keep it at 1 or 2. More than that is usually overkill and adds unnecessary print time and material.
- Enable Support Interface: This creates a denser, flatter top layer on your supports where they meet the model. It's fantastic for really clean bottom surfaces. I almost always enable this. If you do, play with "Support Interface Density" (I usually use 80-100%) and "Support Interface Pattern." Lines or Concentric are usually good.
Remember, every print is different, and every filament behaves slightly uniquely. What works perfectly for a sharp overhang on a figurine printed with Overture PETG might need slight adjustments for a functional part in Real ABS. So, be prepared to experiment!
Switching Gears to OrcaSlicer (and Bambu Studio)
Okay, so if you've ventured into the world of faster, Klipper-driven machines, or if you're rocking a Bambu Lab printer (man, I wish I had a P1P right now, those things are beasts!), then OrcaSlicer (or its sibling, Bambu Studio) is probably your weapon of choice. And let me tell you, their tree support implementation is absolutely phenomenal, arguably even better and more intuitive than Cura's in many ways.
Enabling Tree Supports in OrcaSlicer
It's pretty straightforward here:
- Go to the "Supports" tab on the left sidebar.
- Under "Type," choose "Tree (Auto)". That's their version of the intelligent, branching supports.
Key OrcaSlicer Settings to Tweak:
OrcaSlicer streamlines some of the settings, making it a bit less overwhelming initially, but still giving you powerful control.
- Branch Angle: Just like in Cura, this controls the steepness. I usually keep it around 40-50 degrees.
- Branch Diameter (Min/Max): OrcaSlicer lets you define a range. This is super clever because it allows for thinner, more delicate branches where support is minimal, and thicker, stronger ones where more structural integrity is needed. I usually keep the Min around 1.0mm and the Max around 2.0-2.5mm.
- Support Z distance: Again, critical for removal and surface quality. Start with 0.15mm-0.2mm for a 0.4mm nozzle.
- Top Interface Layers: This is OrcaSlicer's equivalent of Cura's "Support Interface." Enabling this (usually 2-3 layers) and setting a high "Top Interface Spacing" (0.2-0.3mm usually works great for a balance of support and removal) will give you buttery-smooth bottom surfaces. And honestly, this is where OrcaSlicer really shines for me. The interface layers feel more robust yet easier to remove.
- Top Interface Pattern: Lines or Rectilinear are generally solid choices.
One cool thing about OrcaSlicer is its visualization. You can clearly see how the tree supports will connect to your model, and it's often more optimized for minimal contact points right out of the box. Plus, if you're using a modern machine, slicing times are ridiculously fast, even with complex tree supports.
Why Tree Supports Are My Secret Sauce (and Should Be Yours Too!)
Look, running a small business like ArtoPia Collections, every rupee and every minute counts. Tree supports aren't just a fancy feature; they directly impact my bottom line and the quality I deliver to my customers. Hereâs why Iâm such a massive fan:
- Material Savings: Less dense, less contact. This means significantly less filament used per print. Over a month, this adds up to real money. I can save maybe â¹200-â¹300 per spool because I'm not wasting so much on supports. This allows me to invest in better quality filament or even upgrade small tools, maybe a new nozzle set for â¹700 like these on Amazon.
- Time Savings (Post-Processing): This is huge. Instead of meticulously scraping for 15-30 minutes, I can often just snap off tree supports in seconds. This frees up my time to design new products (like my custom miniature range, check them out at ArtoPia Collections!) or manage orders. Time is money, especially when you're a one-man (or one-woman!) show.
- Cleaner Prints: This is non-negotiable for my business. Customers expect high-quality finishes, and tree supports deliver. The minimal contact points and often excellent support interface mean supported surfaces come out much smoother, requiring little to no sanding or cutting. It's a professional finish right off the print bed.
- Reduced Print Failures: Because they're generally more stable and distribute weight better than traditional supports, I've noticed fewer instances of supports detaching mid-print. It's a small thing, but it reduces frustration and wasted filament.
- Better for Complex Geometries: For highly detailed models with intricate overhangs and complex geometries, tree supports navigate those curves and crevices with an elegance that traditional supports just can't match.
A Few More Tips from My Workbench
- Orientation is Key: Even with amazing tree supports, proper model orientation can dramatically reduce the need for supports altogether. Always try to orient your model to minimize overhangs that are steeper than, say, 50-60 degrees.
- Calibrate Your Z-Distance: I cannot stress this enough. Print small calibration cubes or specific support tests. Experiment with your Z-distance until you find that sweet spot for your printer and filament. It's a bit tedious, but it pays off hugely.
- Filament Matters: Some filaments, especially softer ones like TPU, can make support removal a bit trickier, even with trees. PLA and PETG generally work beautifully. If you're struggling, try a different brand or type of PLA, like eSun PLA+ or Sunlu PLA, which I often find myself using from Amazon India.
- Manual Painting (Advanced): Both Cura and OrcaSlicer allow you to "paint" where you want (or don't want) supports. For really tricky models, this can give you ultimate control. Don't be afraid to dabble in it once you're comfortable with the basics.
- Consider Dissolvable Supports: If you have a dual-extruder printer (lucky you!), using PVA or BVOH as a support material with tree supports is the absolute pinnacle. You just print, drop it in water, and watch the supports vanish, leaving a pristine surface. It's expensive, but for high-end custom orders, it's worth it.
So, there you have it, folks. My deep dive into the wonderful world of tree supports. They've genuinely transformed how I approach 3D printing, moving it from a frustrating chore to a more efficient, enjoyable, and profitable venture. If you haven't given them a proper try, or if you've been sticking with the defaults, I urge you to jump into those settings and start experimenting. Your printer, your prints, and your sanity will thank you!
Happy printing, and may your supports always snap off clean!