Anycubic Photon Mono M7 Setup Guide for Resin Printing Beginners
New to resin 3D printing? This guide walks you through setting up your Anycubic Photon Mono M7, from unboxing to your first successful print. Learn the essentials and get your M7 ready for amazing detail.
Get Ready to Print Magic: Your Anycubic Photon Mono M7 Setup Guide!
Oh, my friends, let me tell you, there's a certain kind of magic that happens when you press "print" on a resin 3D printer. It's a different beast altogether from FDM, you know? While I absolutely adore my FDM workhorses for functional parts and big builds – like the custom enclosures I do sometimes – there's just no beating the sheer, jaw-dropping detail you get from resin. And honestly, for a long time, people in India hesitated with resin because of the cost, the mess, or just the perceived complexity. But things have changed, and printers like the Anycubic Photon Mono M7 are making it so much more accessible and, dare I say, fun!
I remember my first resin printer, a much older Anycubic model, and the learning curve was... let's just say it was a proper climb. But the M7? It's like Anycubic heard all our newbie struggles and said, "Hold my chai, we got this." This machine is fast, precise, and surprisingly user-friendly, making it an absolute dream for anyone wanting to dive into the intricate world of resin printing. Whether you're making tiny miniatures for D&D, intricate jewellery prototypes, or high-detail statues for your collection, the M7 is going to seriously impress you. So, if you've just unboxed your shiny new M7, or you're thinking about getting one, you've come to the right place. I'm going to walk you through getting it set up, Indian style, with all the tips and tricks I've picked up running my small business, Artopia Collections.
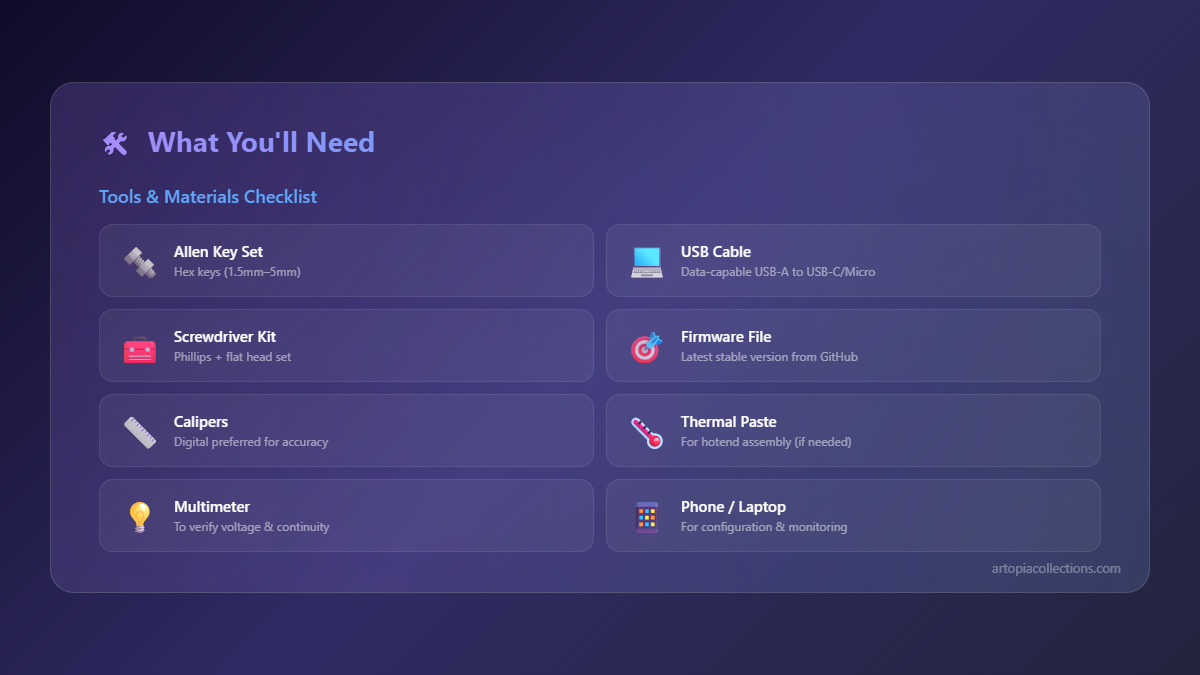
Before We Even Unbox: Your Essential Pre-Print Checklist (Don't Skip This!)
Look, I can't stress this enough: resin printing is not like FDM. You can't just set it up on your kitchen counter and call it a day. There are fumes, there's liquid resin, and there's isopropyl alcohol (IPA) involved. Safety and preparation are paramount. Trust me, I learned this the hard way with a few accidental resin spills and a headache or two from not ventilating properly early on. So, before you even think about slicing open that M7 box, let's get your workspace ready.
- Ventilation is Your Best Friend: This is non-negotiable. Resin fumes can be strong and irritating. Ideally, set up your printer in a garage, a dedicated workshop, or a well-ventilated room with an open window. If you can get a small exhaust fan pointed outwards, even better. My setup has a window fan and an air purifier going constantly. It makes a HUGE difference, trust me.
- Gloves, Gloves, and More Gloves: You absolutely do not want uncured resin on your skin. It can cause irritation and even allergic reactions over time. Get a box of nitrile gloves – not latex, as some people are allergic to latex. A box of 100 will cost you around ₹300-₹500 on Amazon or at your local pharmacy. Keep them handy!
- Eye Protection: A simple pair of safety goggles is a wise investment. Splashes can happen. Better safe than sorry, right?
- Isopropyl Alcohol (IPA): You'll need at least 90% concentration, but 99% is ideal for cleaning your prints and the printer itself. You can find 1-litre bottles for about ₹500-₹1000 online or at chemical suppliers. Stock up, you'll use a lot of it. You can find good quality IPA here on Amazon.in.
- Cleaning Supplies: Paper towels (lots!), a silicon mat or old newspaper to protect your work surface, a couple of plastic containers with lids for washing prints (Tupperware works great), and a soft brush (an old toothbrush is perfect) for scrubbing.
- UV Curing Station (Optional but Recommended): While sunlight can cure prints, a dedicated UV curing station is faster, more consistent, and much more convenient, especially during monsoon season! Anycubic sells its own, but you can find others too.
- Resin: Of course! Anycubic's standard grey resin is a great starting point. I've also had good experiences with Elegoo and Esun resins, all generally available in India. Expect to pay around ₹2000-₹3000 for a 1kg bottle.
Unboxing Your Anycubic Photon Mono M7: The Big Reveal!
Alright, you've got your safety gear, your workspace is ready, and you're practically buzzing with excitement. Time to unbox the beast! The M7 comes pretty well-packaged, so take your time. Inside, you'll find:
- The Photon Mono M7 printer itself (obviously!).
- The build plate.
- The resin vat (with a pre-installed FEP film).
- Power adapter.
- USB drive (super important for your first print files!).
- Scrapers (one metal, one plastic – use the plastic one on the FEP film!).
- Funnel for filtering resin.
- Gloves and masks (but honestly, get your own supply for long-term use).
- Instruction manual.
Take everything out carefully. Remove any protective films or ties. Get a feel for the machine. It’s pretty compact and sturdy, isn't it? I personally love the design of these mono printers; they just look so sleek.
Physical Setup: Placing, Powering, and Leveling
This part is critical, especially the leveling. A perfectly level build plate is the secret sauce for successful first layers in resin printing.
1. Placement and Power
Put your M7 on a stable, flat surface in your pre-prepared, well-ventilated area. Make sure there's enough space around it for you to work, especially for opening the lid and removing the build plate. Plug in the power adapter. Don't turn it on just yet.
2. Build Plate Installation
Unscrew the knob on the arm, slide the build plate in, and tighten the knob to secure it. Make sure it's snug but not overtightened – you'll need to loosen it for leveling.
3. The All-Important Leveling Process
This is where many beginners stumble, so pay close attention. The M7's leveling is generally quite forgiving, but accuracy is key.
- Remove the Resin Vat: Slide out the resin vat from the printer. Set it aside somewhere safe.
- Loosen the Build Plate: Use the provided Allen key to slightly loosen the two grub screws on the side of the build plate assembly. You don't need to remove them, just make it loose enough for the build plate to move freely.
- Place the Leveling Paper: Anycubic provides a leveling paper, which is basically a thick piece of paper. Place this directly onto the LCD screen.
- Home the Z-Axis: Turn on your printer. On the touch screen, navigate to Tools > Manual > Home (or similar depending on the exact firmware version). The build plate will descend until it firmly presses against the leveling paper.
- Apply Pressure & Tighten: While the build plate is pressing down, gently apply a bit of downward pressure on the top of the build plate with one hand, making sure it's perfectly flat against the screen and paper. With your other hand, carefully tighten the two grub screws you loosened earlier. Make sure you tighten them evenly.
- Confirm Leveling: On the screen, go to Tools > Manual > Z-up 0.1mm a few times. Try to pull the paper out. It should feel like there's a slight resistance, but you should be able to slide it. If it's too tight or too loose, repeat the process. Once you're happy, navigate to Tools > Z-Axis > Set Z=0. This tells the printer, "Hey, this is our new starting point!"
- Remove Paper & Re-Install Vat: Carefully remove the leveling paper. Slide the resin vat back into place.
Phew! That's the trickiest part done. Once you've leveled it, you usually don't need to do it again unless you really bump the build plate or experience adhesion issues.
Software Setup: Anycubic Photon Workshop Slicer
Now, let's talk software. Anycubic provides its own slicer called Photon Workshop. You'll find it on the included USB drive, or you can download the latest version from Anycubic's website. I recommend getting the latest version, as they often release updates that improve stability and add new printer profiles.
- Install Photon Workshop: It's a straightforward installation process.
- Select Your Printer: Once installed, open Photon Workshop. The first thing you'll need to do is select your printer model – choose "Anycubic Photon Mono M7."
- Import Your Model: You can load STL files (or OBJ) into the slicer. I often download models from MyMiniFactory or Cults3D.
- Orient and Support: This is a whole topic in itself, but for beginners:
- Orientation: Generally, you want to orient your model to minimize large flat surfaces parallel to the build plate and hide support marks on less visible areas. Angles around 30-45 degrees are often good.
- Supports: Resin prints almost always need supports. Photon Workshop has an auto-support function (click "Support" tab, then "Auto Supports"). Start with "Medium" supports for most things. You can manually add or remove supports later if needed. Make sure overhangs and islands are properly supported.
- Slicing Settings (The Big Ones):
- Layer Height: 0.05mm (50 microns) is a great starting point for detail and reasonable print times.
- Bottom Exposure Time: This is crucial for adhesion. Start with 25-30 seconds. This cures the first few layers extra hard to stick to the build plate.
- Normal Exposure Time: For Anycubic Standard Grey resin, a good starting point is 2.0-2.5 seconds. This varies wildly with resin type and color, so you might need to adjust.
- Lift Distance/Lift Speed: Default settings are usually fine for beginners. Don't mess with these too much until you're more experienced.
- Slice and Save: Once your model is supported and settings are tweaked, click "Slice." After slicing, save the file to your USB drive. It'll be a .pm7 file.
The thing is, getting your settings dialled in perfectly takes a bit of experimentation. Don't be discouraged if your first few prints fail. It's part of the journey! I've had more failed prints than I can count, especially when trying new resins or complex models. It's how you learn, right?
Your First Print: The Moment of Truth!
Okay, the M7 is leveled, the file is sliced, and your heart is probably doing a little happy dance. Let's make some magic!
- Pour the Resin: Wearing your gloves, carefully pour your chosen resin into the vat. Don't overfill it – leave some space for the build plate to submerge. A little less than halfway is usually good for most prints.
- Insert USB Drive: Plug your USB drive, with your .pm7 file, into the printer's USB port.
- Select and Print: On the touch screen, navigate to "Print," select your file, and hit "Print."
- Observe: The build plate will descend into the resin. You'll see the screen flash as the layers cure. It's mesmerizing! Keep an eye on it for the first few layers. If you see nothing sticking to the build plate after the first few layers, something's wrong (often leveling or bottom exposure time), and you might need to abort.
The M7, with its 10-inch screen and fast print speeds, will churn out your print surprisingly quickly. You'll hear the characteristic "thwack" sound as each layer detaches from the FEP film – that's normal and a sign it's working!
Post-Processing: The Messy But Rewarding Part
Once your print is done, the build plate will rise. Now comes the "clean-up crew" part of resin printing. Again, gloves ON!
- Remove the Build Plate: Unscrew the knob and carefully remove the build plate, letting excess resin drip back into the vat.
- Scrape Off the Print: Using the metal scraper, carefully pry the print off the build plate. Be gentle but firm. Sometimes a small hammer tap on the scraper helps.
- First Wash (IPA): Place your print into a container of IPA. Swish it around, use a soft brush to scrub off any uncured resin. You can use two containers – one for a preliminary dirty wash, and a second for a cleaner wash.
- Second Wash (Optional, but Recommended): Repeat the wash in fresh IPA if you want super clean prints.
- Rinse with Water: Some people rinse with water after IPA, especially if using water-washable resin. Even with standard resin, a quick rinse under the tap can help.
- Dry: Let your print air dry completely, or use compressed air. Ensure there's no IPA left.
- Curing: Place your now-dry print in your UV curing station (or a sunny spot). Cure it for a few minutes (check your resin's recommendations). This hardens the print fully. For larger prints, I sometimes cure for 5-10 minutes, rotating it halfway.
- Support Removal: Once fully cured, carefully snip off the supports with flush cutters. You can often snap off lighter supports by hand. Sand down any nubs if you're feeling fancy.
And there you have it! A perfectly printed, clean resin model. It's such a satisfying feeling, isn't it? The smooth finish and incredible detail are just unparalleled. This is how I create all the intricate pieces I sell through Artopia Collections, from detailed scale models to custom trophies. It really opens up a world of possibilities!
Maintenance and Safety Reminders (Because I Care!)
A little care goes a long way with resin printers. After your print:
- Filter Your Resin: If you're not planning to print for a while, or if you had a failed print with debris, filter your resin back into its original bottle using the provided funnel and a paint filter. This prevents cured bits from ruining future prints.
- Clean the Vat: If changing resin colours or if there's cured resin stuck to the FEP, clean the vat with IPA and soft paper towels. Be gentle with the FEP film! Never use metal scrapers on it.
- Clean the Screen: If any resin spilled on the LCD screen, clean it immediately with IPA.
- Store Resin Properly: Keep resin bottles tightly sealed in a dark, cool place. UV light will cure it!
Seriously, folks, invest in good safety habits from day one. I've seen people get complacent, and that's when accidents happen. Always wear gloves. Always ventilate. Treat the resin with respect, and it'll treat you to amazing prints.
My Two Cents: Why the M7 is a Game-Changer for Beginners (and Pros!)
The Anycubic Photon Mono M7 is, in my honest opinion, a fantastic piece of kit, especially for its price point in the Indian market. You can often find deals around ₹25,000 - ₹35,000, which is just incredible for what it offers. The speed is phenomenal, thanks to its 10.1-inch 14K monochrome screen, meaning less waiting and more actual printing. And the resolution? Chef's kiss! Your prints will have details that simply blow FDM away. If you're looking to elevate your crafting, prototyping, or just want to make some incredibly detailed display pieces, this printer is a solid investment. Trust me, I've used several Anycubic printers over the years – like the Photon S and the Mono X – and they consistently deliver great results.
So, what are you waiting for? Dive in! Resin printing is a fantastic hobby and can even become a profitable little business like mine. The learning curve is there, but with printers like the M7, it's a much gentler slope than it used to be. Happy printing, and don't forget to share your amazing creations with me on social media!
And hey, if you're still considering getting one, you can check out the Anycubic Photon Mono series on Amazon.in. It's a worthy addition to any maker's arsenal, I promise you that!