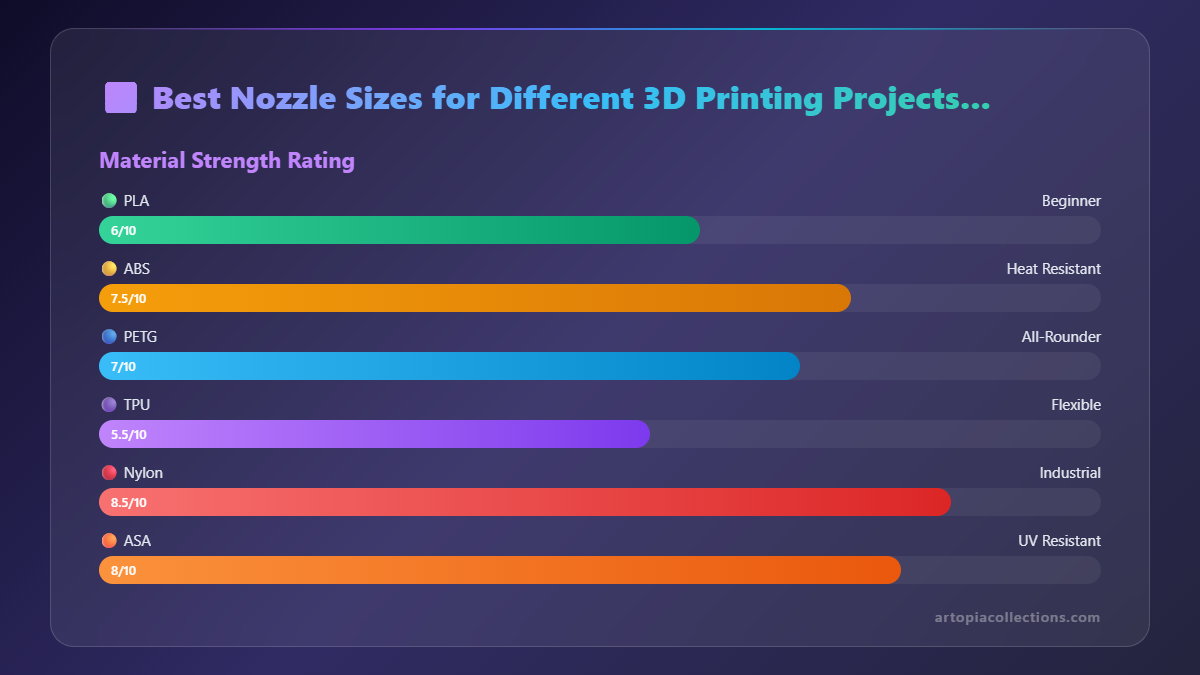
Best Nozzle Sizes for Different 3D Printing Projects Explained
The right 3D printer nozzle size is critical for achieving optimal print quality and project success. This guide explains which nozzle to choose for different applications, from high detail to strong parts and fast prints.
Chalo yaar, let's be real. How many of you, when you first started 3D printing, just stuck with the 0.4mm nozzle that came with your printer and never, ever thought about changing it? Be honest! I know I did for the longest time, and it was honestly a huge mistake. A colossal blunder, you could say. Because, my friends, understanding and swapping out your nozzle is like unlocking a whole new level in the 3D printing game. It's not just a tiny piece of brass; it's a gateway to better prints, faster production, and solving those frustrating print failures that make you want to throw your printer out the window (don't do that, by the way, they're expensive!).
I’m Vidyut, and here at ArtOptia Collections, we’re all about making cool stuff, whether it’s intricate miniatures or hefty prototypes. And over the years, I've learned that the secret sauce to getting exactly what you want from your prints often boils down to one small, overlooked component: the nozzle. The thing is, there’s no such thing as a "best" nozzle size. It’s all about the "right" nozzle size for the job at hand. It's a tool, you know? Like how you wouldn't use a screwdriver to hammer a nail. So, let’s dive deep into this brass (or steel, or ruby!) wonderland and figure out which nozzle you should be screwing onto your hotend for your next big project.
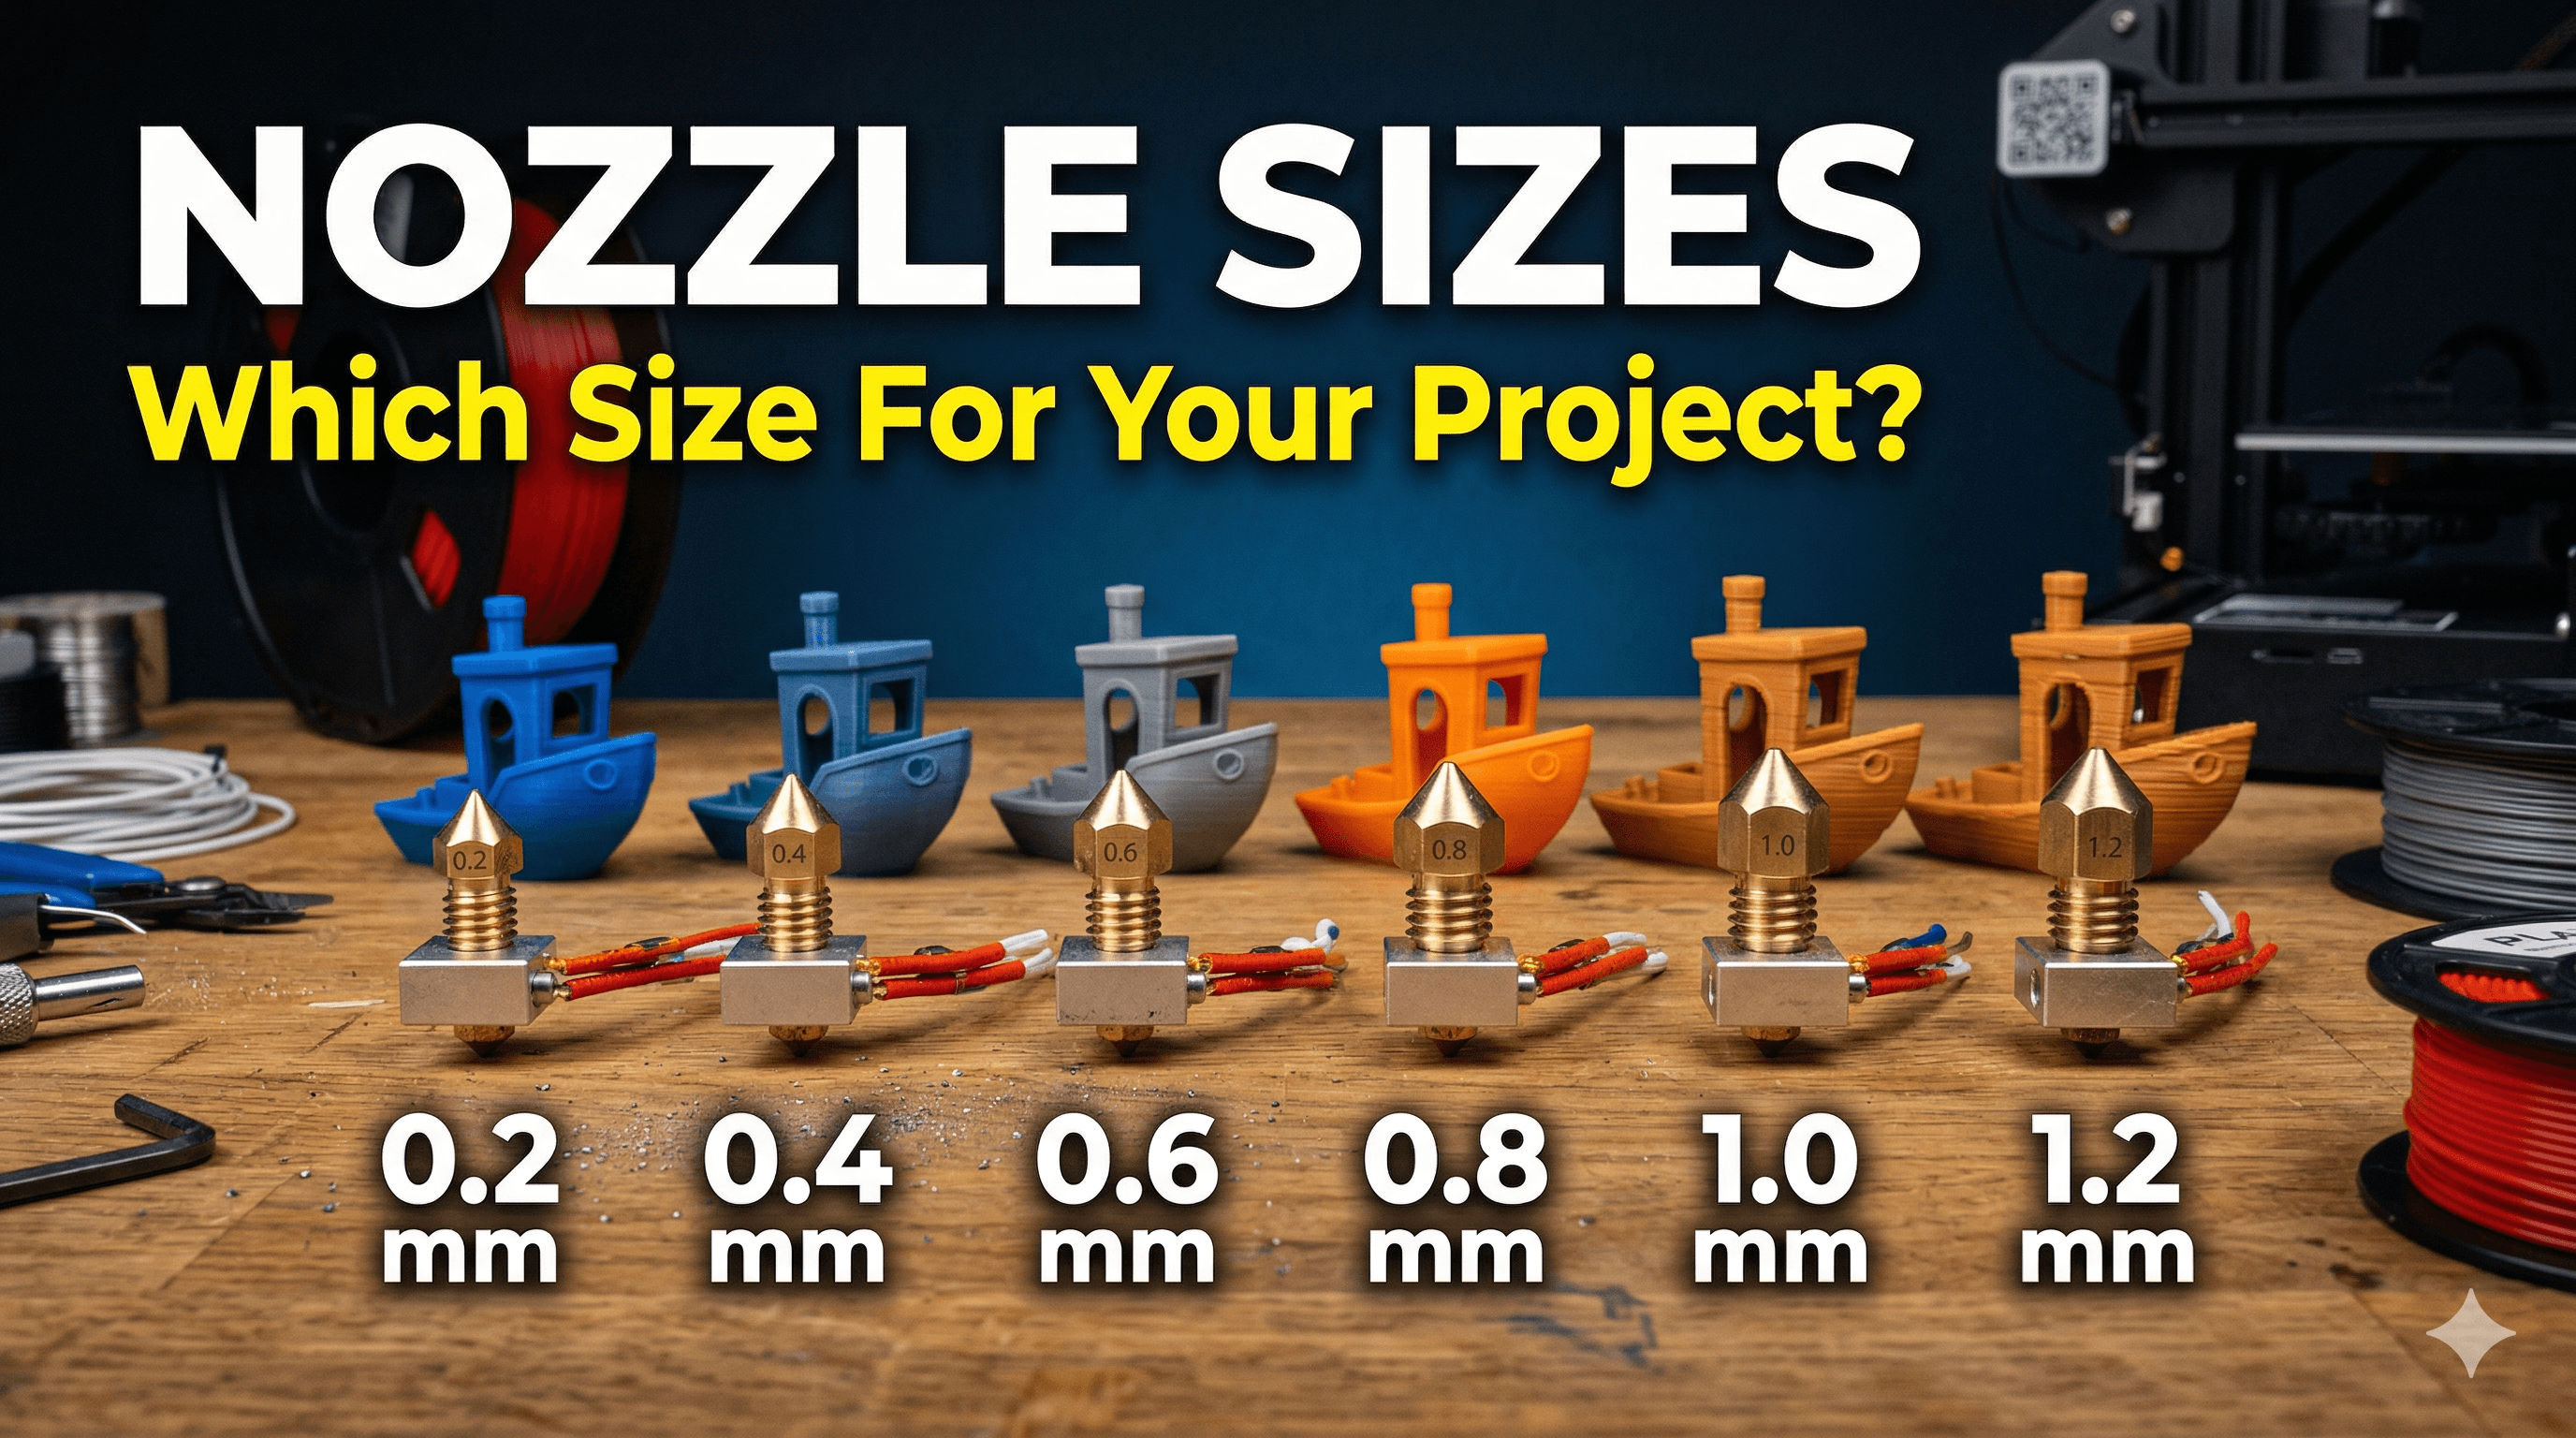
The Default Workhorse: The 0.4mm Nozzle
Okay, so let’s start with the one we all know and (mostly) love: the 0.4mm nozzle. This is your standard, your go-to, the one that probably came pre-installed on your Creality Ender 3 or your Anycubic Kobra. And honestly, for a good reason! It’s the jack-of-all-trades of the nozzle world. It strikes a fantastic balance between detail and speed.
Think about it: a 0.4mm nozzle can give you pretty decent detail for most figures, functional parts, and general prototypes without making you wait an eternity. You can get away with layer heights from, say, 0.16mm up to 0.28mm pretty comfortably. And for most hobbyists, this is perfectly adequate. It’s forgiving with filament, too – less likely to clog than smaller nozzles, and generally easy to work with right out of the box. Most slicer profiles are even optimized for it.
But here’s the catch. Because it tries to do everything, it’s not *excellent* at anything. If you want super-fine details, like the tiny inscriptions on a miniature model, it’s going to fall short. If you want to print a huge planter or a storage box in a few hours, it's going to take... well, more than a few hours. That’s where the other guys come in.
My humble opinion? Keep a few good quality 0.4mm brass nozzles handy. You can grab a pack of 10 for like ₹200-₹300 on Amazon.in. It's always good to have spares! Brass is soft, so they wear out, especially if you're printing a lot or with slightly abrasive filaments. No biggie, just swap 'em out.
When Precision is Key: The Tiny Terrors (0.2mm & 0.3mm Nozzles)
Alright, now we’re getting into the nitty-gritty, the microscopic world of fine details. When someone comes to ArtOptia Collections asking for custom tabletop gaming miniatures, or perhaps a intricate jewelry prototype (we get some really cool requests, by the way – check out some of our creations here!), my mind immediately jumps to the 0.2mm or 0.3mm nozzle.
These tiny nozzles are absolute game-changers for anything that demands high resolution. Imagine printing a small statue of Ganesh with incredibly sharp details on his trunk and ornaments, or a super-fine texture on a scale model. This is where the smaller nozzles shine. They allow for much thinner lines and smaller layer heights (think 0.08mm or even 0.04mm, though that's pushing it for FDM!). The results can be absolutely stunning, almost resin-like if you tune your printer just right.
But – and this is a big "but" – they are not without their challenges. First off, speed. Forget about it. Printing with a 0.2mm nozzle is a lesson in patience. Your print times will skyrocket because the printer has to lay down so much less material per pass. Second, clogging. Oh, the clogging! If your filament isn't perfectly dry, or if it has even the slightest impurity, these nozzles will get blocked faster than you can say "filament dryer." It’s super frustrating, believe me. I've spent hours debugging prints only to find a tiny spec of dust was the culprit in a 0.2mm nozzle.
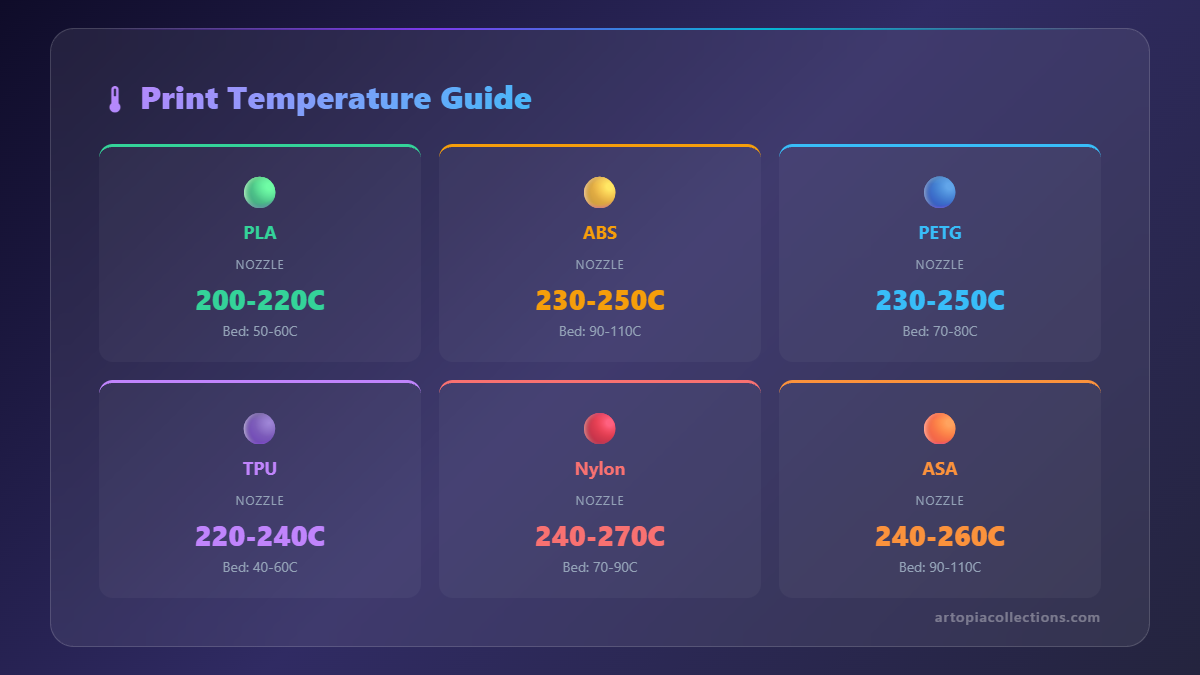
You also need really good quality filament for these. I've had great success with eSUN PLA+ or Overture PLA for fine details. They tend to be more consistent in diameter, which is critical. Also, consider your print temperature. Sometimes a slightly higher temperature helps flow through the tiny opening, but don’t go too high or you’ll get stringing. It’s a delicate balance, an art really.
When to use them:
- Miniatures and figurines
- Jewelry molds or prototypes
- High-detail display pieces
- Small, intricate functional parts where precision is paramount
They’re not for everyday use, but when you need that "wow" factor, these are your secret weapons. Just be prepared for longer print times and a bit more meticulous prep.
Speed & Strength Kings: The Big Boys (0.6mm, 0.8mm, 1.0mm+ Nozzles)
Alright, let’s flip the coin entirely. What if detail isn’t your priority, but speed, strength, and structural integrity are? That’s where the big nozzles come into play. We’re talking 0.6mm, 0.8mm, or even monstrous 1.0mm and above. And let me tell you, once you print with a 0.8mm nozzle, there’s a certain satisfaction that comes from seeing those fat lines being extruded.
The primary advantage here is speed, pure and simple. A 0.8mm nozzle can lay down significantly more material per second than a 0.4mm nozzle. This means a print that might take 15 hours with a 0.4mm could be done in 6-8 hours with a 0.8mm. For large prototypes, architectural models, or anything where size matters more than microscopic features, these are invaluable. Imagine printing a full-sized helmet or a functional storage bin – the time savings are massive.
But it's not just about speed. These larger nozzles also tend to create stronger prints. How? Because they create thicker extrusion lines, which means better layer adhesion. When you have more molten plastic squishing together, it bonds better, resulting in a part that’s more resistant to breaking along the layer lines. This is super important for functional parts that will undergo stress.
I personally use a 0.6mm nozzle a lot for many of our bigger functional prints. It's a great intermediate step between 0.4mm and 0.8mm. You still retain a decent amount of detail, but gain a lot in terms of speed and strength. For example, if I'm printing a large, sturdy enclosure for an electronic project, a 0.6mm nozzle is my go-to. It makes the print strong and relatively quick. And you can get a set of these larger nozzles for a couple of hundred rupees, not much more than the standard ones. Go check them out!
Of course, the trade-off is detail. Your layer lines will be much more visible, and fine features will be blobby or simply won’t print accurately. You’re effectively sacrificing visual finesse for utility and speed. But for many projects, that’s a perfectly acceptable compromise.
When to use them:
- Large prototypes and models (e.g., architectural, cosplay props)
- Functional parts requiring high strength
- Quick drafts or iterations of designs
- Printing with exotic or filled filaments (more on that next!)
- Anything where speed is paramount
Beyond Size: Nozzle Materials Matter, Yaar!
So far, we’ve mostly talked about brass nozzles. They’re cheap, they conduct heat well, and they’re great for common filaments like PLA, ABS, PETG. But what happens when you want to print with something a bit more… aggressive?
Brass Nozzles (₹100-₹300 for a pack):
 Pros: Inexpensive, excellent heat conductivity, widely available.
Cons: Soft, wears out quickly with abrasive filaments.
Best for: PLA, ABS, PETG, TPU, Nylon (unfilled).
Pros: Inexpensive, excellent heat conductivity, widely available.
Cons: Soft, wears out quickly with abrasive filaments.
Best for: PLA, ABS, PETG, TPU, Nylon (unfilled).
Hardened Steel Nozzles (₹500-₹1000 for a pack):
This is where it gets interesting! If you start dabbling with filaments like carbon fiber PLA, wood-filled PLA, glow-in-the-dark PLA (the glow particles are super abrasive!), or even some metal-filled composites, a brass nozzle will literally get drilled through in a matter of hours. I learned this the hard way trying to print some wood-filled sculptures – the brass nozzle was basically a wider, more inconsistent size after one medium-sized print!
Hardened steel nozzles are, as the name suggests, much harder and can withstand the abrasive nature of these exotic filaments. They're a must-have if you’re exploring these materials. They cost a bit more, but they save you money in the long run by not having to replace nozzles constantly.
Pros: Extremely durable, resistant to abrasive filaments. Cons: Slower heat transfer (might need to increase print temp slightly), more expensive. Best for: Carbon fiber filled, wood filled, glow-in-the-dark, metal filled, and other abrasive filaments.
Nozzle X / Ruby Nozzles (₹3000-₹5000+ per nozzle!):
 Now we’re getting into the supercar territory of nozzles. These are premium, high-performance nozzles, often featuring a hardened steel body with a ruby tip, or made from exotic alloys like E3D’s Nozzle X. They offer the best of both worlds: the extreme wear resistance for any filament imaginable, combined with good heat transfer (especially Nozzle X). They are incredibly durable and designed for professional use or for those who print a *lot* of highly abrasive materials.
For most hobbyists or even small businesses like mine, these are often an overkill unless you’re specifically working with industrial-grade composites on a regular basis. The price tag is hefty, so it's an investment, not a casual purchase. But hey, if you're doing high-volume abrasive printing, they can definitely pay for themselves in reduced downtime and consistent quality.
Pros: Ultimate durability, compatible with ALL filaments, excellent print quality. Cons: Very, very expensive. Best for: Industrial applications, continuous printing with highly abrasive materials, ultimate performance.
The Slicer Settings Dance: It’s Not Just the Nozzle!
Switching your nozzle isn't just about unscrewing one and screwing in another. You *have* to tell your slicer software (like Cura, PrusaSlicer, or Simplify3D) about the change! This is critical, people. Your slicer uses the nozzle diameter to calculate everything from line width to flow rate and even minimum layer height. If you print with a 0.8mm nozzle but your slicer thinks it’s a 0.4mm, you’re going to have a bad time. Expect over-extrusion, blobs, and general messiness.
Here are a few things that change with nozzle size:
- Line Width: Generally, you set your line width equal to your nozzle diameter, or slightly more (e.g., 0.48mm for a 0.4mm nozzle for better adhesion). For larger nozzles, you can even go up to 120-150% of the nozzle diameter for extra strong prints!
- Layer Height: A good rule of thumb is that your maximum layer height should be no more than 80% of your nozzle diameter. So, for a 0.4mm nozzle, max 0.32mm. For a 0.8mm nozzle, you can push it to 0.64mm! This is another way to dramatically speed up large prints.
- Print Speed: Smaller nozzles need slower speeds to ensure proper extrusion and detail. Larger nozzles can often handle much higher speeds because they’re pushing out more volume, though your hotend needs to be able to melt the filament fast enough (volumetric flow rate limits).
- Retraction Settings: You might need to tweak retraction distance and speed, especially with very small nozzles to prevent stringing.
Always, always, always remember to update your machine settings in the slicer when you change nozzles. And once you do, a quick calibration cube or test print isn't a bad idea, just to make sure everything's flowing as it should.
My Two Cents: Experiment and Don't Be Afraid!
Look, I get it. For a long time, the idea of changing a nozzle seemed intimidating. What if I strip the hotend? What if I break something? It's a valid concern, and trust me, I've had my share of screw-ups (like that time I tightened a nozzle cold and snapped it – rookie mistake, don't do that!). Always heat up your hotend to printing temperature before you attempt to remove or install a nozzle. Be gentle, use the right tools, and support your hotend when you're tightening.
But the gains you get from understanding and utilizing different nozzle sizes are immense. It transforms your printer from a one-trick pony into a versatile workhorse. Whether you're chasing that ultra-fine detail for a showpiece or cranking out a huge, sturdy part in record time, there's a nozzle for that.
So, my advice? Don't just stick with 0.4mm forever. Grab a small pack of different size nozzles – maybe a 0.2mm, a 0.6mm, and a 0.8mm brass set. They’re super affordable. Experiment! See what works best for your projects and your specific printer. You’ll be amazed at the difference it makes in the quality and efficiency of your prints.
Happy printing, my friends! And remember, every failed print is just a lesson learned. Until next time!