Blender Geometry Nodes for 3D Printing: Procedural Design Patterns
This post explores the exciting intersection of Blender Geometry Nodes and 3D printing. Uncover techniques for generating intricate procedural design patterns suitable for your next printed project.
Tired of "Good Enough"? How Blender Geometry Nodes Unlocked My 3D Printing Superpowers!
Oh man, if you're anything like me, you've probably spent countless hours meticulously modeling something in Blender for a 3D print, only to realise halfway through that a tiny design tweak means you have to basically start over. Or maybe you've tried to create some super cool, intricate pattern for a lamp shade or a ventilation grille, and just the thought of manually extruding and beveling a thousand tiny holes makes you want to throw your mouse across the room. Been there, done that, bought the t-shirt, probably printed it too!
That feeling of hitting a wall with conventional modeling, especially when you're trying to make something truly unique and not just another cookie-cutter print, it's brutal. For a long time, I felt like my designs, while functional and decent, lacked that "wow" factor, that truly custom, handcrafted-but-digitally-designed touch. And let's be honest, in the competitive world of custom 3D prints, especially here in India where everyone's looking for value and uniqueness, you NEED that edge. So, I was always on the hunt for something that would transform my workflow, something that would let me design intricate patterns without losing my mind. And then, Blender Geometry Nodes landed in my lap, and honestly, it changed everything for my little business, ArtTopia Collections.
What Even ARE Geometry Nodes? (And Why Should You Care, Like, A LOT?)
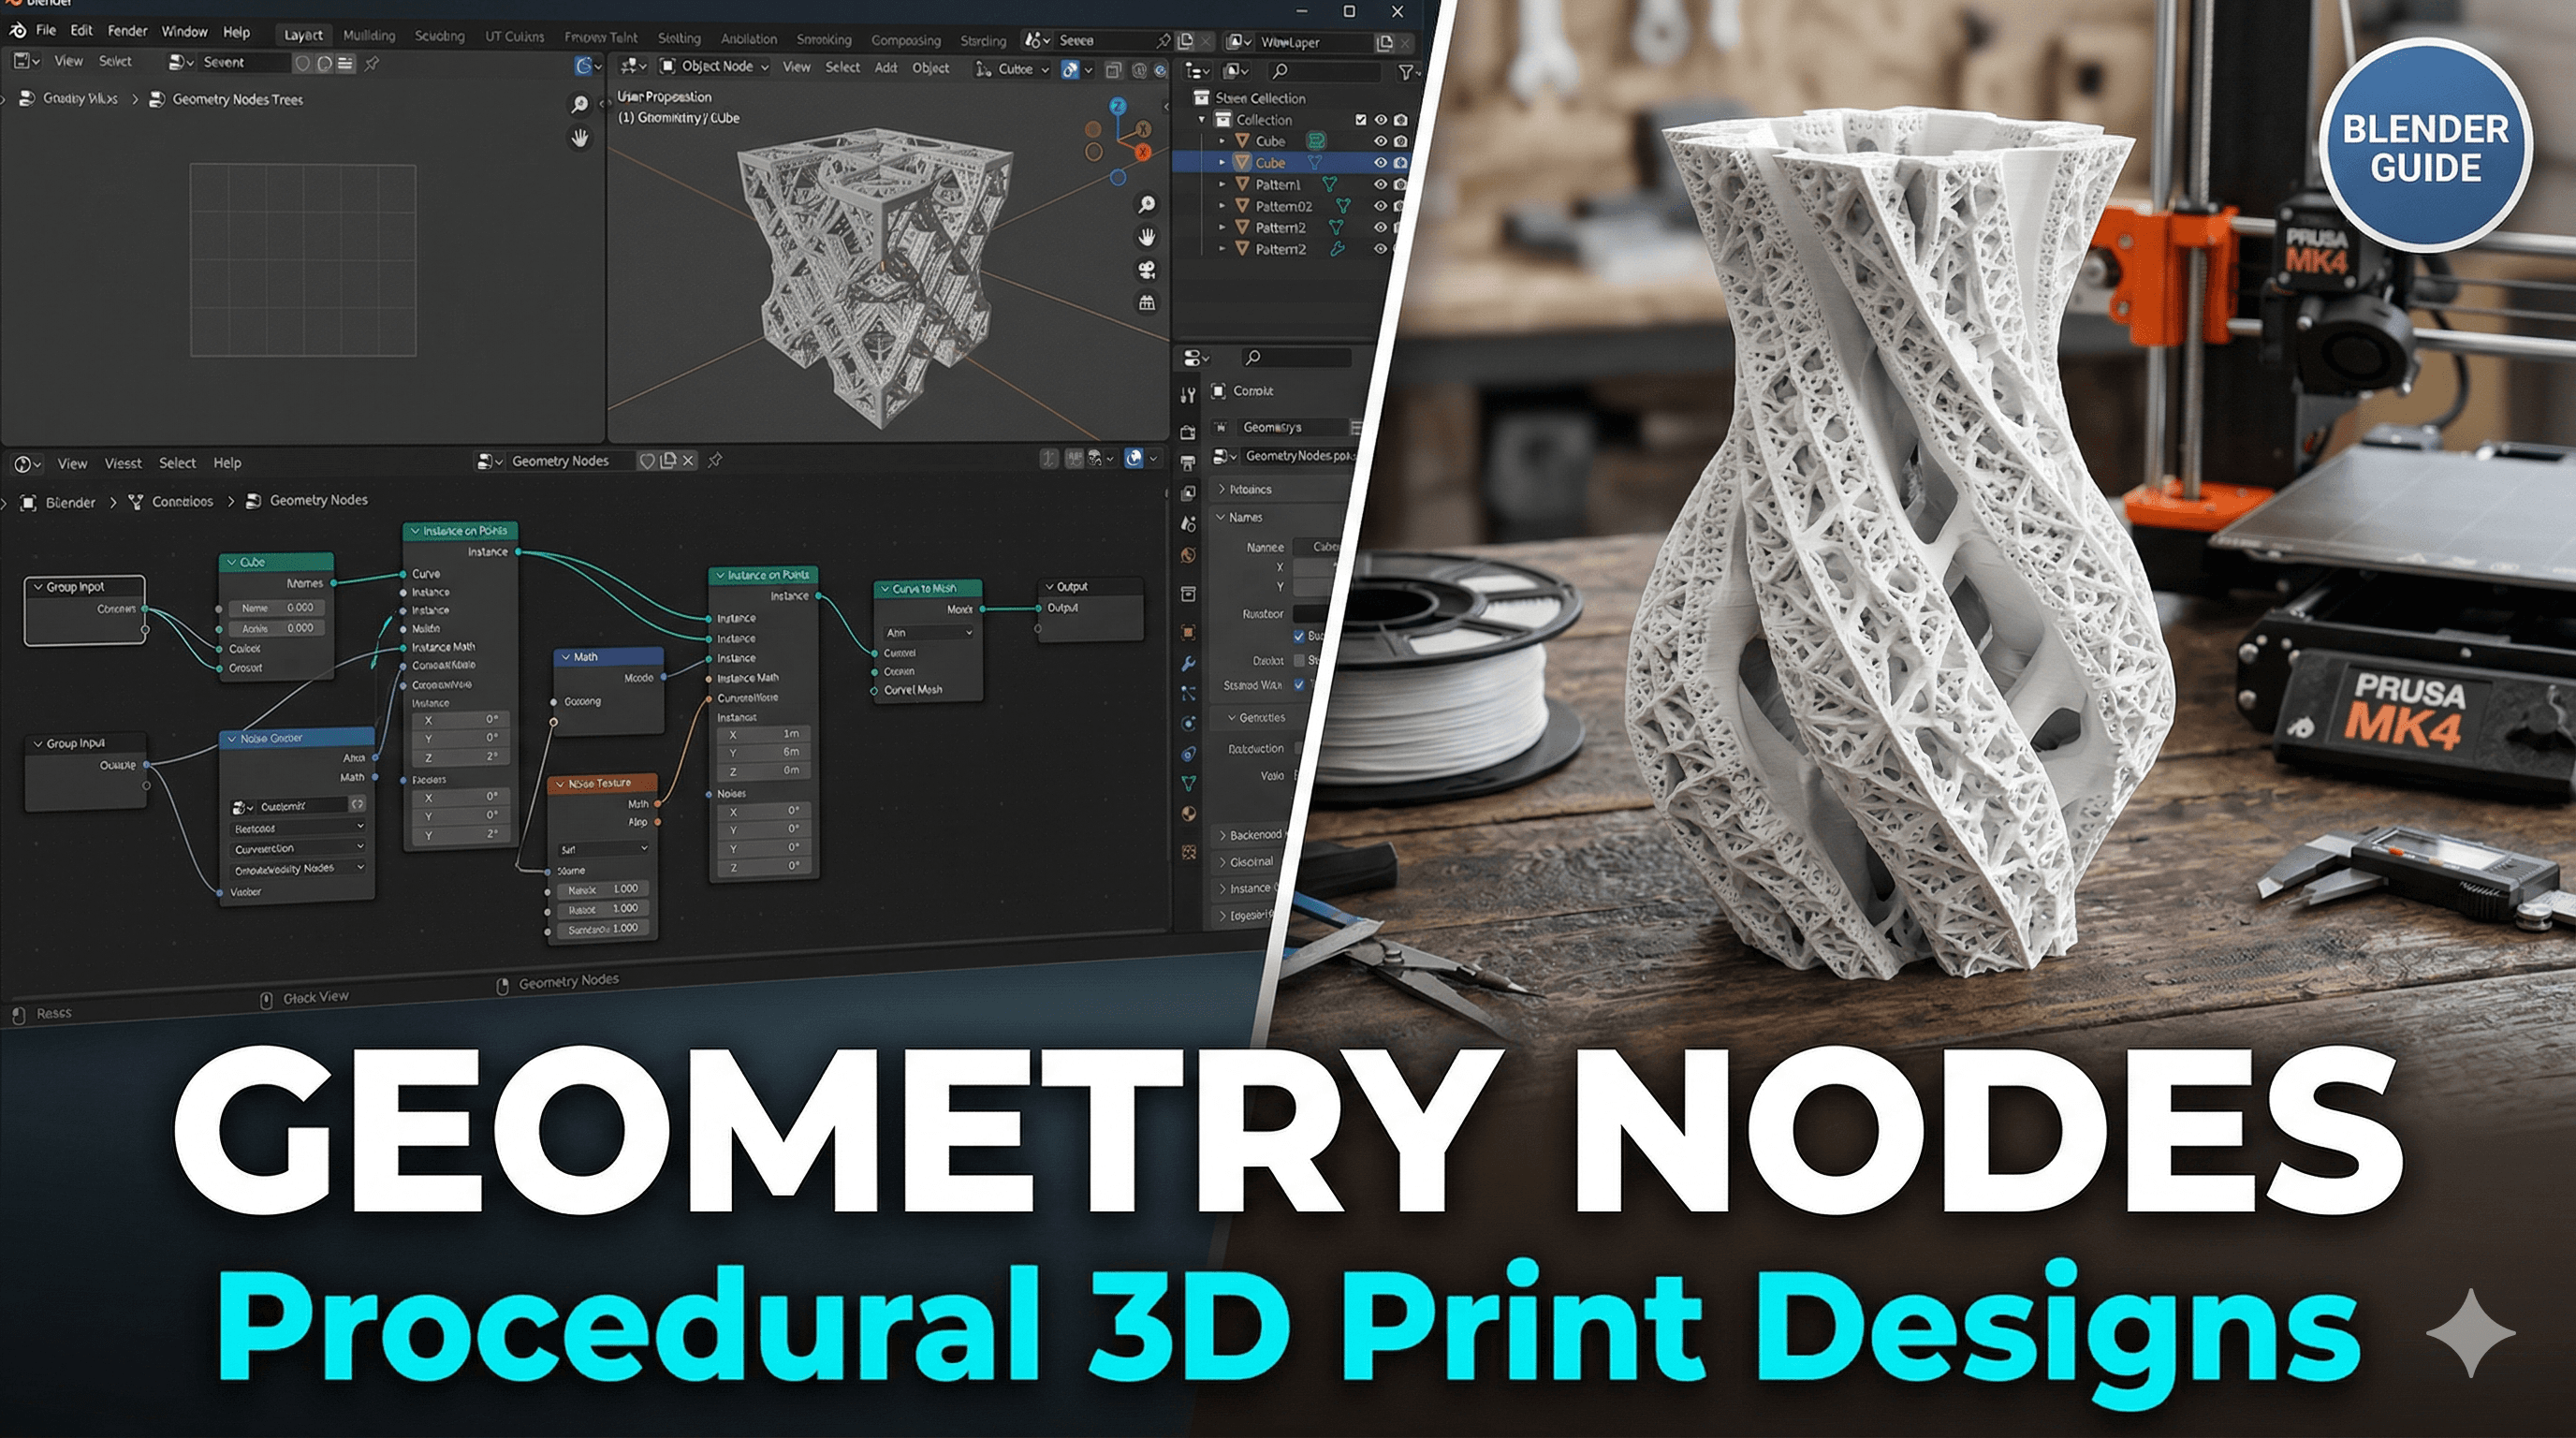
Okay, so before you get intimidated by the "nodes" part, let me simplify it. Think of Geometry Nodes as a visual programming language for 3D models within Blender. Instead of manually pushing, pulling, and cutting geometry, you're basically telling Blender a series of steps – a recipe, if you will – on how to build and modify your mesh. You connect these little "nodes," each doing a specific task like creating a grid, scattering points, instancing objects, or deforming surfaces, and Blender executes them in order.
The magic for us 3D printing enthusiasts? Procedural design. That's the real game-changer. It means you're not just drawing one static object; you're creating a system that *generates* objects. Want to change the size of every hole in a lattice? Just adjust one number on a node. Want to add more density to a Voronoi pattern? Slide a slider. It's like having a superpower that lets you iterate and customise complex designs at the speed of thought, instead of the painstaking pace of manual modeling. For a small business like mine, where customisation is key and time is money (and believe me, every rupee counts!), this is invaluable.
Why Manual Modeling Is The Old Hat (For Patterns, Anyway!)
Look, I'm not saying manual modeling is dead. Not at all. It's fantastic for specific, organic shapes or highly detailed character models. But when you're talking about patterns – repetitive structures, tessellations, organic-looking meshes generated from rules – manual modeling quickly becomes a nightmare. Imagine trying to create a complex Voronoi pattern for a lamp shade by hand. You'd be pulling your hair out, probably needing multiple chai breaks just to get through a small section! And if the client then says, "Actually, can we make the holes slightly bigger and more uniform?" – well, you're basically back to square one.
With Geometry Nodes, that exact scenario is a breeze. I can whip up a fully parametric Voronoi shade in, say, an hour or two, and then spend literally seconds tweaking parameters based on client feedback. That kind of flexibility is what lets me offer truly bespoke products without the astronomical design costs. It makes my design process incredibly efficient, and that translates directly into being able to offer better prices to my customers, or simply making more profit per design, which is always nice, right?
Unlocking a Universe of Procedural Design Patterns for 3D Printing
So, what kind of cool stuff can you actually make with this for 3D printing? Oh, the possibilities are endless, my friend! Here are just a few ideas that have totally transformed my product line:
- Intricate Vases & Lampshades: This is probably the most obvious and satisfying application. Think about those stunning lattice lamps or decorative vases you see online. With Geo Nodes, you can generate incredibly complex, organic, or geometric patterns that would be a nightmare to model by hand. I've made vases with swirling wave patterns, lampshades with delicate floral lattices, and even some with intricate Voronoi structures that look absolutely stunning when printed with translucent PLA. Imagine how cool a silk PLA filament looks with light shining through a custom geo-node pattern! It's pure magic.
- Custom Grilles & Vents: Need a custom air vent cover for a PC, or a unique grille for an electronic project? Instead of basic squares, you can generate patterns that optimise airflow while looking incredibly sleek. We've done some custom exhaust fan covers for a client's server rack that not only improved airflow but also looked a thousand times better than the stock plastic.
- Textured Surfaces for Grip or Aesthetics: Ever wanted a unique grip pattern for a tool handle, or a subtle, organic texture on a decorative box? Geo Nodes can scatter tiny bumps, ridges, or even generate abstract relief patterns across any surface. This adds a level of tactile and visual sophistication that makes prints feel high-end. I've used this to create unique chess pieces and even phone stands with a really nice, textured finish.
- Lightweighting & Infill Patterns: For functional parts that need to be strong but light, Geo Nodes can create internal lattice structures or shell patterns. While slicers do their own infill, sometimes you need a very specific, custom internal structure to meet certain strength or weight requirements. This is where advanced users can really shine.
- Custom Jewellery & Ornaments: Delicate, organic-looking jewellery pieces, intricate pendants, or unique earrings can be generated with incredible detail using procedural methods. This allows for truly one-of-a-kind wearable art.
My Journey: From Node-Noob to Node-Ninja (Well, Kinda!)
Honestly, when I first heard about Geometry Nodes, I was a bit intimidated. Blender itself has a learning curve, and then adding another layer of visual programming? Yikes! But I dove in. I watched countless YouTube tutorials – bless the hearts of creators like Erindale, Johnny Matthews, and the Blender Guru (Andrew Price) for their amazing insights. It took time, a lot of trial and error, and yes, a fair bit of frustration when my node tree would inevitably break or produce a spaghetti monster instead of a beautiful mesh. I even spent a good five (okay, fine, probably eight) hours debugging a single node group that was supposed to make a simple wavy pattern but instead made my Blender crash every time I tried to render it. But that moment when you connect the final node and your intricate, beautiful pattern just *appears*? Pure euphoria!
In my experience, the best way to learn is to pick a simple pattern you want to create – say, a basic grid of holes on a plane – and then try to build it node by node. Understand what each node does. How does a "mesh line" combine with a "grid" and then a "transform geometry" node? It's like learning building blocks. Once you get the basics, combining them into more complex structures becomes intuitive. And the best part? Once you've built a node group for a specific pattern, you can often reuse it or adapt it for future projects. Talk about efficiency!
Practical Realities for the 3D Printer (Because It's Not *Just* About Design!)
Okay, so you've designed your masterpiece in Blender using Geometry Nodes. Now what? You need to actually print it! And here's the deal: Geo Nodes can generate incredibly complex meshes, sometimes with millions of polygons. Your 3D printer and slicer software need to be able to handle that.
1. Mesh Complexity & Simplification: My trusty Creality Ender 3 V2, which I've had for years and still love, or even the newer Anycubic Kobra 2 Neo I use for faster prints, can struggle with super dense meshes if they're not processed correctly. Always, always, always make sure your final mesh is manifold (watertight) and, if too complex, consider using Blender's Decimate modifier or a Remesh node in your Geometry Node tree to reduce polygon count before exporting. There's a sweet spot between detail and printability.
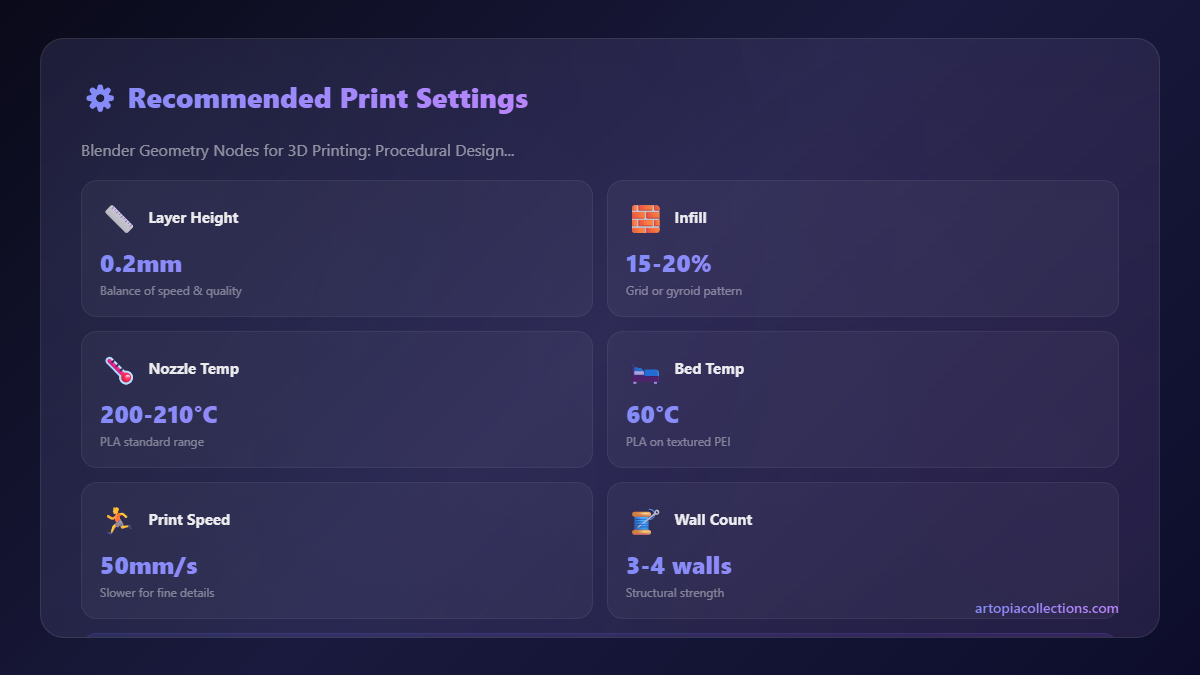
2. Printability & Slicer Settings: Intricate patterns often mean thin walls, delicate overhangs, and small details. You'll need to experiment with your slicer settings (I mostly use PrusaSlicer or Cura) to get the best results. Think about:
- Nozzle Size: A 0.4mm nozzle is standard, but some super fine details might benefit from a 0.2mm, though it slows printing significantly.
- Layer Height: Lower layer heights (0.12mm to 0.16mm) will capture more detail.
- Print Speed: Slow down for intricate patterns, especially the outer walls.
- Supports: Some patterns will absolutely require supports. Design your patterns with print orientation and support placement in mind if possible.
3. Filament Choice: The material you choose can make a huge difference. For aesthetic patterns, good quality PLA from brands like eSun, Overture, or even some of the great Indian brands available on Amazon can look fantastic. For functional parts requiring more strength, PETG or ABS might be necessary, but they can be trickier to print with intricate designs. And for those really fancy, light-diffusing lamps, translucent or silk PLAs are brilliant. A 1kg spool of good PLA typically costs me anywhere from ₹800 to ₹1500, depending on the brand and type.
4. Your PC's Power: Generating super complex Geometry Node trees can be quite demanding on your computer's CPU and RAM. While you don't need a supercomputer, a decent mid-range gaming PC (with, say, 16GB RAM and a modern i5 or Ryzen 5 processor) will definitely make your life easier and prevent frustrating crashes. My current setup cost me around ₹70,000, and it handles most of what I throw at it without much fuss, which is a significant investment for a small business but totally worth it for the time saved.
My ArtTopia Collections: Where Geo Nodes Shine
This procedural design approach has truly been a game-changer for ArtTopia Collections. It's allowed me to diversify my product offerings and take on custom design projects that I would have previously considered too time-consuming or complex. For instance, we've created a whole line of decorative architectural elements – small wall panels, intricate window grilles, and even custom table lamp bases – all leveraging the power of Geometry Nodes. Each piece can be parametrically adjusted to fit specific dimensions or aesthetic preferences, making every order truly custom-made without hours of manual redesign.
We've also used it to create bespoke gifts and corporate merchandise with unique, branded patterns. The ability to quickly generate variations means clients can pick from a range of subtle design changes before committing to a final print. If you want to see some of the unique things we've been crafting, do check out our product page here – you'll definitely spot some of the procedural magic at play!
The Road Ahead: Embracing the Future of Design
Geometry Nodes, and procedural design in general, are constantly evolving. Blender's developers are adding new capabilities with every update, making it even more powerful. Yes, there's a learning curve, and yes, you'll still have those moments where you stare at a broken node tree wondering what went wrong. But the payoff – the ability to create designs that were previously impossible or incredibly time-prohibitive – is absolutely immense.
For anyone running a 3D printing business, or even just a passionate hobbyist looking to push the boundaries of what you can create, I can't recommend diving into Blender Geometry Nodes enough. It's not just a tool; it's a paradigm shift in how we approach 3D design. It allows for unparalleled creativity, efficiency, and customisation, and in today's market, that's exactly what you need to stand out. So, go on, give it a try. Open up Blender, watch a tutorial, and start connecting those nodes. Who knows what incredible patterns you'll unlock!