Blender Modifier Stack for 3D Printing: Mirror, Array, and Solidify
Discover how Blender's essential modifiers like Mirror, Array, and Solidify can dramatically improve your 3D printing workflow. Prepare models efficiently and ensure high-quality, print-ready results for all your projects.
Blender Modifiers: Your Secret Weapon for Epic 3D Prints – Mirror, Array, and Solidify Unpacked!
Oh man, let me tell you, there's nothing quite like the feeling of watching a design you painstakingly crafted in Blender come to life, layer by layer, on your 3D printer. It's pure magic, isn't it? But honestly, if you're still painstakingly duplicating every single symmetrical part or thickening every wall manually, you're working way too hard, my friend. We need to talk about Blender's modifier stack – specifically the holy trinity for 3D printing: Mirror, Array, and Solidify.
I mean, seriously, these aren't just fancy tools for professional studios; they're absolute game-changers for us hobbyists and small business owners here in India. As someone who runs Artopia Collections, churning out custom prints and unique designs, efficiency is everything. And these modifiers? They basically put your workflow on steroids. You can crank out complex, perfectly symmetrical, and robust models in a fraction of the time, leaving you more time to, well, print more cool stuff!
For me, Blender isn't just a software; it's an extension of my creativity. And its modifiers? They're like cheat codes. They let you non-destructively alter your mesh, which means you can always go back and tweak things without ruining your original work. This is huge for 3D printing, where tiny adjustments can make or break a print. Let's dive in, shall we? Grab a chai, fire up Blender, and let's get sculpting, or rather, modifying!
The Mirror Modifier: Perfect Symmetry, Zero Effort
Okay, so you're designing something that needs to be perfectly symmetrical, right? Think a vase, a character's head, an enclosure for a circuit board, or even a fancy earring. Traditionally, you'd model one half, then try your best to duplicate and flip it, hoping it aligns perfectly. Spoiler alert: it almost never does, at least not without a lot of fiddly adjustments. That's where the Mirror modifier swoops in like a superhero.
What it does is incredibly simple yet profoundly powerful: you model one half of your object, and the Mirror modifier automatically creates a perfect, mirrored copy along a chosen axis (X, Y, or Z). It's literally like magic. You just select your mesh, go to the Modifier Properties tab (the little wrench icon), click "Add Modifier," and choose "Mirror." Boom. Instant symmetry.
The beauty of it is that any changes you make to your original half are instantly reflected on the mirrored side. So, if you're sculpting a face, you only need to worry about one eye, one side of the nose, one ear. It saves you probably 50% of your modeling time right there, especially for organic shapes. And trust me, for intricate details, trying to manually match them on both sides is just asking for a headache, and honestly, a print that looks slightly off. Nobody wants that, especially if you're selling your creations!
For 3D printing, the Mirror modifier is a lifesaver. You often need symmetrical parts – like two identical brackets, or a left and right side of an articulated toy. While you could just print two copies, designing with Mirror ensures absolute fidelity. Just remember one crucial thing: make sure "Clipping" is enabled in the Mirror modifier settings if you want to ensure the vertices along the mirror axis stick together and don't overlap or pull apart. This helps create a truly manifold (watertight) mesh, which is super important for successful 3D prints. A non-manifold mesh can cause all sorts of slicing errors, giving you holes or weird artifacts in your final print. And nobody likes a print that looks like Swiss cheese!
I recently used the Mirror modifier to design a pair of intricate decorative bookends. I sculpted one half of the design, applied the Mirror modifier along the Y-axis (because they were facing each other), and then just duplicated the whole thing to get the second bookend. Saved me hours, and they looked absolutely perfect, symmetrical down to the last curve. It's truly a game-changer for detailed work!
The Array Modifier: Multiply Your Awesomeness
Next up, we have the Array modifier. This one is another absolute gem, especially if you're into repetitive patterns, gears, chain links, or even if you just need to print multiple identical small parts for a larger assembly. The Array modifier duplicates your object multiple times, either along a specific offset, a curve, or even around another object.
Think about it: you want to make a chain. You model one link. Apply an Array modifier, set the count, and adjust the relative offset. Instantly, you have a chain! Want to make a gear? Model one tooth, use a circular Array (by adding an empty object and offsetting the array based on that empty's rotation), and bam – a perfect gear with all teeth identical. This is exponentially faster than duplicating and aligning each element manually, which is, frankly, a tedious nightmare.
For us 3D printing folks, the Array modifier is fantastic for batch production. Let's say you've designed a cool little keychain or a small decorative piece that sells well at a local craft fair. Instead of loading your model, slicing, printing, then repeating for each piece, you can use the Array modifier to create a grid of, say, 10 or 20 of them on your build plate. Then, you slice that single file and print all of them in one go! This seriously boosts your productivity and makes the most of your printer's uptime. Imagine printing 15 of these at once on your Creality Ender 3 V2 – it's just so efficient.
When using the Array modifier for 3D printing, pay attention to the spacing. You want enough space between each duplicated object to allow for easy removal of supports (if needed) and to prevent parts from fusing together during printing. Generally, I leave a gap of at least a couple of millimeters, depending on the object's size and complexity. And remember, just like Mirror, this is non-destructive until you "Apply" the modifier. So, you can tweak the count, offset, or even the original object, and the array will update automatically. This flexibility is priceless!
I use Array constantly when making things like my custom cookie cutters. I design one cutter, array it across my print bed, and print a whole sheet of different designs or multiple copies of the same design. It's a massive time saver, letting me fulfill orders faster without having to babysit the printer for individual prints. A roll of good quality PLA, like from eSun or Overture, which you can easily find on Amazon India for around ₹1500-₹2000, goes a long way when you're maximizing your build plate with the Array modifier.
The Solidify Modifier: Giving Your Prints Some Girth (And Printability!)
Alright, hold up. If Mirror and Array are like the cool, flashy siblings, then Solidify is the responsible, absolutely essential backbone of the family. This one is CRITICAL for 3D printing. I cannot stress this enough. If you take one thing away from this post, it's this: use the Solidify modifier for almost everything you intend to 3D print!
Here's the deal: when you model in Blender, especially if you're starting from a plane or creating shapes from curves, your objects often have zero thickness. They're just infinitely thin surfaces. Think of them like paper. And you can't 3D print paper, can you? Your slicer (like PrusaSlicer or Cura) needs objects to have actual volume, defined walls, and thickness. It needs a "manifold" mesh, meaning it's watertight, with no holes, internal faces, or zero-thickness surfaces.
The Solidify modifier literally takes your paper-thin mesh and gives it thickness. It extrudes the surface inward or outward (or both), creating an actual volume. You control the thickness, the offset, and how the edges are handled. Just like the others, go to the Modifier Properties, "Add Modifier," and choose "Solidify."
Why is this so important? Because without it, your slicer will either refuse to slice your model, or it'll produce a broken, incomplete G-code, resulting in a failed print. I've had my share of those, usually when I'm tired and forget to add Solidify to a quick design. Trust me, it's frustrating watching an object print beautifully only to realize it's just two thin layers on top of each other and not an actual solid part.
When you're setting the thickness, keep your 3D printer's nozzle size in mind. For a standard 0.4mm nozzle, I usually aim for a wall thickness of at least 0.8mm (which is two perimeters) or even 1.2mm (three perimeters) for stronger parts. Going too thin, say 0.4mm, might only result in one perimeter and a very flimsy print. You can even set multiple material zones if you want different thicknesses in different areas, though for most general prints, a uniform thickness works just fine.
I use Solidify for almost every single model I print. Whether it's turning a flat logo into a sturdy sign, making a decorative shell robust enough to handle daily use, or ensuring a detailed figure has enough wall thickness to not crumble. It's the unsung hero that ensures your beautiful Blender creations are actually printable and durable. It's saved me from countless failed prints and wasted filament (and considering a kilo of good quality PETG can be ₹1800-₹2500, every failed print stings a bit!).
The Modifier Stack: A Symphony of Power
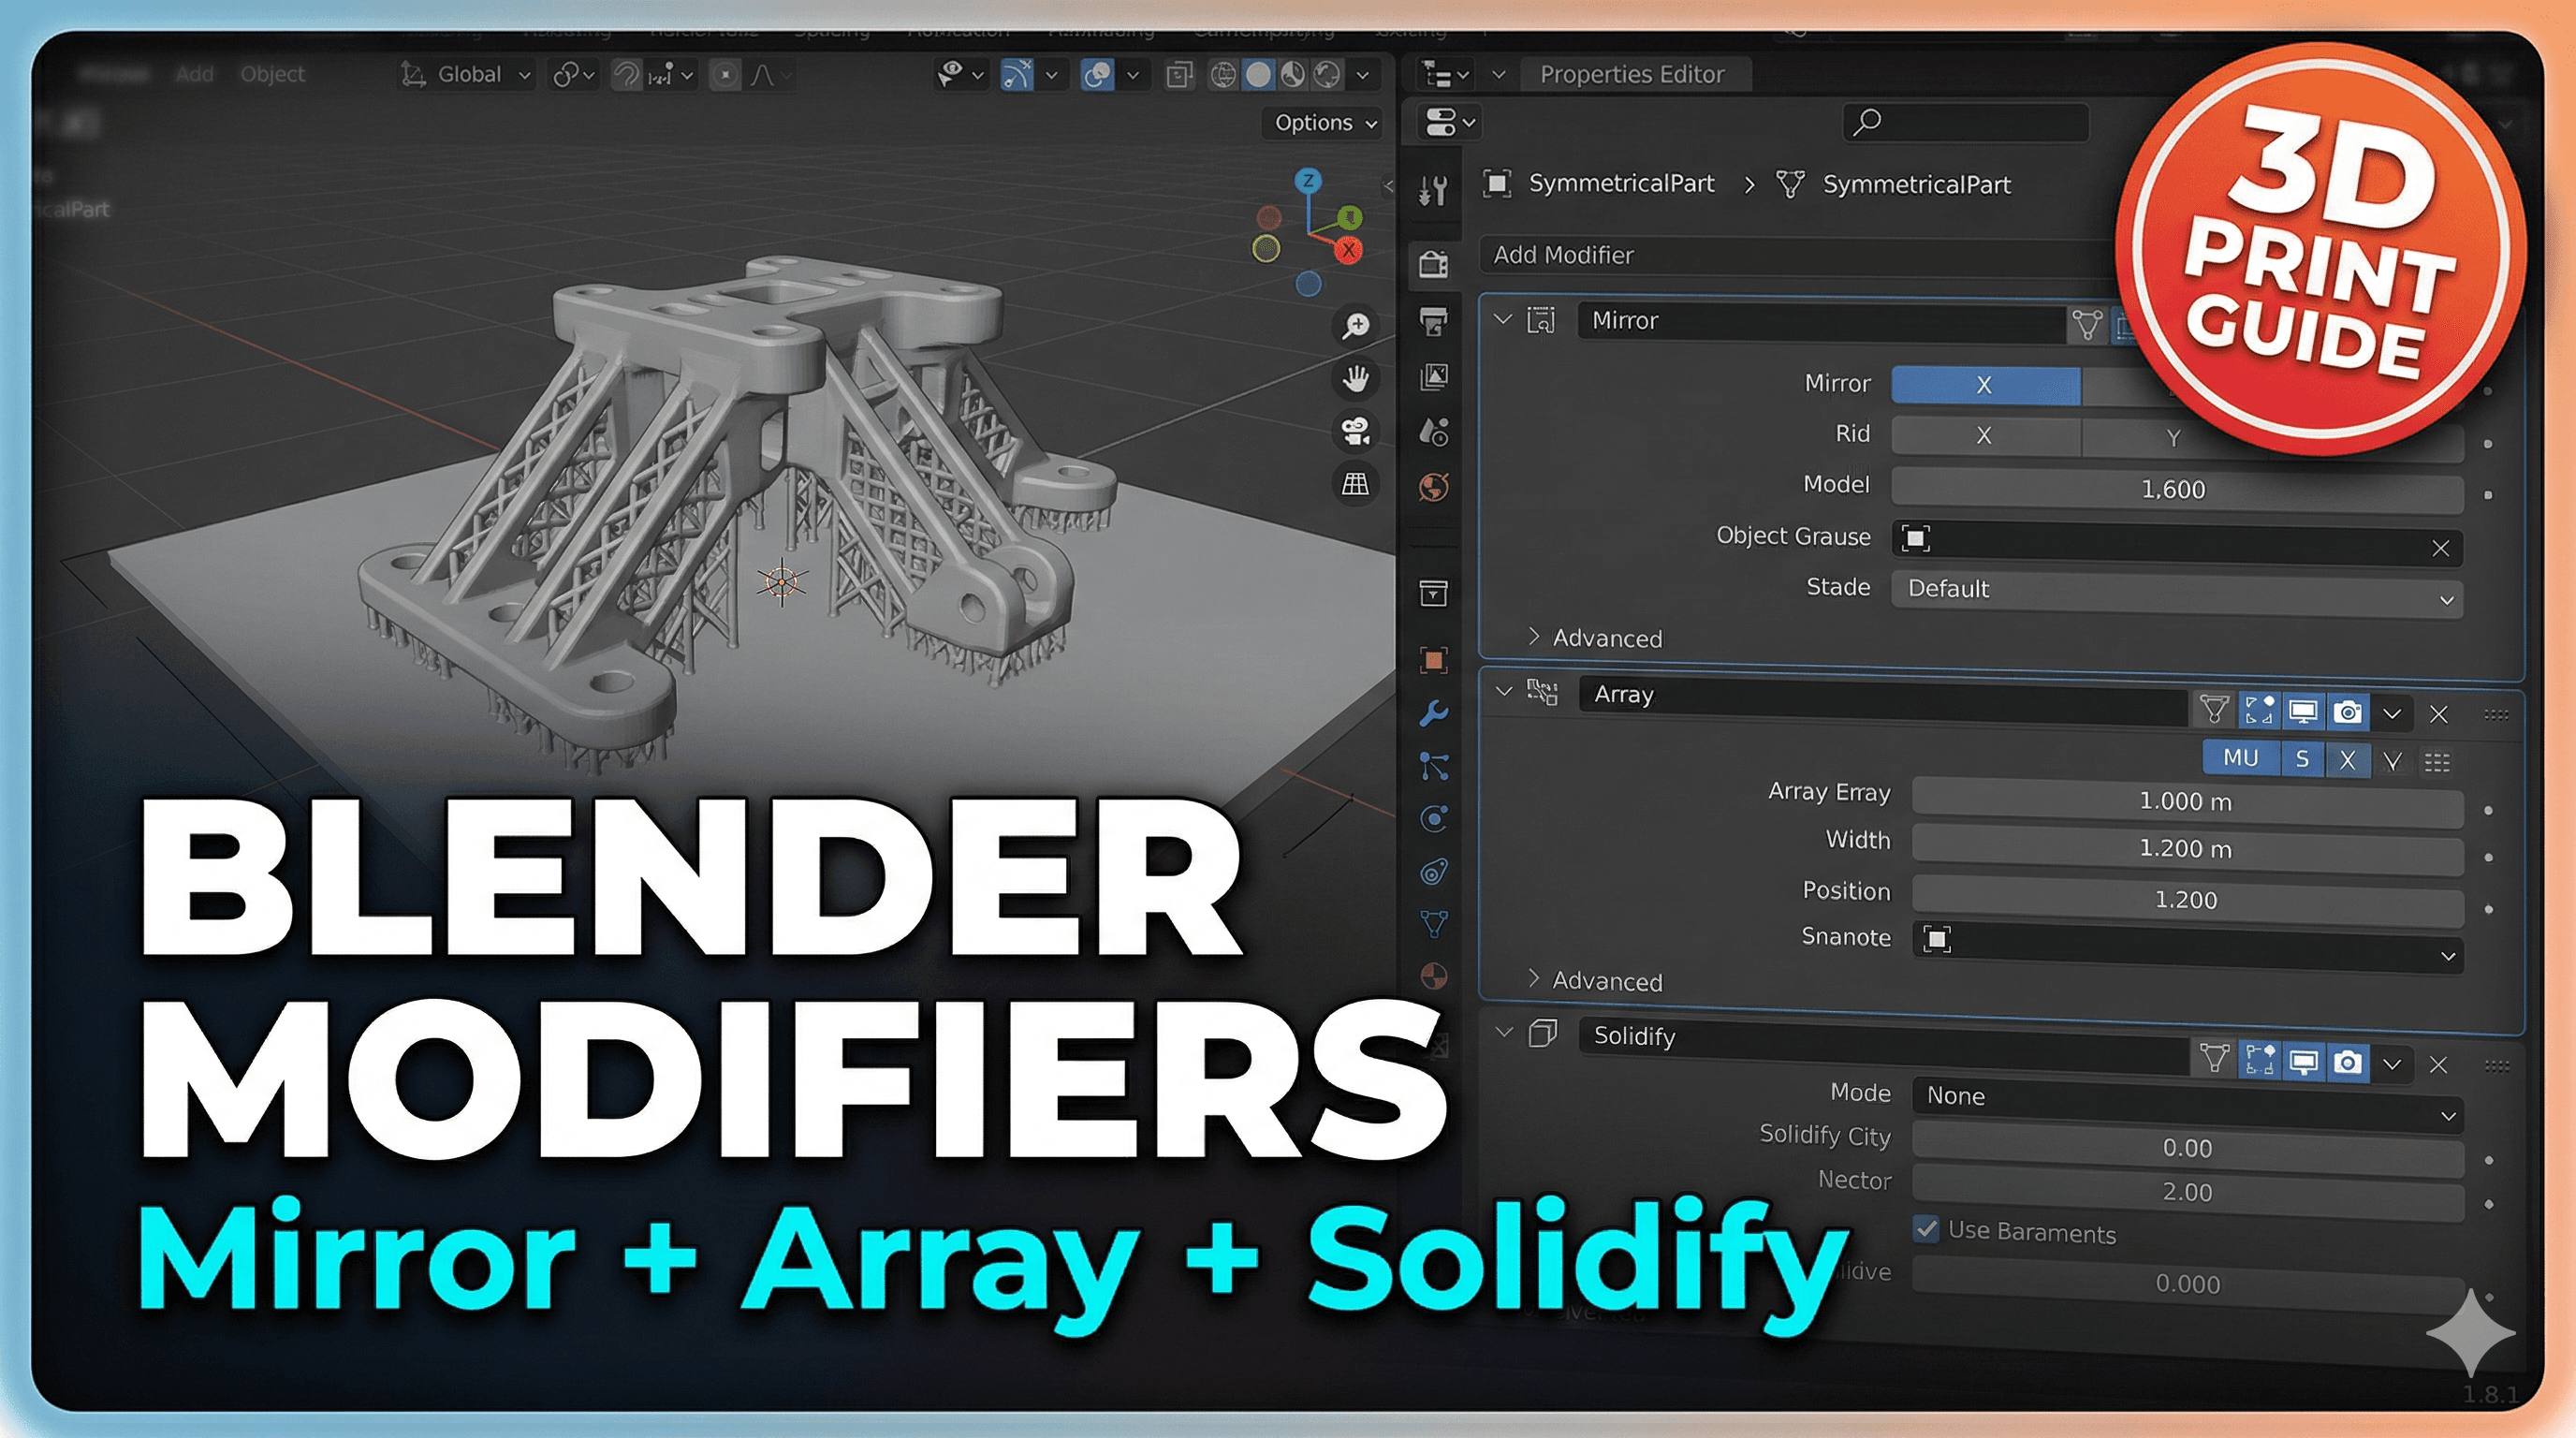
Now, here's where the real magic happens. These modifiers aren't meant to be used in isolation! They form a "stack," and the order in which you place them matters immensely. Blender processes them from top to bottom. This means you can create incredibly complex and robust models with just a few clicks.
A classic combination for 3D printing is Mirror -> Array -> Solidify. Let's say you're designing a complex, repeating pattern for a decorative panel:
- You model one small, unique element.
- Add a Mirror modifier if that element itself needs internal symmetry.
- Then, add an Array modifier to duplicate that element across a row or grid. Now you have a whole pattern, still paper-thin.
- Finally, add the Solidify modifier at the bottom of the stack. This will give thickness to the entire array of mirrored elements, making it a robust, single, printable object.
If you tried to Solidify *before* Array, you'd get a thick single element, and then Array would just duplicate that chunky element, which might not be what you want. Similarly, if you put Solidify before Mirror, you'd solidify half an object, then mirror it, which again, might lead to odd results where the mirrored half doesn't perfectly connect. The order is key!
I use this stack all the time for things like creating modular wall tiles or intricate jewelry components. You sculpt one small piece, let Mirror handle its symmetry, Array it to create a larger sheet, and then Solidify the whole thing into a printable object. It's incredibly powerful and efficient.
A Few General Blender-to-3D-Print Tips
Beyond the modifiers, here are a few more tips from my experience running Artopia Collections and just generally messing around with my printers:
- Check for Manifold: After you've applied your modifiers (or before, if you want to fix issues on the base mesh), always, always check if your mesh is manifold. Blender has a fantastic built-in add-on called "3D Print Toolbox." Enable it, go to the N-panel (press N in the 3D viewport), and you'll find it under "3D-Print." Hit "Check All" to identify non-manifold edges, intersections, or zero-faces. It even has "Make Manifold" but sometimes manual fixing is better. This is your first line of defense against failed prints.
- Exporting: For 3D printing, the most common file formats are STL and 3MF. STL is robust, but 3MF can carry more information (like colors, if you're into multi-color printing). When exporting from Blender (File > Export > STL), make sure to select your object and check "Selection Only" if you only want to export specific parts. Also, check the "Scale" option to make sure your units (usually millimeters in Blender) translate correctly to your slicer.
- Slicer Settings: Your slicer (PrusaSlicer, Cura, Simplify3D) is where you turn your 3D model into printer instructions. Experiment with settings like layer height (0.2mm is standard, 0.12mm for fine detail), infill percentage (10-20% is usually enough for strength unless it's a structural part), and supports. Don't be afraid to tweak.
- Filament Choice: For most hobby and decorative prints, PLA is your friend – it's easy to print and comes in a zillion colors. For stronger, more functional parts, or anything that needs to resist a bit of heat (like car parts or outdoor components), PETG is fantastic. ABS is tougher but trickier to print (warping!). Always get good quality filament; cheap stuff can lead to clogs and inconsistent prints. Brands like eSun, Overture, and locally available ones are generally good.
Wrapping Up This Blender Love Fest
So, there you have it, folks! The Blender Modifier Stack, with special shout-outs to Mirror, Array, and Solidify, is not just a bunch of fancy buttons. It's a powerful toolkit that can transform your 3D printing workflow from frustrating and manual to efficient and creative. For me, running my little business, Artopia Collections, these modifiers are indispensable. They allow me to iterate faster, produce higher quality models, and ultimately deliver awesome custom 3D prints to my customers without pulling my hair out.
If you've been dabbling in Blender for 3D printing, but haven't really explored these modifiers, please, give them a shot. Experiment. See how they can speed up your design process and improve the quality of your prints. You won't regret it, I promise. It's amazing what you can achieve once you unlock these tools.
Happy blending, and even happier printing! Drop a comment below if you have any questions or your own modifier stack tips. I'd love to hear from you!