Fusion 360 Render Tutorial: Create Professional Product Photos of Your Designs
This Fusion 360 render tutorial shows you how to transform your 3D designs into captivating, professional product photos. Master rendering techniques to create stunning visuals that impress clients and showcase your work.
Ever felt that pang of frustration when you finally pull an amazing 3D print off your Ender 3 (or whatever beast you're running!) and then… you take a picture of it, and it just looks… meh? Like, honestly, your awesome design, that took hours to model and print, ends up looking like a blurry potato on your messy workbench?
Yeah, I’ve been there. More times than I care to admit. As someone who runs a small 3D printing business, Artopia Collections, presentation is everything. It's not just about getting a cool design out of my machine; it's about making it look professional, desirable, and ready for a customer's cart. And for a long time, I struggled. My "product photos" were basically glorified snapshots, and honestly, they weren't doing my hard work any justice. I mean, who wants to buy something that looks like it was photographed in a dimly lit cave, right?
But then I discovered the magic of Fusion 360's rendering capabilities. And let me tell you, it was a game-changer. Suddenly, those same models, before they even touched a print bed, could look like they were professionally photographed in a studio. Clean, crisp, perfectly lit, and with just the right amount of shine. And the best part? It didn't cost me a single rupee for fancy lights or backdrops. It's all within the software, which, let's not forget, is free for hobbyists and startups for a good while.
So, if you're struggling to make your digital designs look as good as they are in your head, or if you're like me and running a small business where every impression counts, this tutorial is for you. We're going to dive deep into how to use Fusion 360 to create stunning, professional-grade product photos of your 3D designs. Trust me, it's easier than you think, and the impact on how people perceive your work (and your sales!) is HUGE. Let's make your designs pop, digitally!
Why Bother with Renders When You Can Just Print It?
That's a fair question, and one I get asked a lot, especially by fellow enthusiasts. "Why waste time on a render when I can just print the actual thing and snap a photo?" Well, here's the deal, my friend. While a physical print is the ultimate proof, renders offer several massive advantages, especially for a business like mine:
- First Impressions are Everything: Imagine a customer browsing online. They see a blurry, poorly lit photo of your print next to a crystal-clear, professionally rendered image from a competitor. Which one do you think they're clicking on? It's not rocket science. A good render grabs attention and conveys professionalism right off the bat.
- Cost-Effective Prototyping: Before I even print a single piece, I can generate a dozen different render variations. Different colors, different textures, maybe even a logo added via a decal. This saves me so much filament and time! Instead of printing something, realizing the color combination looks awful, and then reprinting, I can see it digitally. That's a huge saving, especially when a good quality 1kg spool of eSUN PLA+ costs around ₹1,800-₹2,500.
- Showcase Variations Without Printing: Let's say you design a cool vase. You want to offer it in matte black, glossy white, and a metallic copper finish. Do you print all three just for photos? Nah, man! Render them. It’s quick, it’s easy, and it keeps your filament stash for actual orders.
- Marketing Material Before Production: You can start marketing a new product and gauge interest even before your printer has laid down its first layer. This is invaluable for pre-orders or crowdfunding campaigns.
- No Fancy Gear Needed: To get truly professional physical product photos, you’d need a decent camera, lighting setup (softboxes, ring lights – which can easily run you ₹5,000-₹10,000+ for a basic kit), backdrops, and a well-lit space. With Fusion 360, all you need is your computer.
So, yeah, rendering isn't just an artistic flourish; it's a powerful business tool. And Fusion 360 makes it surprisingly accessible.
Getting Started: Your First Render in Fusion 360
Alright, enough talk! Let’s get our hands dirty. Or rather, our mice clicking. I’m assuming you’ve already got your model ready in Fusion 360. If not, quickly design something simple, like a basic cube or a phone stand. Even a simple shape can look amazing with the right render settings.
Step 1: Prep Your Model (The Foundation)
Before you even think about rendering, make sure your model is clean. No floating components, no weird intersecting bodies unless that’s intentional. Also, make sure your model is oriented correctly. If it’s meant to sit upright, make sure it’s upright in the workspace. It just makes things easier down the line.
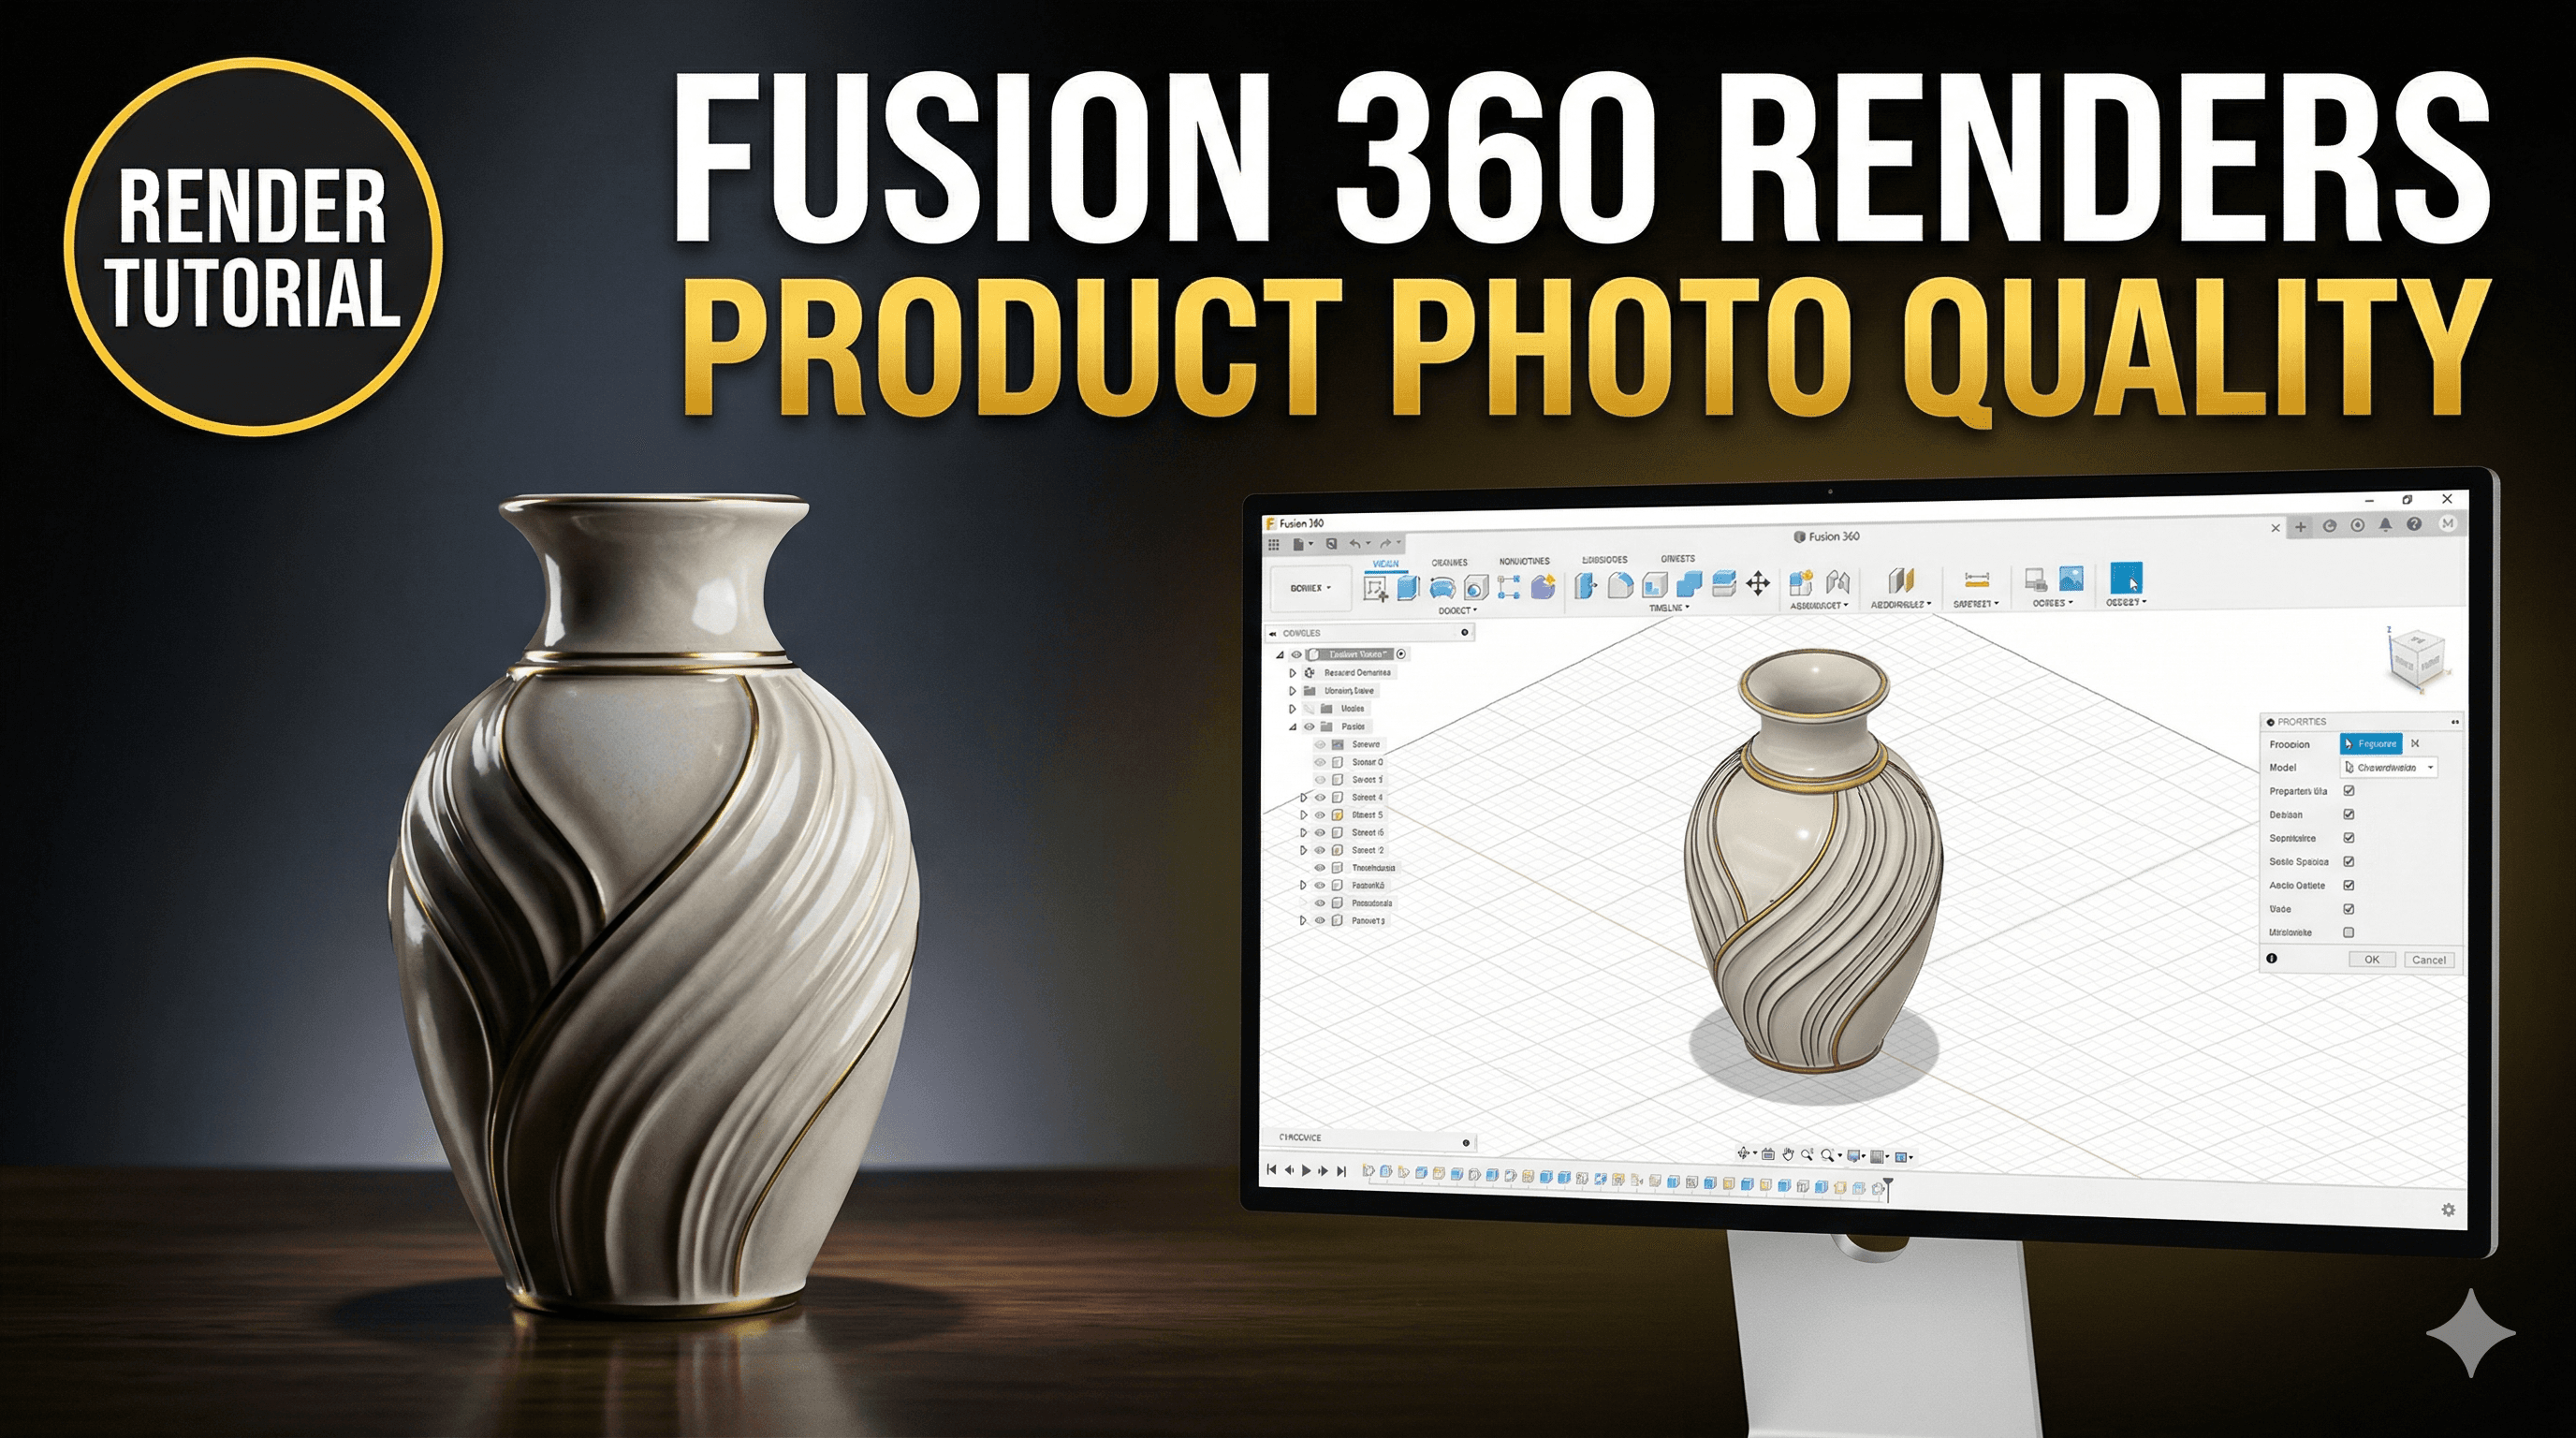
Step 2: Enter the Render Workspace
This is where the magic begins! Up top, where you usually see "Design," click that dropdown menu. You'll see "Render" as an option. Click it, and boom! The whole interface changes. You’ll notice new tools popping up for appearance, scene settings, decals, and the big render button.
Step 3: Applying Appearances (Materials Matter!)
This is probably the most crucial step for realism. The default grey look of Fusion 360 models isn't going to cut it. You need to tell Fusion what your object is made of. Is it plastic? Metal? Wood? Glass?
Look for the "Appearances" icon (it looks like a checkerboard sphere) in the toolbar. Click it, and a library will pop up on the right. Fusion 360 has a massive built-in library of materials, and it's fantastic!
Here’s what I usually do:
- Browse the Library: Go through the categories. For 3D prints, you'll mostly be looking at "Plastic," "Paint (Glossy/Matte)," and sometimes "Metal" if you're simulating inserts or metallic filaments.
- Drag and Drop: Find a material you like (e.g., "Plastic (Glossy) > ABS Plastic (White)") and just drag it directly onto your model. You can apply it to the whole body, or if you have multiple bodies/components, you can apply different materials to different parts. This is great for multi-color prints or simulating different filament types.
- Customize! This is where it gets fun. Once you’ve applied a material, it will appear under "In Design" at the top of the Appearances window. Double-click on it. A dialog box will open, allowing you to change its color, roughness, reflectivity, and other properties. Want a specific shade of blue? Punch in the RGB values. Want a super matte finish like some silk PLA? Increase the roughness. Want it to look like a high-gloss resin print? Go for maximum shine!
Pro Tip: Fusion 360’s materials are surprisingly good at simulating real-world properties. Play around with the "roughness" and "reflectivity" sliders. A lower roughness value usually means a shinier, smoother surface, while higher roughness makes it look more matte or textured. For mimicking PLA or PETG prints, I usually go for a slightly rougher plastic appearance than, say, a polished ABS.
Step 4: Setting the Scene (Lighting is Key)
Just like in real photography, lighting makes all the difference. Fusion 360 handles this with "Scene Settings" (the icon looks like a light bulb). Click it, and another panel slides out.
Environments: This is basically your virtual photo studio. Fusion 360 comes with a bunch of pre-set environments (called "HDRI environments").
- Browse the Library: Under "Environment Library," you’ll find options like "Soft Light," "Sharp Highlights," "Grid Light," "Plaza," "Rim Highlights," etc. Each one offers a different lighting setup and background. "Soft Light" or "Photobooth" are great starting points for product shots because they provide even, diffused lighting.
- Drag and Drop: Just like with materials, drag an environment onto your canvas. Watch how your model instantly changes!
- Customization: Under "Settings" in the Scene Settings panel, you can further tweak the environment.
- Brightness: Make your scene brighter or darker.
- Position (Rotation): This is super important! Rotating the environment changes where the light sources hit your model. Experiment until you get nice highlights and shadows that define your design.
- Background: Don’t want the busy environment image as your background? You can change it to a solid color (often a simple white or light grey works best for product shots), or even upload your own custom image. A plain white background is usually my go-to for e-commerce listings.
- Ground Plane: You can turn on or off the ground plane, adjust its color, and even add a reflection or roughness to it. This helps ground your model and make it look like it's actually sitting on a surface.
- Perspective vs. Orthographic: For renders, always use "Perspective." Orthographic is great for engineering drawings but makes your renders look flat and unrealistic.
- Focal Length: This simulates different camera lenses. A shorter focal length (e.g., 20-35mm) gives a wider, slightly distorted "fish-eye" look, while a longer focal length (e.g., 80-120mm) compresses the scene, making it feel more zoomed in and professional for product shots. I usually stick to 50-85mm for my product renders; it's a good balance.
- Depth of Field (DOF): This is gold! It allows you to blur the background, making your product really pop and adding a professional touch. Turn it on, then click on the part of your model you want to be in focus (the "Focus Point"). Then adjust the "F-Stop." A lower F-Stop (e.g., F/2.8, F/4) means a shallower depth of field (more blur), while a higher F-Stop (e.g., F/11, F/16) means more of the scene will be in focus. For product photos, a subtle DOF can work wonders.
- Quality: You have options like "Standard" and "Final." For high-quality product photos, always go with "Final." It takes longer but delivers much better results with smoother lighting and reflections.
- Render Type:
- Local Render: This uses your computer's CPU or GPU. If you have a powerful machine, this can be quick. The downside is it ties up your computer until it's done.
- Cloud Render: This sends your render job to Autodesk's servers. It costs "Cloud Credits" (which Fusion 360 users get some for free, and can purchase more if needed – but for hobbyist licenses, there's usually a generous free tier for renders). The HUGE advantage here is that it doesn't tie up your computer. You can keep working on other designs while your render is churning away in the cloud. I personally use Cloud Render almost exclusively for "Final" quality renders; it’s just so much more convenient.
- Output: This is about the size and format of your final image.
- Image Size: Choose a high resolution! For website banners or detailed product listings, aim for something like 1920x1080 or even 4K (3840x2160). Don't skimp here; a higher resolution means a sharper image, even if you scale it down later.
- Format: PNG is usually best for renders as it supports transparency (if you have a transparent background) and is lossless. JPG is also an option, but PNG is generally preferred for quality.
- Don’t Overdo It: Keep your scene simple. A clean, well-lit render of your product on a plain background is usually far more effective than a cluttered scene with too many elements. The focus should be on your design.
- Experiment, Experiment, Experiment: There’s no single "best" setting. Play with different environments, material properties, and camera angles. What works for a sleek phone case might not work for a textured sculpture. And sometimes, you just stumble upon a setting that makes your design sing!
- High Resolution Always: Even if you think you only need a small image, render it at a high resolution. You can always scale down a high-res image without losing quality, but you can’t magically make a low-res image sharper.
- It Takes Practice: Your first few renders might not be perfect. That's totally fine! Like any skill, it gets better with practice. Stick with it.
- Consider Your Target Audience: Are you selling intricate models for fellow enthusiasts? Or simple, elegant home decor? Tailor your rendering style to appeal to that audience.
This part takes a bit of trial and error. Just keep playing with different environments and their rotation until your model looks perfectly lit.
Step 5: Camera Control (Framing Your Shot)
This is where you become the photographer. Fusion 360 gives you full control over your virtual camera. You can zoom in/out, pan, and orbit just like you would in the design workspace. But there are a few extra goodies in the "Camera" section of the Scene Settings panel:
Position your model attractively. Think about angles that highlight its best features. Sometimes a slight upward angle works, other times a direct frontal shot. Experiment!
Step 6: Adding Decals (Logos and Labels)
Got a logo you want to put on your design? Or a label? Fusion 360’s "Decal" tool is perfect for this. Click the Decal icon, select the face you want to apply it to, and then browse for your image file (PNGs with transparency work great!). You can then scale, rotate, and position the decal precisely on your model. It's an excellent way to brand your designs without having to model the logo into the geometry itself, which, honestly, would be way more work.
Step 7: It's Time to Render!
Alright, you've set up your materials, lit your scene, and framed your shot. Now for the grand finale! Click the "Render" icon in the toolbar (it looks like a teapot – a classic rendering software icon).
A new dialog box will appear with a few crucial settings:
Once you hit "Render," a "Render Gallery" window will open, showing you the progress of your render. For cloud renders, you can even close Fusion 360 and come back later; the gallery will show you when it's done. And when it is, simply download it!
Beyond Fusion 360: A Touch of Post-Processing
Even the best render can benefit from a tiny bit of post-processing. I'm not talking about anything elaborate, just minor tweaks in a free program like GIMP or even built-in photo editors on your computer. A slight bump in contrast, a touch of brightness, maybe a tiny bit of sharpening – these small adjustments can take an already great render and make it truly spectacular. But honestly, most of the heavy lifting is done in Fusion 360.
My Business & Renderings: Real-World Impact
At Artopia Collections, good renders are non-negotiable. When I first started, my product photos were… well, let's just say they were "authentic." My phone camera, whatever background was handy (usually my workbench, complete with filament scraps and a half-eaten samosa – don't judge!). Sales were slow. People couldn't quite grasp the quality of my 3D printed unique products from those pictures.
But once I started integrating Fusion 360 renders, the change was almost immediate. My website looked more professional. My Instagram feed went from "hobbyist" to "boutique." Enquiries picked up. Clients appreciated seeing crisp, clean images of products before they were even printed. It instilled a sense of trust and professionalism that I just couldn't achieve with my initial phone snaps.
I can show a client a product in ten different colors and finishes in minutes without wasting a single gram of expensive filament. Imagine having to print out a prototype with an expensive specialized filament, like say, carbon fiber PETG, which can cost ₹3,000-₹4,000 per kg, just to decide the client doesn't like the look. Fusion 360 renders save me from that headache, and that cost!
Plus, it helps me spot design flaws or aesthetic issues before committing to a physical print. Sometimes a detail that looks fine in the design workspace looks awkward when rendered with realistic lighting. It's like a free quality check.
A Few Last Tips from My Experience
Look, I've seen some incredible prints come off machines like the Creality Ender 3 V3 KE, or even my old Anycubic i3 Mega, using filaments like eSUN PLA+ or Overture PETG. But even the best print needs to be showcased properly. Don't let your hard work be diminished by poor photography or presentation. Learn to leverage the power of Fusion 360 rendering. It's a skill that will not only elevate your designs but also significantly boost your small business.
So, go on, give it a try! Transform those digital blueprints into stunning, professional product photos. And hey, if you're looking for some great quality filament to bring those rendered designs to life, check out some options on Amazon.in. I personally recommend something like eSUN PLA+ filament – it's reliable and comes in a great range of colors. And if you're thinking about upgrading your printer or getting started, a solid machine like the Creality Ender 3 V3 KE can be a fantastic workhorse for a small business!
Happy rendering, and remember to share your stunning creations with the world!