How Does a 3D Printer Work? Simple Explanation with Diagrams
Ever wondered how a 3D printer transforms a digital file into a physical object? This post provides a simple, diagram-rich explanation of the entire 3D printing process, step-by-step.
Ever Wondered How a 3D Printer Pulls Off That Magic? LetâÂÂs Unwrap It!
Gosh, I still remember the first time I saw something actually materialize out of thin air â well, out of plastic, but you get the idea! It was a tiny little chess piece, printed layer by excruciating layer right before my eyes. My jaw dropped. I mean, we've all seen movies where objects pop into existence, right? But to see it happen in real life? That was it for me. I was hooked. Fast forward a few years, and here I am, running a small 3D printing business right here in India, turning digital dreams into tangible realities every single day. And trust me, it still feels like magic sometimes, even after all these years and countless failed prints (we don't talk about those, shhh!).
But the thing is, itâÂÂs not *actually* magic. ItâÂÂs brilliant engineering, pure and simple. And today, I want to pull back the curtain and show you how a 3D printer works. No fancy jargon, just a simple explanation, almost like weâÂÂre sitting over a cup of chai, looking at one of my trusty machines at work. You ready? Let's dive in!
Additive vs. Subtractive: The Fundamental Difference
Before we get into the nitty-gritty, let's understand a core concept. Most traditional manufacturing, like carving wood or machining metal, is what we call *subtractive*. You start with a big block of material and you cut away everything you don't need until you're left with your desired object. Think of a sculptor chiseling away at a marble block.
A 3D printer, on the other hand, does the exact opposite. It's *additive*. It builds an object up, layer by tiny layer, adding material only where it's needed. This is why 3D printing is often called Additive Manufacturing. ItâÂÂs like building something with LEGOs, but instead of pre-formed bricks, youâÂÂre precisely laying down microscopic strands of molten plastic (or other materials, but we'll focus on plastic for now).
The Digital Blueprint: Where Everything Begins
So, how does the printer know what to print? It doesn't have eyes, right? This is where the digital world comes in. Every physical object starts as a digital 3D model. You can either design this yourself using software like Fusion 360, Blender, Tinkercad (great for beginners, by the way!), or download models from sites like Thingiverse or Cults3D. These models are essentially digital blueprints, describing the object's shape, size, and every curve and corner.
Once you have your 3D model, it's usually saved in a file format called an STL (Standard Tessellation Language) or OBJ. This STL file is basically a mesh of tiny triangles that defines the surface of your object. Think of it like a very detailed instruction manual.
The Slicer: The Unsung Hero
Now, here's where things get really clever. You can't just give an STL file directly to a printer. The printer doesn't understand complex shapes; it only understands movements and temperatures. So, we use a piece of software called a "slicer." Popular ones include PrusaSlicer, Cura (my personal favourite), and Simplify3D. What does a slicer do? It literally "slices" your 3D model into hundreds, sometimes thousands, of thin, horizontal layers. Imagine taking a cucumber and slicing it up â that's what the slicer does to your digital model.
For each layer, the slicer generates a set of instructions, telling the printer exactly how to move, how much plastic to extrude, how fast to go, and at what temperature. These instructions are called G-code. G-code is like the printer's native language. It's a series of commands like "move X to this coordinate, Y to that coordinate," "heat nozzle to 200ðC," "extrude 10mm of filament." This G-code file is what you actually load onto your printer (usually via an SD card or USB drive).
Meet the Players: Inside Your 3D Printer (FDM Explained)
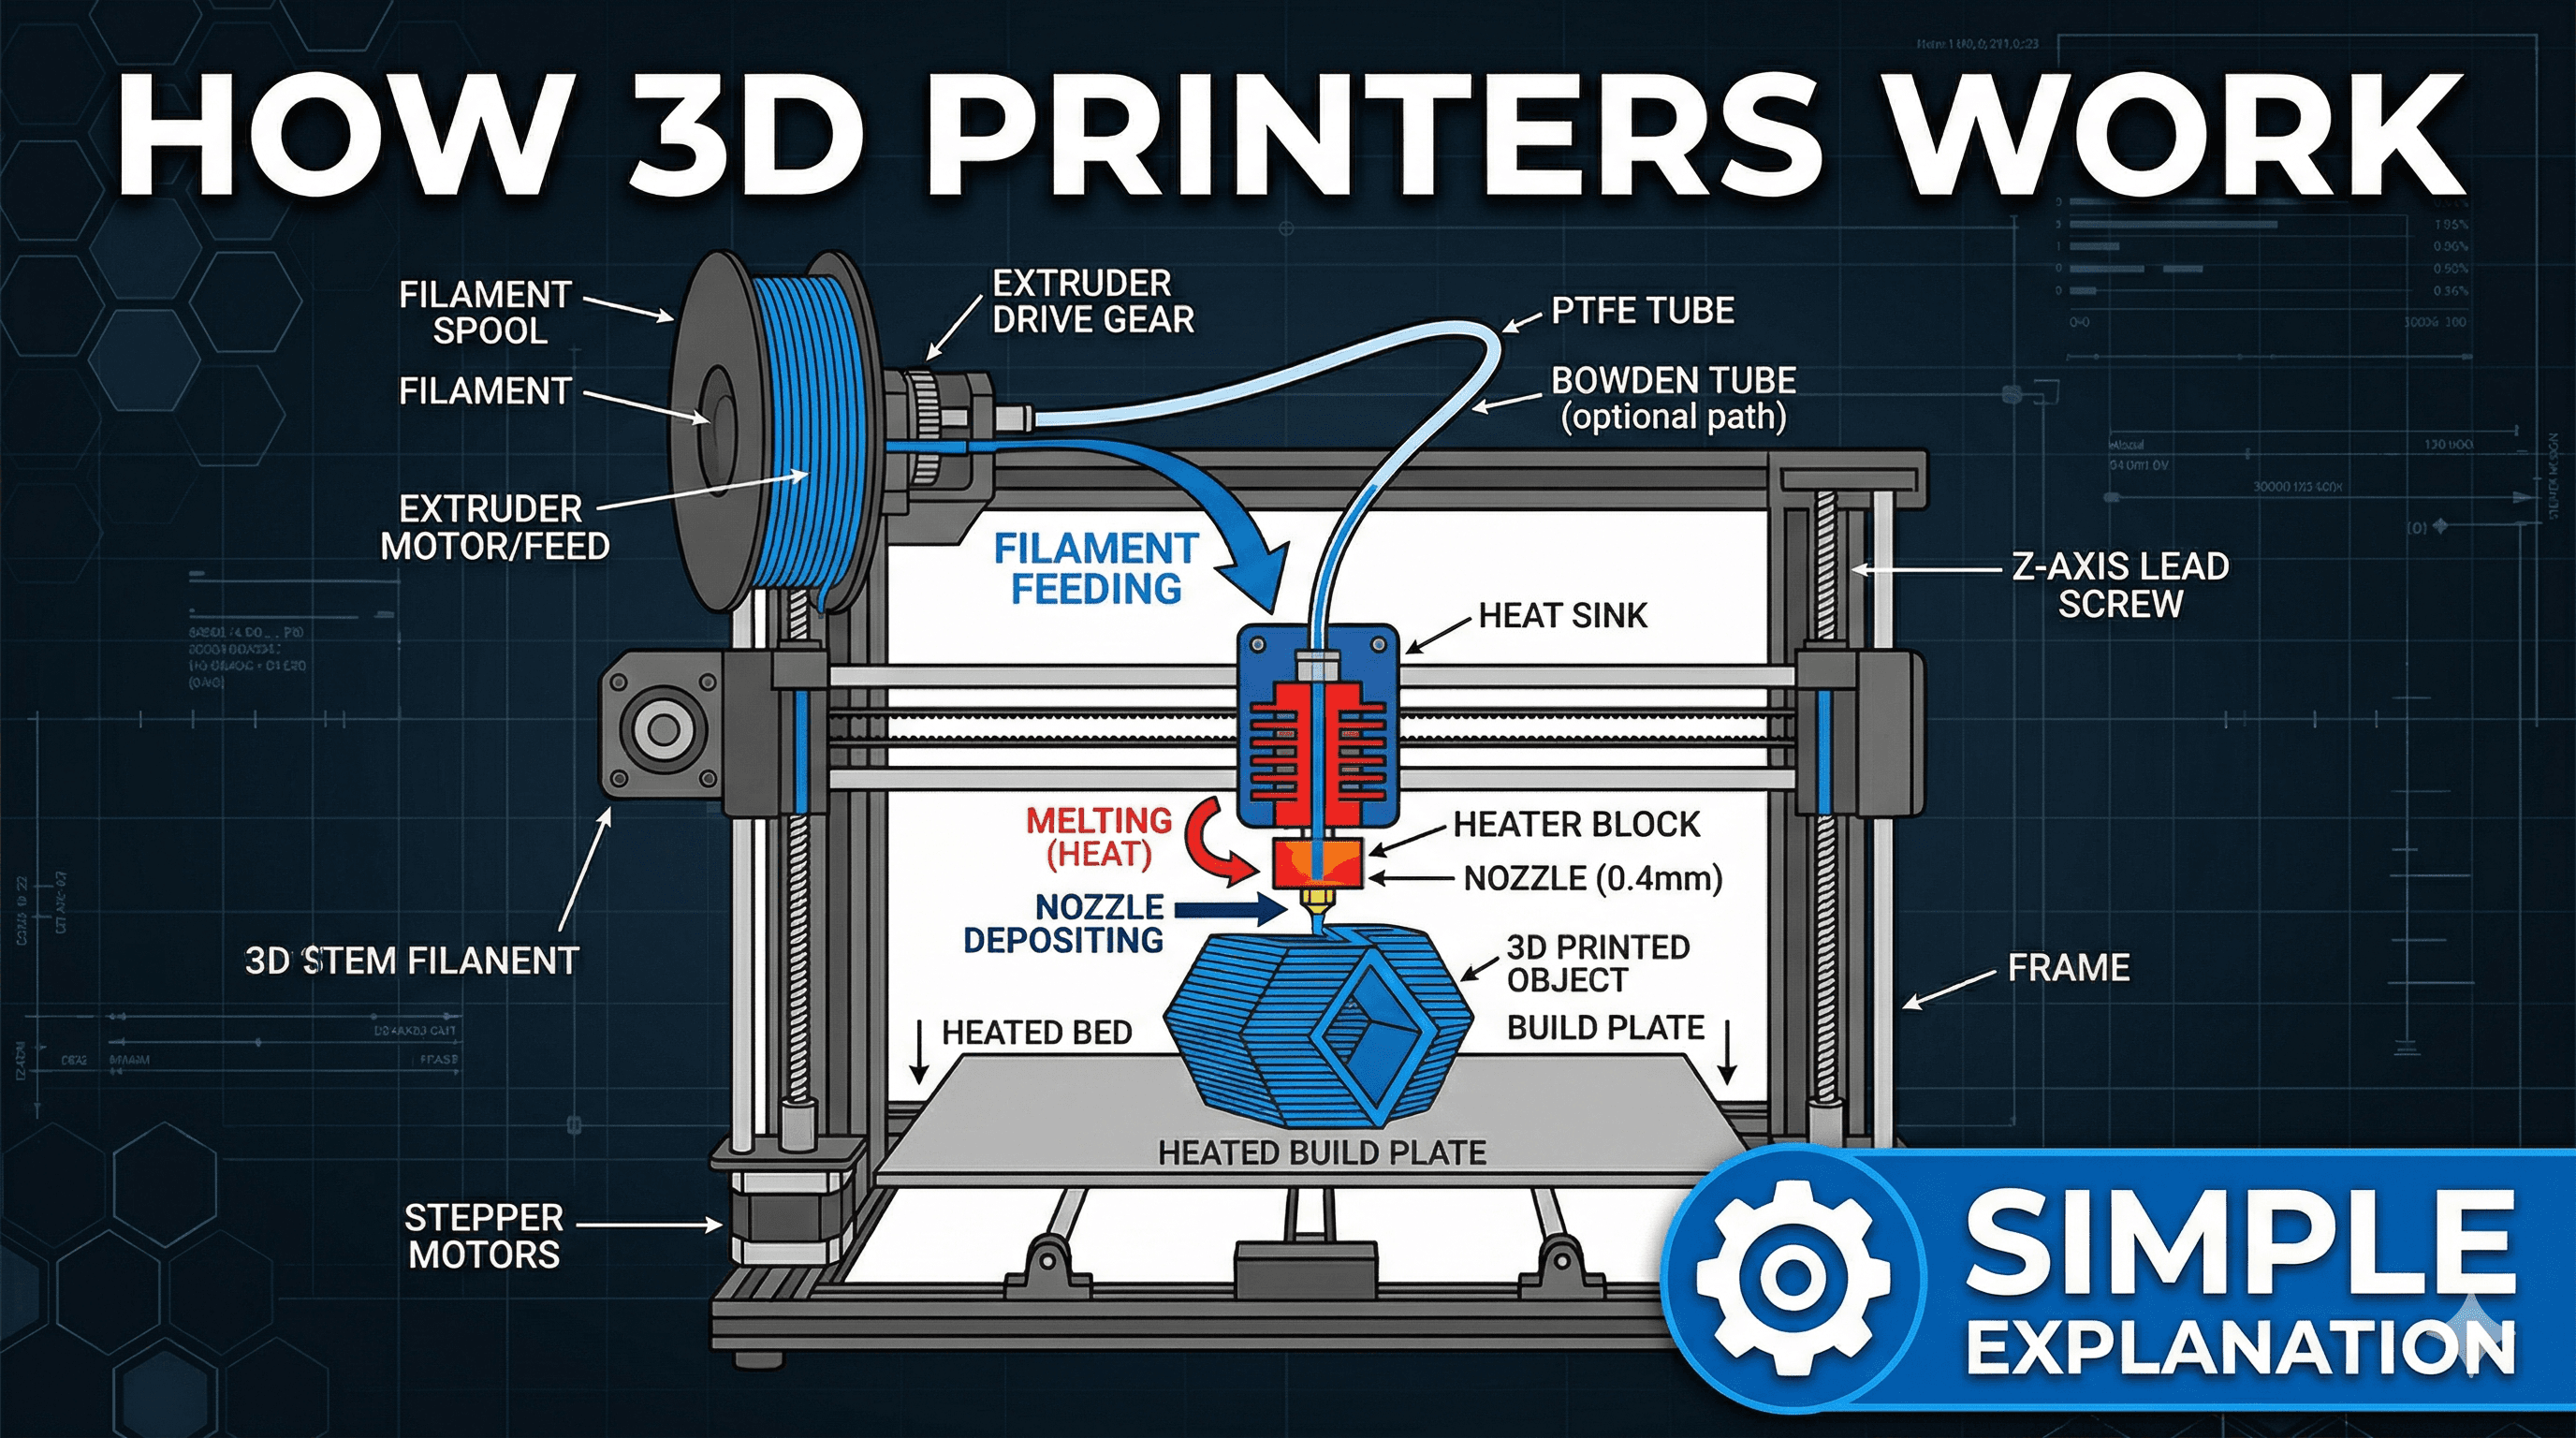
Most desktop 3D printers, especially the ones enthusiasts like me use for hobbies and small businesses, work on a principle called Fused Deposition Modeling (FDM), sometimes called Fused Filament Fabrication (FFF). It's the most common and easiest to understand. Here's a breakdown of the key components, imagining them working together:
1. The Brain: Mainboard and Firmware
Every printer has a main circuit board, its "brain." This board interprets the G-code instructions you've loaded. It tells all the other components what to do and when to do it. The "firmware" is the operating system for this brain â it's the code that makes the printer smart enough to understand G-code and control its movements and temperatures precisely. Good firmware makes a huge difference in print quality, trust me!
2. The Muscles: Motors and Belts (X, Y, Z Axes)
To build an object layer by layer, the printer needs to move very precisely in three dimensions:
- X-axis: Left and right movement.
- Y-axis: Forward and backward movement.
- Z-axis: Up and down movement (for building layers).
These movements are handled by stepper motors â super accurate motors that move in tiny, discrete steps. They're connected to belts and lead screws that precisely position the print head (or the print bed, depending on the printer's design). For example, on a popular printer like the Creality Ender 3 V2 Neo (a fantastic starter printer, by the way, often goes for around â¹25,000-â¹30,000 on Amazon.in), the print head moves along the X and Y axes, while the print bed moves down on the Z-axis after each layer.
3. The Heart: The Extruder and Hotend
This is where the magic really starts happening with the plastic. The extruder assembly has two main parts:
- The Cold End (Extruder Gear): This is usually a motor with a geared mechanism that grips the filament (the plastic string) and pushes it precisely towards the hot end. Think of it like a conveyor belt for your plastic.
- The Hot End (Hotend, Nozzle, Heater Block): The filament travels from the cold end into the hot end. Here, it passes through a heater block with a heating element and a thermistor (to monitor temperature). The plastic melts as it goes through, and then it's pushed out through a tiny nozzle (typically 0.4mm in diameter â about the size of a pencil tip!). This is where the molten plastic is precisely laid down.
The nozzle temperature is super important. For common plastics like PLA, it's usually around 190-220ðC. Too cold, and the plastic won't melt properly; too hot, and it can burn or become too runny.
4. The Foundation: The Print Bed
The print bed is the surface where your object is built. It's crucial for the first layer to stick properly. If the first layer doesn't adhere well, the whole print is probably going to fail. Many modern printers have heated beds, which help with adhesion and prevent warping, especially for materials like ABS. Materials like PLA generally stick well to glass, PEI sheets, or magnetic flex plates. Proper bed leveling (making sure the bed is perfectly flat and the right distance from the nozzle) is a skill every 3D printer owner learns, often through trial and error (oh, the hours IâÂÂve spent leveling beds!).
5. The Material: Filament!
And finally, the star of the show: the filament. This is the raw material, usually a plastic strand wound around a spool. The most common type is PLA (Polylactic Acid), which is derived from renewable sources like cornstarch, so it's relatively eco-friendly and easy to print with. Other popular types include PETG (stronger than PLA, good for functional parts), and ABS (very strong, but trickier to print due to warping). We've got tons of great filament brands available in India now, from international ones like eSun and Overture to local brands providing good quality. A good 1kg spool of PLA usually costs anywhere from â¹1500 to â¹2500, depending on the brand and colour. You can find a huge variety of PLA filament 1.75mm on Amazon.in if you're looking to start your collection!
The Printing Process: Step-by-Step
So, you've got your G-code file ready, and your printer is assembled. What happens next?
- Loading the Filament: You feed the filament from the spool into the extruder assembly. The printer's gears grab it and feed it towards the hotend.
- Preheating: You tell the printer to preheat the hotend and the print bed to the temperatures specified in your G-code (e.g., 200ðC for the nozzle, 60ðC for the bed for PLA).
- First Layer Magic: Once temperatures are stable, the print head moves to the starting position. It then extrudes a line of molten plastic for the very first layer, following the G-code instructions. This first layer is critical, remember? If it sticks perfectly, you're usually golden.
- Layer by Layer: After the first layer is complete, the print bed moves down a tiny increment (or the print head moves up). Then, the printer lays down the second layer directly on top of the first. This process repeats, layer after layer after layer, slowly building up the object from the bottom up. Each layer fuses to the one below it, creating a solid object.
- Cooling: As each layer is laid down, it needs to cool and solidify quickly so it can support the next layer. Small fans on the print head help with this.
- Finishing Up: Once all layers are complete, the printer stops extruding, the print head moves away, and the bed cools down. You can then carefully remove your finished print! Sometimes you might need to do a little bit of post-processing, like removing "supports" (temporary structures printed to hold up overhangs) or smoothing surfaces.
Why Is This So Cool? My Honest Take.
Honestly, understanding *how* a 3D printer works just makes me appreciate the technology even more. ItâÂÂs not just a fancy gadget; itâÂÂs a powerful tool for creation, innovation, and even problem-solving. Think about it:
- Prototyping: Businesses can quickly make prototypes of new products, test them, iterate, and refine designs in hours instead of weeks.
- Customization: From bespoke phone stands to custom-fit medical prosthetics, the possibilities for personalized items are endless. We even print custom trophies and awards for local schools here in Ghaziabad!
- Education: It brings STEM subjects to life, letting students touch and feel concepts they only read about.
- Art & Design: For artists and designers, itâÂÂs a whole new medium to explore complex geometries and intricate details that would be impossible with traditional methods.
I personally think the biggest impact for us in India is how it democratizes manufacturing. Someone with an idea and an affordable printer can literally start a small business from their home, making products that were once only available from big factories. It's truly empowering.
Ready to Jump In?
I know, that was a lot to take in! But I hope this simple explanation gives you a clearer picture of how these amazing machines bring digital designs to life. It's a blend of software, mechanics, and material science, all working in harmony.
If you're still curious, or maybe even thinking about getting your own 3D printer (trust me, it's a rabbit hole, but a fun one!), don't hesitate to reach out or explore more. We've got some pretty cool things we've made and designed right here at ArtOpia, so feel free to check out our latest creations and products if you want to see what's possible!
Happy printing, and may your first layers always stick perfectly!