How to Design Custom Drawer Organizers with Exact Measurements
Transform your cluttered drawers into organized havens with custom-designed organizers. This post walks you through the precise measurements and steps needed to build them yourself.

Ever opened a drawer, looked inside, and felt that familiar pang of despair? Yeah, you know the one. That tangled mess of chargers, stray pens, half-used stationery, tiny tools, or even those elusive bobby pins that seem to multiply overnight. It's a universal problem, isn't it? And honestly, I've tried all sorts of off-the-shelf organizers, those flimsy plastic trays from the market, even repurposed shoebox lids. But here's the deal: they never quite fit right, they're either too shallow, too deep, or leave awkward gaps where more clutter just… happens. My friends, that’s where 3D printing swoops in like a superhero in a vibrant filament cape!
For years, running Artopia Collections, my small 3D printing business here in India, I've seen firsthand how this incredible technology transforms ideas into tangible solutions. And one of the most satisfying, genuinely useful applications? Custom drawer organizers. Forget the frustration of ill-fitting solutions; we're talking about designing something that perfectly hugs every internal curve of your drawer, giving every single item its own bespoke home. It's not just about tidiness; it’s about peace of mind, about saving time, and honestly, it just feels good to open a perfectly organized drawer. Let's dive in, shall we?
Why Go Custom? The Unbeatable Edge of 3D Printing
You might be thinking, "Hey Vidyut, isn't buying a ready-made organizer easier?" And sure, it might seem that way initially. But let me tell you, the difference is night and day. Imagine this: you have a specific drawer in your kitchen for spices, but some of your jars are unusually tall, and others are those small, squat ones. A standard organizer won't accommodate both efficiently. It'll leave wasted space, or some jars will just flop around. With 3D printing, you can design individual compartments tailored to each spice jar's exact dimensions. Or maybe it's your office desk drawer, overflowing with USB drives, SD cards, sticky notes, and a gazillion paperclips. You can literally model a tiny slot for each type of item! That's the power, my friend.
No more gaps. No more wobbly compartments. Just a snug, perfect fit that maximizes every single millimeter of your drawer space. Plus, you get to choose the color! Want a vibrant blue for your kids' stationery drawer? Or a sleek black for your tools? The world (or at least your filament spool) is your oyster.
The Nitty-Gritty: How to Design Your Perfect Organizer
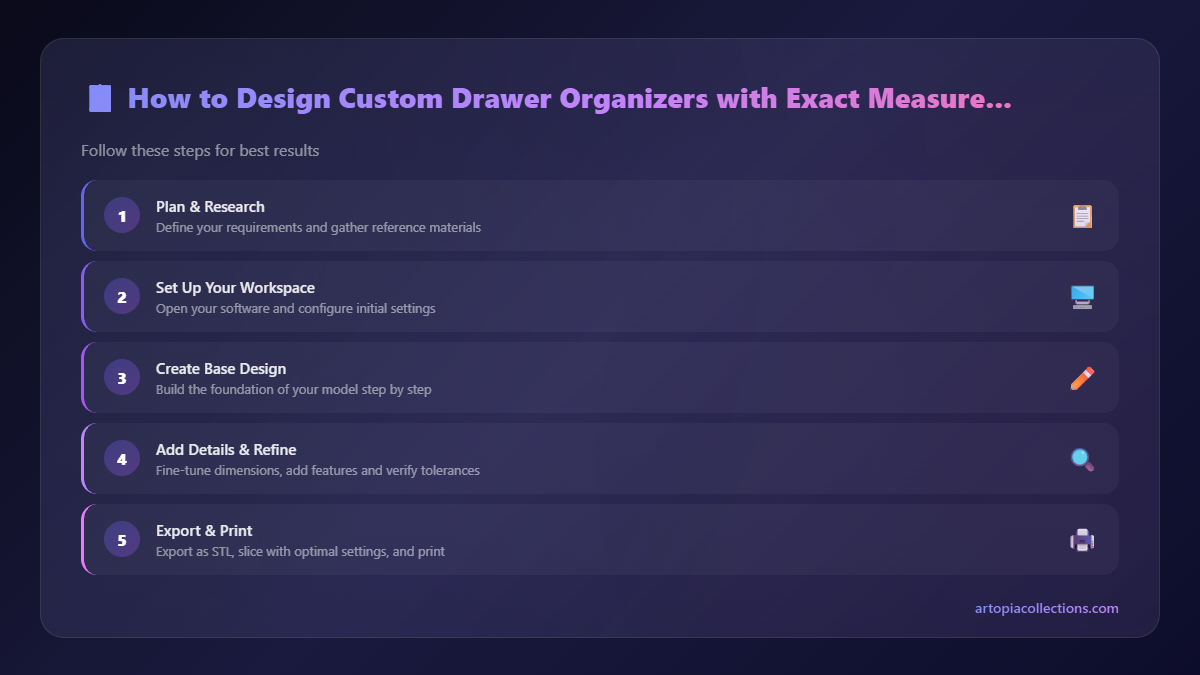
Alright, let's get down to business. Designing custom organizers isn't rocket science, but it does require a bit of patience and precision. Trust me, the results are absolutely worth it.
Step 1: Measurement is Absolutely Everything!
This is where most people rush, and then regret it later. Seriously, don't skimp on this step. Grab a good tape measure, and better yet, invest in a decent pair of digital calipers. You can find them on Amazon for around ₹500-₹1000, and they're incredibly useful for 3D printing. Check out some good options for digital calipers here.
Here’s what you need to measure for your drawer:
- Internal Length: Measure from the inside front edge to the inside back edge.
- Internal Width: Measure from the inside left edge to the inside right edge.
- Internal Depth (Height): Measure from the inside bottom surface to the top edge of the drawer.
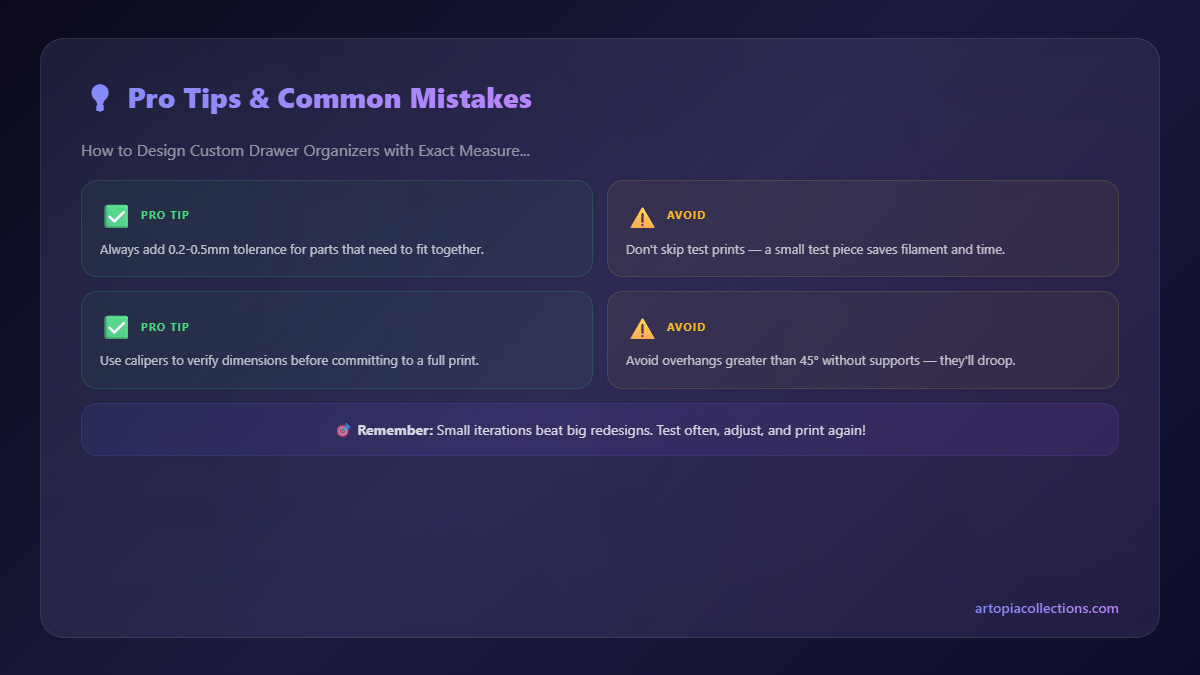
And here's a crucial tip: measure in multiple places. Drawers, especially older wooden ones, aren't always perfectly square. Take measurements at the front, middle, and back, and use the smallest measurement for each dimension to ensure your organizer will fit without snagging. I usually recommend subtracting another 0.5mm to 1mm from your smallest measurement as a safety buffer – it's always better for it to be a tiny bit loose than too tight to fit!
Next, think about what's going into the drawer. Lay out all the items you want to organize. Measure their individual lengths, widths, and heights. This will help you decide on the size and number of compartments you need. Don't be afraid to sketch it out on paper first; a rough doodle can save you a lot of time in the CAD software.
Step 2: Choosing Your Design Software
Now that you have your measurements, it's time to bring your design to life. There are fantastic free options available:
- Tinkercad: This is my absolute go-to recommendation for beginners. It's browser-based, incredibly intuitive, and uses simple drag-and-drop shapes. You can create surprisingly complex designs with it once you get the hang of combining and subtracting shapes.
- Fusion 360: If you're looking for something more powerful and are willing to learn a slightly steeper curve, Fusion 360 by Autodesk is amazing. It's free for personal use and small businesses (which is fantastic for us here at Artopia Collections!). It offers parametric design, meaning you can easily go back and change dimensions later without rebuilding everything. This is super handy for iterative designs.
I personally tend to use Fusion 360 for most of my custom design work because of its precision and flexibility, but for a simple box-type organizer, Tinkercad is more than sufficient and much quicker to pick up.
Step 3: Designing in Your Chosen Software (General Workflow)
Let's walk through the basic idea:
A. Create the Base Box:
Start by creating a solid rectangle or cube that represents the external dimensions of your organizer (based on your drawer measurements). For example, if your drawer is 300mm x 200mm x 50mm deep, you'd make a block slightly smaller, say 299mm x 199mm x 49mm.
B. Hollow it Out / Create Walls:
Now, you need to make it a container. In Tinkercad, you'd use a "hole" shape (another cube) that's slightly smaller than your base and align it perfectly, then group them. This subtracts the inner volume, leaving you with walls. In Fusion 360, you'd typically sketch a rectangle on the top face of your base block, offset it inwards by your desired wall thickness, and then extrude that inner rectangle downwards to create the cavity. I usually recommend a wall thickness of 1.2mm to 2mm. Less than 1.2mm can be too flimsy, and much more than 2mm just wastes filament and print time for an organizer.
C. Add Compartments:
This is where the magic happens. You can either add new solid "wall" shapes inside your main container (using your item measurements as guides) and combine them, or (my preferred method in Fusion 360) sketch out all your compartment lines on the bottom of the organizer and then extrude them upwards to create the dividing walls. Think about what goes where. Do you need a long slot for rulers? Small squares for paperclips? A wide rectangle for a stapler? Design each partition with purpose.
Pro Tip: Remember that 0.5mm buffer I mentioned for the overall organizer? Apply that to your internal compartment dimensions too. If your pen is exactly 10mm wide, make the slot 10.5mm or even 11mm. You want your items to fit easily, not get stuck.
D. Refinements (Optional but Recommended):
- Fillets/Chamfers: Adding a small radius (fillet) to internal corners or a slight angle (chamfer) to top edges can make the organizer look more professional and less sharp. It also helps with print adhesion on the first layer sometimes, honestly.
- Text/Labels: Want to label "Pens" or "USB Drives"? You can easily add embossed or debossed text in both Tinkercad and Fusion 360. This is super helpful for maintaining order!
E. Export as STL:
Once you're happy with your design, export it as an STL file. This is the standard file format that your 3D printer understands.
Step 4: Slicing and Printing!
Now you've got your STL file, it's time to prepare it for your printer using a "slicer" software. Popular ones include Cura (from Ultimaker, but works with most printers) and PrusaSlicer (great if you have a Prusa printer, but also supports others). I mostly use Cura for my Ender 3 Pro and Anycubic Kobra 2.
Here are some basic settings I usually use for drawer organizers:
- Material: For most organizers, PLA filament is perfect. It's affordable (a good 1kg spool from brands like eSUN, Overture, or Eryone usually costs between ₹1800-₹2500 here), easy to print with, and comes in a huge variety of colors. If it's for something that will see higher temperatures (like near a sunny window or in a car), or needs more durability, PETG might be a better (though slightly pricier, around ₹2200-₹3000) option. But for drawer inserts, PLA is generally king.
- Layer Height: 0.2mm is my standard. It gives a good balance between detail and print speed. You could go down to 0.16mm for smoother finishes or up to 0.28mm for faster prints, but 0.2mm is a great middle ground.
- Infill: Organizers don't need to be super strong. I usually go with 5-15% infill (cubic or grid pattern works well). Anything more is overkill and just adds print time and uses more filament.
- Walls/Perimeters: 2 or 3 walls are usually sufficient. This gives enough rigidity to the structure.
- Supports: Typically, you won't need supports for drawer organizers, as they are mostly straight walls. If you have very complex overhangs, you might, but for standard compartments, you're good.
Once you've set your slicer settings, save the G-code file to an SD card or transfer it to your printer. Then, hit print! Grab a chai, because these prints can sometimes take several hours, especially for larger organizers.
Costs and Considerations
Let's talk brass tacks. What does this actually cost?
- Filament: A typical medium-sized organizer might use anywhere from 50g to 200g of filament. If a 1kg spool costs ₹2000, then 100g costs ₹200. It's surprisingly affordable per item once you have the spool.
- Electricity: While not a huge factor for a single print, a 3D printer running for 5-10 hours does consume power. My Creality Ender 3 Pro might use around 50-100W per hour. So, a 10-hour print might cost ₹5-₹15 in electricity depending on your local rates. It adds up if you're printing constantly for business, but for a home user, it's pretty negligible.
- Time: Your time designing and setting up the print is the real investment here. But it's also the fun part!
In my experience, the biggest "cost" is actually getting started with a printer. A good entry-level FDM printer like the Creality Ender 3 V3 SE or the Anycubic Kobra Neo can be found for around ₹15,000-₹25,000 on Amazon.in. That's a significant upfront cost, but the versatility and problem-solving capabilities you unlock are truly priceless for a hobbyist or a small business like mine.
My Journey and What I've Learned
When I started Artopia Collections, I mostly focused on artistic prints and prototypes. But soon, I realized the immense potential for functional prints in everyday life. Custom drawer organizers became a popular request. People love getting exactly what they need, rather than trying to make do with what's available. I've printed organizers for everything from intricate jewellery and watch parts for a local artisan, to makeup brushes for a friend, to all sorts of tools for a mechanic, and even custom inserts for specific board game components. Each project is a fun little puzzle, honestly.
The thing is, once you start down this path of custom 3D printed organization, you'll look at every cluttered space differently. You'll stop seeing problems and start seeing design opportunities. "Hmm, that kitchen cabinet could use a custom spice rack riser," or "My toolbox needs tailored compartments for these specific wrenches." It's incredibly empowering!
So, if your drawers are crying out for some love, and you're tired of mass-produced solutions that just don't cut it, I urge you to give custom 3D printed organizers a shot. It's a fantastic way to learn a new skill, declutter your life, and create something truly unique and functional. And hey, if you ever feel overwhelmed or need a hand with a complex design, you know who to call (or message!). That's what Artopia Collections is here for, to help you bring those ideas to life, one layer at a time. Go on, measure that drawer, fire up Tinkercad, and unleash your inner organizer!