How to Fix Under-Extrusion: Step-by-Step Troubleshooting
Under-extrusion can ruin your 3D prints, leading to weak layers and gaps. This guide provides a comprehensive, step-by-step troubleshooting process to help you diagnose and resolve the issue quickly.
"Ugh, Not Again!" â Conquering Under-Extrusion and Saving Your Prints (and Sanity!)
You know that feeling, right? Youâve been working on a design for hours, sliced it just so, hit print, and everything sounds good. You walk away, maybe grab a chai, feeling all confident. Then you come back, and your beautiful print looks like itâs been on a diet â thin walls, gaps everywhere, layers barely holding on. Yep, my friend, youâve met under-extrusion. And honestly, itâs one of the most frustrating things in 3D printing. Especially when youâre running a small business like mine here in India, where every failed print is not just wasted filament, but wasted time and potential earnings.
Iâve been there more times than I care to admit. From trying to print custom miniatures for local gamers to making prototypes for small businesses, under-extrusion has tried to derail my plans countless times. But over the years, Iâve developed a pretty solid troubleshooting routine that saves me a lot of headaches (and frankly, a lot of money on wasted filament). So, pull up a chair, grab your own chai, and letâs talk about how we can beat this annoying issue, step-by-step.
What Exactly IS Under-Extrusion?
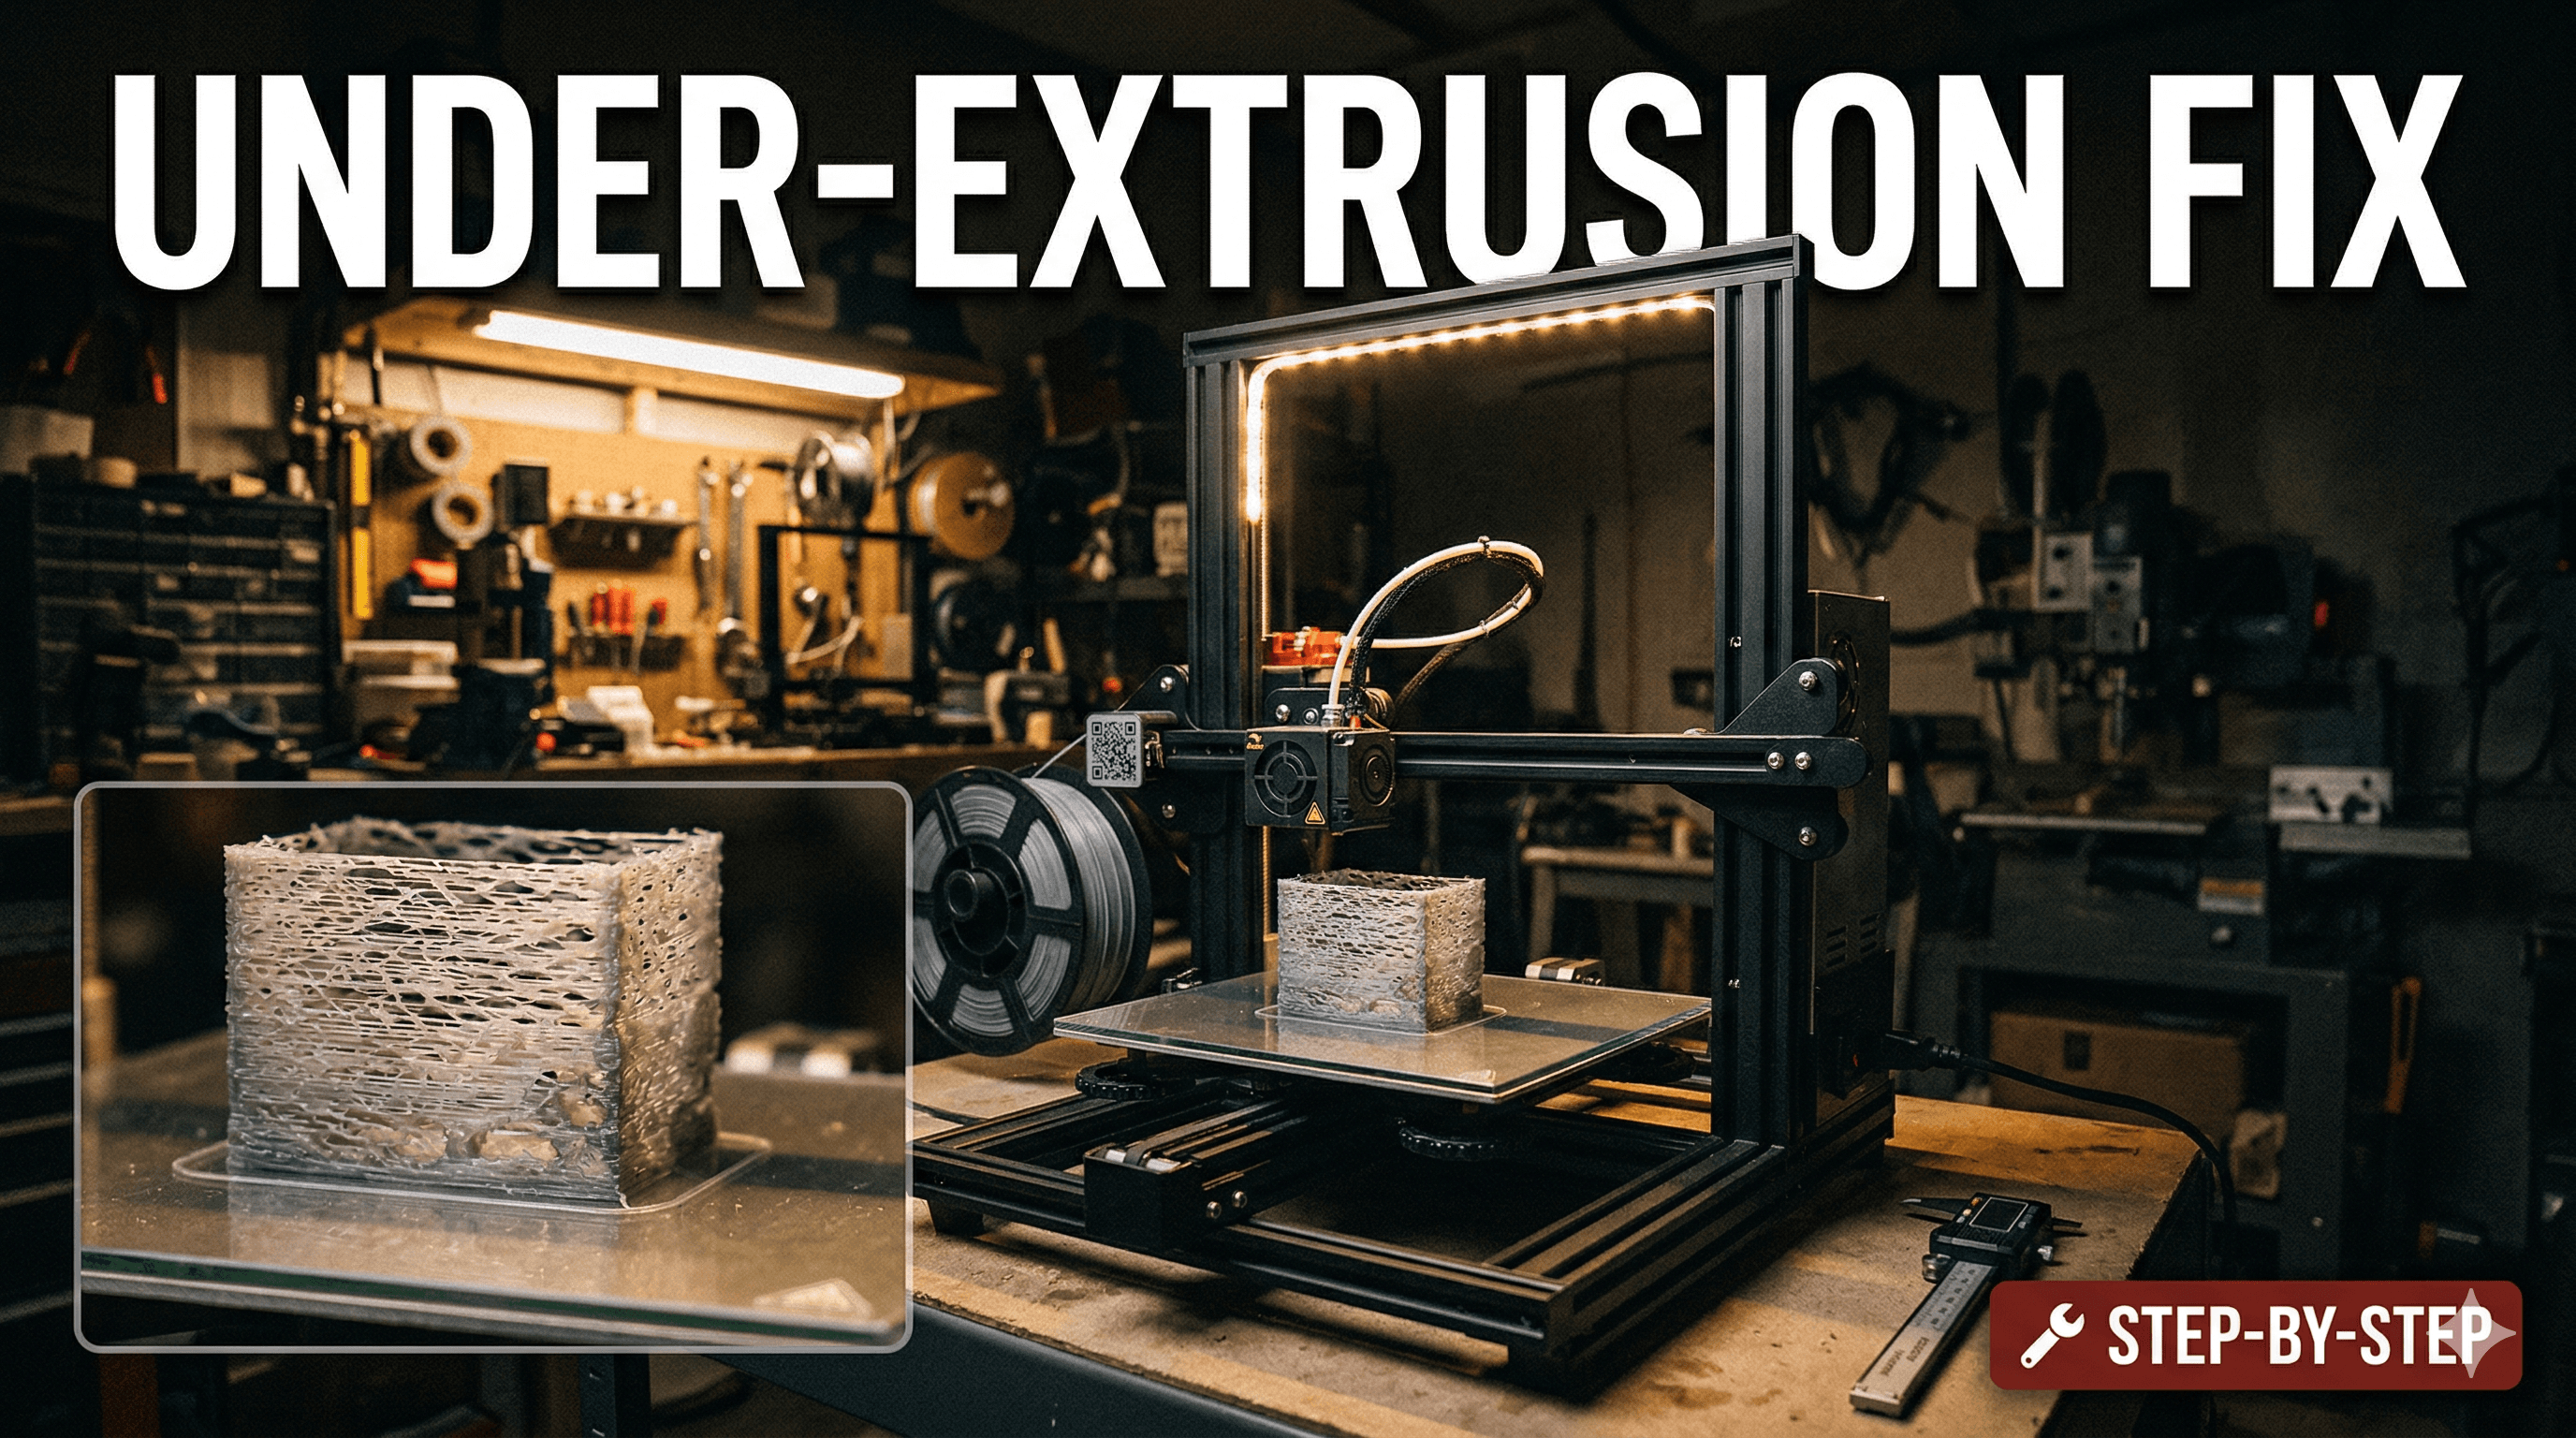
Basically, under-extrusion happens when your 3D printer isnât pushing out enough plastic for the layers it's trying to create. Think of it like a chef trying to spread butter on toast, but the butter knife only has a tiny bit on it. You end up with patchy, weak coverage. On your prints, this manifests as visible gaps in the perimeters, fragile top layers, holes in solid areas, and just overall weak, brittle parts. Itâs like your printer went on a starvation diet, and your prints are the ones suffering the consequences.

Now, the thing is, there isn't just one single cause for under-extrusion. Oh no, that would be too easy, wouldn't it? It's often a combination of factors, or sometimes, just one sneaky culprit hiding in plain sight. But don't worry, we'll go through the most common ones. In my experience, it's usually one of the first few things on this list.
Step 1: The Filament â Your Printer's Food
1. Clogged Nozzle â The Arch Nemesis
This is, hands down, the most common reason for under-extrusion. A partially or fully clogged nozzle restricts the flow of filament, leading to those ugly gaps. Itâs like trying to drink a thick milkshake through a tiny straw.
- How to check: Try manually extruding some filament. If it curls up immediately, comes out in a very thin stream, or doesn't come out at all, you've likely got a clog.
- How to fix:
- The Cold Pull (Atomic Pull): Heat your hotend to about 20-30°C above your normal printing temperature for the filament. Push some fresh filament through. Then, lower the temperature by about 50-70°C (e.g., from 210°C to 140°C for PLA) and as it cools, gently pull the filament out. The idea is for the filament to solidify enough to grab the clog, but not so much that it's stuck. You're looking for a nozzle-shaped tip with the clog attached. You might need to do this a few times.
- Nozzle Cleaning Needles: I keep a set of these handy. Theyâre super thin needles you can poke up into the hot nozzle. They usually cost around â¹200-â¹300 for a pack online. Just heat your hotend to printing temperature, push the needle in and out a few times.
- Replace the Nozzle: Honestly, sometimes itâs just easier to swap out a clogged nozzle, especially if itâs an old brass one. They wear down over time anyway, especially if you print with abrasive filaments like carbon fiber PLA. A pack of five brass nozzles for an Ender 3 or Anycubic Kobra usually costs around â¹400-â¹600. Itâs a small investment for peace of mind.
- Run a Cleaning Filament: Some people swear by cleaning filaments, which are designed to help purge contaminants. I've used them occasionally, and they can be helpful, though not a magic bullet.
2. Wet Filament â The Stealthy Saboteur
Humidity is a big deal here in India, especially during the monsoon season. Filament, particularly PLA and PETG, absorbs moisture from the air. When this wet filament heats up, the water turns to steam, creating tiny bubbles that interrupt the extrusion. You'll hear popping or crackling sounds while printing, and your prints will be noticeably weaker and stringier.
- How to check: Listen for popping sounds. Visually inspect the print for fuzzy textures or poor layer adhesion.
- How to fix:
- Dry it out: You can bake PLA in a conventional oven at 40-50°C for a few hours (be super careful not to go too high!). Or, if youâre serious about it, invest in a dedicated filament dryer. I got mine for about â¹4,500, and itâs been a game-changer for my business. I use something like this one: Filament Dryer on Amazon.in. It really extends the life of your filament, especially those premium rolls.
- Proper Storage: Store your filament in airtight containers with desiccant packets when not in use. You can get a pack of silica gel packets for â¹300-â¹400.
3. Filament Diameter Inconsistency
Not all filament is created equal. Cheap filament (or even some not-so-cheap ones) can have inconsistent diameters. If the filament is thinner than expected in some parts, your printer extrudes less material than it should. If it's thicker, it can get jammed in the Bowden tube or hotend.
- How to check: Use calipers to measure your filament at several points along the roll. It should consistently be 1.75mm (or 2.85mm if that's what your printer uses).
- How to fix: Unfortunately, for a bad roll, thereâs not much to do but discard it or use it for less critical prints. Stick to reputable brands like eSUN, Overture, or even local Indian brands like FlashForge India when buying, even if they cost a little more. Quality control is worth the extra â¹300-â¹500 per spool.
Step 2: Slicer Settings â The Brains of the Operation
1. Extrusion Multiplier / Flow Rate â The Volume Knob
This setting in your slicer (Cura, PrusaSlicer, Simplify3D) tells your printer how much filament to extrude as a percentage of its calculated amount. If itâs too low, you'll under-extrude. Itâs usually set to 100% by default, but sometimes, a filament might perform better at 95% or 105%.
- How to check/fix: Print a simple single-wall cube (without a top or bottom). Measure the wall thickness with calipers. Adjust your flow rate in 0.5-1% increments until the wall thickness matches your nozzle diameter (e.g., 0.4mm for a 0.4mm nozzle). Donât go too crazy with this setting without first checking your E-steps (weâll get to that).
2. Print Temperature â The Flow Factor
If your hotend isn't hot enough, the filament won't melt consistently or flow easily, leading to under-extrusion. It's like trying to squeeze cold honey out of a bottle.
- How to check/fix: Refer to your filament's recommended temperature range. Print a temperature tower. This is a print that changes temperature every few layers, letting you visually see which temperature gives the best layer adhesion and surface finish. Generally, try increasing the temperature by 5-10°C. For PLA, I usually print between 200-215°C depending on the brand.
3. Retraction Settings â The Pullback
Retraction pulls the filament back slightly when the nozzle moves between print areas to prevent stringing. If your retraction speed is too high or the distance is too long, it might pull too much filament back, and not push enough out when it starts a new segment, causing tiny gaps (especially visible on corners).
- How to check/fix: Print a retraction test tower. Adjust retraction speed and distance in small increments. For a Bowden setup (like an Ender 3), I usually start with 5-6mm distance at 40-50mm/s. For direct drive, it's much less, maybe 0.5-1.5mm.
4. Print Speed â The Rush Job
Printing too fast can overwhelm your hotendâs ability to melt filament, especially if it's not a high-flow hotend. The printer tries to push filament through quicker than it can melt, leading to under-extrusion.
- How to check/fix: Try reducing your print speed by 10-20mm/s. If the under-extrusion improves, you've found your culprit. Sometimes, a slower print is a successful print! I personally prefer slower, high-quality prints for my business, even if it takes a bit longer. My customers appreciate the finish, and it cuts down on post-processing.
Step 3: Hardware â The Mechanical Bits
1. E-steps Calibration â The Precision Factor
Your E-steps (Extruder Steps Per Millimeter) tell your extruder stepper motor how many steps it needs to take to push out a specific length of filament. If this value is incorrect, your printer will consistently under-extrude (or over-extrude).
- How to check/fix:
- Heat your hotend to printing temperature (e.g., 200°C for PLA).
- Mark 120mm of filament above the extruder input with a marker.
- Tell your printer to extrude 100mm of filament (most firmware lets you do this via the "Control" -> "Movement" -> "Extruder" menu).
- Measure the remaining filament from the extruder input to your mark. If it's 25mm, your printer extruded 95mm instead of 100mm.
- Calculate your new E-steps:
(Current E-steps * Desired Extrusion) / Actual Extrusion. So if your current E-steps are 93, it would be(93 * 100) / 95 = 97.89. - Update this value in your printer's firmware or via G-code (
M92 E[new_e_steps]thenM500to save). This is crucial.
2. Extruder Arm Tension & Gear Wear â The Grip
The extruder mechanism needs to grip the filament firmly and push it through. If the spring tension is too low, or the extruder gear is worn out, it can slip, causing inconsistent extrusion.
- How to check:
- Gear: Inspect the extruder gear for wear. If the teeth are worn down or clogged with plastic debris, it won't grip well.
- Tension: Try pushing the filament manually through the hotend. Does the extruder gear turn smoothly without skipping? If the spring is too weak, you might hear clicking noises.
- How to fix:
- Clean the gear: Use a brush or needle to remove any plastic bits.
- Adjust tension: Some extruders have an adjustable spring. Tighten it slightly. Be careful not to overtighten, as it can deform the filament.
- Replace the extruder: If the gear is badly worn or the plastic extruder arm is cracked (a common issue on stock Creality extruders!), itâs time for an upgrade. Iâd highly recommend a metal extruder kit. Theyâre super cheap, usually â¹700-â¹1000, and much more durable. You can find them easily on Amazon.in.
3. Hotend Gap / Bowden Tube Issues â The Path Less Traveled
If you have a Bowden setup (where the extruder motor is separate from the hotend), the PTFE (Teflon) tube guides the filament. If thereâs a gap between the end of the Bowden tube and the nozzle inside the hotend, molten plastic can collect there, leading to a partial clog and inconsistent flow. Also, if the Bowden tube itself is degraded or pinched, it adds friction.
- How to check: Disassemble your hotend (when cold!). Inspect the end of the Bowden tube â it should be cut perfectly square and clean. Check inside the hotend for any plastic buildup above the nozzle.
- How to fix:
- Reseat the Bowden tube: Heat the hotend, push the Bowden tube all the way down until it firmly touches the nozzle. Then, tighten the hotend fitting. There are many great YouTube videos on "hotend gap fix" for Creality printers.
- Replace the Bowden tube: If it's degraded or showing signs of wear, replace it with a good quality Capricorn PTFE tube. They have tighter tolerances, reducing friction.
4. Heat Creep â The Sneaky Heater
This is where heat from the hotend travels too far up the heat break, causing the filament to soften prematurely before it reaches the melt zone. This leads to increased friction, blockages, and eventually, under-extrusion.
- How to check: If you're getting clogs higher up in the hotend (above the nozzle), especially after long prints, it could be heat creep. The fan on your hotend's heatsink might be failing or clogged.
- How to fix:
- Check heatsink fan: Make sure itâs spinning freely and no dust bunnies are blocking it. Clean it out.
- Replace fan: If the fan is failing, replace it.
- Thermal paste: Ensure good thermal contact between the heat break and heatsink.
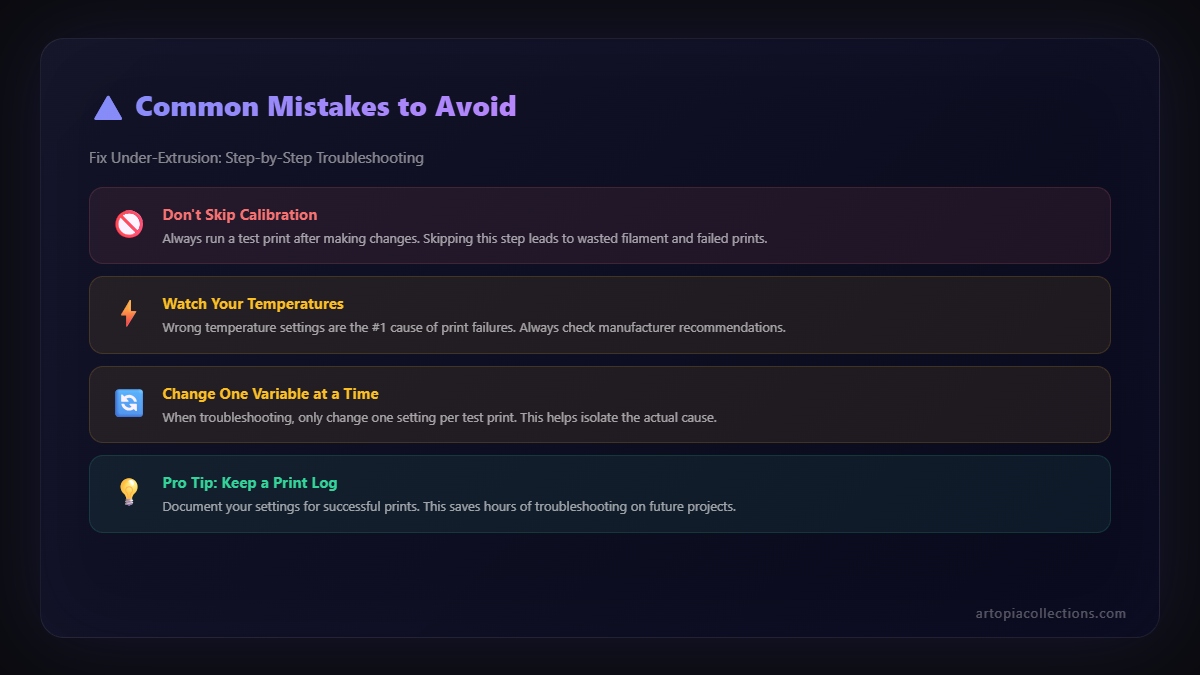
Wrapping It Up â Don't Give Up!
I know this list seems long, but honestly, it's just a systematic way of tackling a common problem. Most of the time, the fix is something simple like a clogged nozzle or wet filament. Don't feel discouraged if your first attempt doesn't work. This is part of the journey of 3D printing, especially when you're trying to push the limits or just get reliable prints for your orders.
My biggest advice? Keep a log. Seriously. Note down what print failed, what the symptoms were, and what you tried to fix it. Over time, you'll start seeing patterns, and your troubleshooting will get lightning fast. It's how I keep my little business running smoothly!
And hey, if you're ever looking for some cool, unique 3D printed items, or just want to see what's possible, swing by my store at Artopia Collections. Weâve got everything from custom prototypes to really intricate display pieces, all made with love (and a whole lot of successful extrusion, I promise!).
Happy printing, my friends! May your layers always be perfect.