How to Install a BLTouch on Ender 3 V2: Complete Wiring Guide
Struggling to install your BLTouch on an Ender 3 V2? Our comprehensive wiring guide simplifies the process, ensuring a perfect setup. Achieve accurate auto-bed leveling and improve your print quality today.

From First Layer Nightmares to Printing Bliss: How I Installed a BLTouch on My Ender 3 V2 (and How YOU Can Too!)
Yaar, how many times have you been there? You've spent hours designing a killer model, sliced it perfectly, loaded up some gorgeous Extrudr PLA (or maybe even some of that fancy wood-filled stuff from a local supplier, you know the kind), hit print, and then... disaster. Your first layer, the MOST important layer, decides to play hide-and-seek with the build plate. Corners peeling, spaghetti monster forming, your blood pressure going up faster than your printer's hot end. Sound familiar? Because, trust me, it’s a story I've lived through more times than I care to admit with my beloved Ender 3 V2. That's why, my friends, we need to talk about the BLTouch.
Why Even Bother with a BLTouch? My Journey to Sanity!
Honestly, for ages, I was a manual levelling purist. "Nah, my skilled hands are enough," I'd tell myself, while secretly cursing every time I had to re-level after a slight bump or even just changing the filament. I mean, the Ender 3 V2 is an amazing printer, especially for its price point here in India – you get so much machine for around ₹20,000-₹25,000, it's unreal. But that manual levelling, oh man, it could be a real pain.
But when you're running a small business like ArtOPIA Collections, churning out custom prints for clients, consistency isn't just a luxury, it's a necessity. Every failed print costs you time, filament (and these days, good quality filament isn't cheap, right? A decent kilo of PLA can set you back anywhere from ₹1500 to ₹2500, depending on the brand and type), and your sanity. You can't tell a client, "Sorry, your custom figurine failed because my printer decided to play games with the first layer." That's just not how it works in the real world.
That's when I finally caved and bought a BLTouch. And let me tell you, it was a game-changer. Pure magic, I tell you. It's basically a sophisticated servo probe that touches your print bed at multiple points, maps out any inconsistencies, and then the printer compensates for them in real-time. No more warped beds ruining your day! Your Ender 3 V2, already a fantastic machine, just becomes an absolute workhorse, spitting out perfect first layers almost every single time. It literally gives me more time to design new pieces for my shop at ArtOPIA Collections instead of constantly adjusting bed springs.
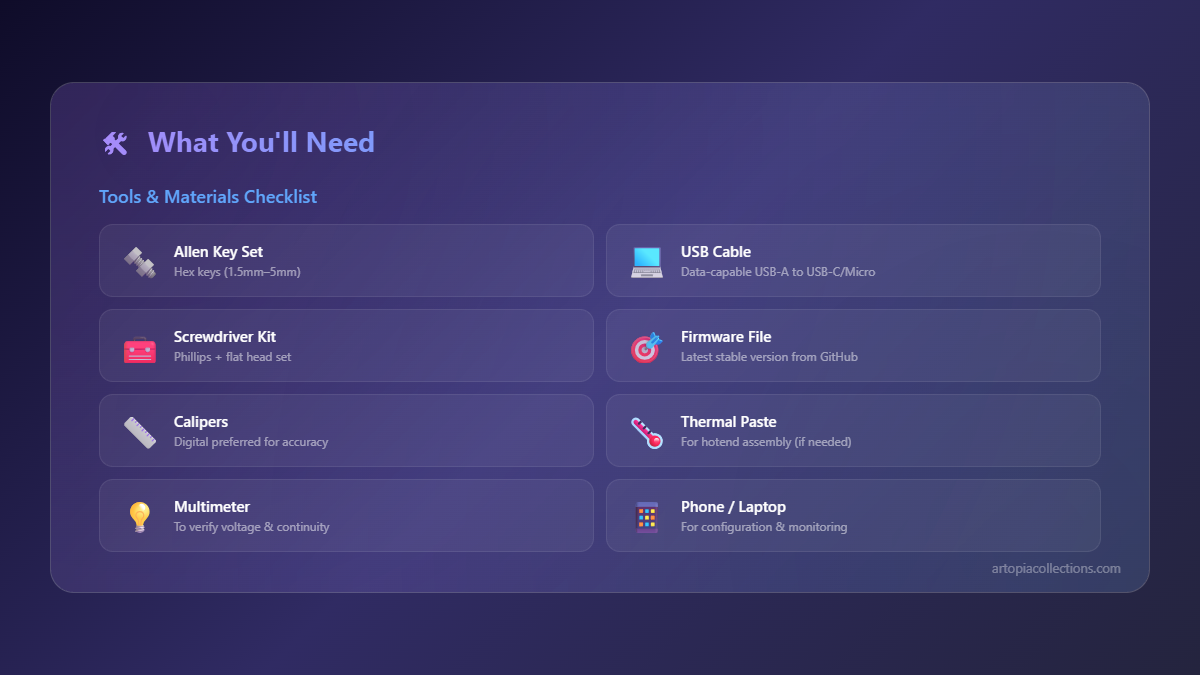
Alright, You're Convinced! What You'll Need for the BLTouch Install
So you've heard my spiel, and you're ready to ditch the frustration, right? You've hit 'add to cart' (or maybe already have one gathering dust on your workbench, like I did for a while). What else do you need? Gather these bits before you start, trust me, it saves a lot of running around.
- Your BLTouch kit (obviously!). Make sure it's a genuine one, there are fakes out there that can cause more headaches than they're worth. You can usually snag a good quality one for around ₹2000-₹3500 online. Check out BLTouch kits compatible with Ender 3 V2 on Amazon.in here.
- A small Philips head screwdriver – essential for all those tiny screws on the printer. Seriously, invest in a decent set, a cheap one will strip screws faster than a hot knife through butter, and then you're stuck, you know?
- Side cutters or wire strippers – you might need these if you have to snip or extend any wires, but for most kits, it's just plug and play.
- A bunch of zip ties – always, always useful for cable management. A messy printer is an unhappy printer, and it’s a fire hazard too, let's be honest.
- A micro SD card – for flashing the firmware. Your printer came with one, probably.
- A computer – to download and transfer that firmware.
- And finally, patience – because sometimes, things don't go perfectly on the first try, and that's totally okay! It’s part of the learning curve, and trust me, the reward is worth it.
The Physical Installation: Getting Your Hands Dirty (Just a Little!)
Okay, let's get our hands a little dirty. Don't worry, it's not as scary as it sounds. We'll take it step by step.
Mounting the BLTouch
Your BLTouch kit usually comes with a specific mounting bracket for the Ender 3 V2. It's designed to attach to the hot end assembly, typically on the left side, using the existing screws. First things first, though: power off and unplug your printer! Safety first, always! We're dealing with electronics here, and nobody wants a shock or a fried mainboard.
Now, locate the two screws on the side of your hot end shroud – those are the ones holding the fan cover. Loosen those up. The BLTouch bracket should slot right in there. Secure it with the provided screws. Make sure it's snug, but don't overtighten; we don't want to crack any of the plastic parts. This part is critical: the BLTouch probe needs to be lower than your nozzle when it's deployed (when it extends), but higher than your nozzle when it's retracted. When it’s retracted, it should clear the nozzle completely. When it extends, it needs to be the lowest point to accurately probe the bed. Play around with the bracket's position slightly if your kit allows, or bend it gently, until you get this clearance just right.
The Wiring – This is the TRICKY Bit! (But I Got You)
Now, this is where most people (including a slightly younger, more confused me) get a bit flustered. But honestly, once you understand the Ender 3 V2's mainboard, it's pretty straightforward. Your Ender 3 V2 likely has the Creality 4.2.2 or 4.2.7 mainboard. Both are largely similar for BLTouch wiring, but always, always check your specific board version. You can usually see it printed directly on the board itself. Pop off the bottom cover of your printer – it's held on by a few screws. Be gentle, there are wires everywhere, and we definitely don't want to yank anything out accidentally.
You'll see two sets of wires coming from your BLTouch. Usually, one is a 5-pin connector, and the other is a 2-pin connector. Sometimes, the kits simplify it and combine them into a single 3-pin and a single 2-pin, or even a single 5-pin. Here's the deal:
The 5-pin BLTouch connector typically has three wires for the servo signal (usually Orange, Red, Brown) and two wires for the probe's endstop function (usually Black and White). On the Ender 3 V2's 4.2.X board, you're looking for one specific port:
The 5-pin 'BLTouch' port: This is a dedicated port on your mainboard. It's usually labelled 'BL-TOUCH' or 'PROBE' and is separate from your motor and endstop ports. You’ll typically see a 5-pin header there. This is where you connect the 5-pin connector from your BLTouch. Make absolutely sure the colours match the pinout on the board if specified. If not, follow the standard wiring:
- Orange (Signal)
- Red (5V)
- Brown (Ground)
- White (Probe Signal)
- Black (Ground for Probe)
Seriously, double-check your BLTouch's manual for its specific wiring colour scheme! Some manufacturers use different colours, and mixing them up can damage your BLTouch or your board. I've seen it happen to a friend, and replacing a BLTouch costs another ₹2500, which is just unnecessary. For most modern kits for the Ender 3 V2, it's usually just this single 5-pin cable that connects directly to the dedicated BLTouch port. That's what I used for my setup, nice and clean.
(Optional) The Z-axis Endstop port: If your BLTouch only came with a 3-pin and 2-pin connector, or if you're using an older BLTouch wiring scheme (less common with dedicated 5-pin ports on the 4.2.X boards), you *might* need to use the Z-axis endstop port. In this scenario, the 3-pin (Orange, Red, Brown) would go into the dedicated BLTouch port, and the 2-pin (Black, White) would go into the Z-axis endstop port, replacing the original Z-endstop switch. But again, for most kits today, with the 4.2.X boards, it's just the single 5-pin cable.
Once you've connected the wires, try to route them neatly alongside your existing cable loom. Use those zip ties! We don't want cables snagging or getting caught in moving parts. This is where a little extra effort pays off in the long run, preventing wear and tear, and just making your setup look professional – something my clients really appreciate when they visit ArtOPIA Collections. After wiring, gently put the bottom cover back on. Don't screw it in fully yet, just in case you need to recheck something. Connect your printer to power, but don't turn it on just yet!
Firmware: The Brain Transplant
Now, the wiring is only half the battle. Your printer doesn't *know* it has a BLTouch yet. We need to tell it. This is where firmware comes in. It's basically the printer's operating system, and we need to flash one that supports the BLTouch. Without it, your BLTouch is just a fancy paperweight.
Downloading the Right Firmware
Creality usually provides official firmware versions for BLTouch setups on their download page. Look for the firmware specifically for 'Ender 3 V2' and 'BLTouch'. It's absolutely crucial that it matches your mainboard version (4.2.2 or 4.2.7). If you install the wrong one, your printer might just sit there doing nothing, or worse, act erratic. It's a bit like putting Android on an iPhone – just doesn't work right. Save the .bin file to the root directory of your micro SD card. Don't put it in any folders! The printer won't find it if it's buried in a subfolder.
Alternatively, if you're feeling adventurous (and I highly recommend this for better control once you're comfortable), you can compile your own Marlin firmware. Sites like Teaching Tech or Chris's Basement have fantastic guides for this. You get so many more features and fine-tuning options, it’s honestly amazing what you can do. But for a first-timer, stick to Creality's official firmware, it's much easier to get started. Just search for 'Ender 3 V2 BLTouch firmware' on Creality's site. It’s pretty straightforward. Or if you’re really struggling, there are communities online, even Telegram groups here in India, where people share pre-compiled binaries. Just be careful and make sure they're from a trusted source, you know? Always verify.
Flashing the Firmware
This is arguably the easiest part. With the .bin file on your micro SD card, and your printer still powered off:
- Insert the micro SD card into your printer's slot.
- Power on the printer.
Your screen might stay blank for a few seconds, or show the Creality logo. It's basically updating itself. The printer automatically detects the .bin file and flashes the firmware. Once the main menu appears, the firmware is flashed! Now, very important: remove the micro SD card, and either delete the .bin file from it or rename it (like firmware.bin.OLD) to prevent it from reflashing every time you power on. You don't want to accidentally re-flash and reset your settings later.
If your screen is still blank after a minute or two, turn off, remove the SD card, and re-power. If it works, great. If not, recheck your firmware download and try again. Sometimes, SD card issues can cause problems too – try another card if you have one. Cheap SD cards can be notorious for these kinds of glitches.
First Steps After Installation: Dialling It In
Okay