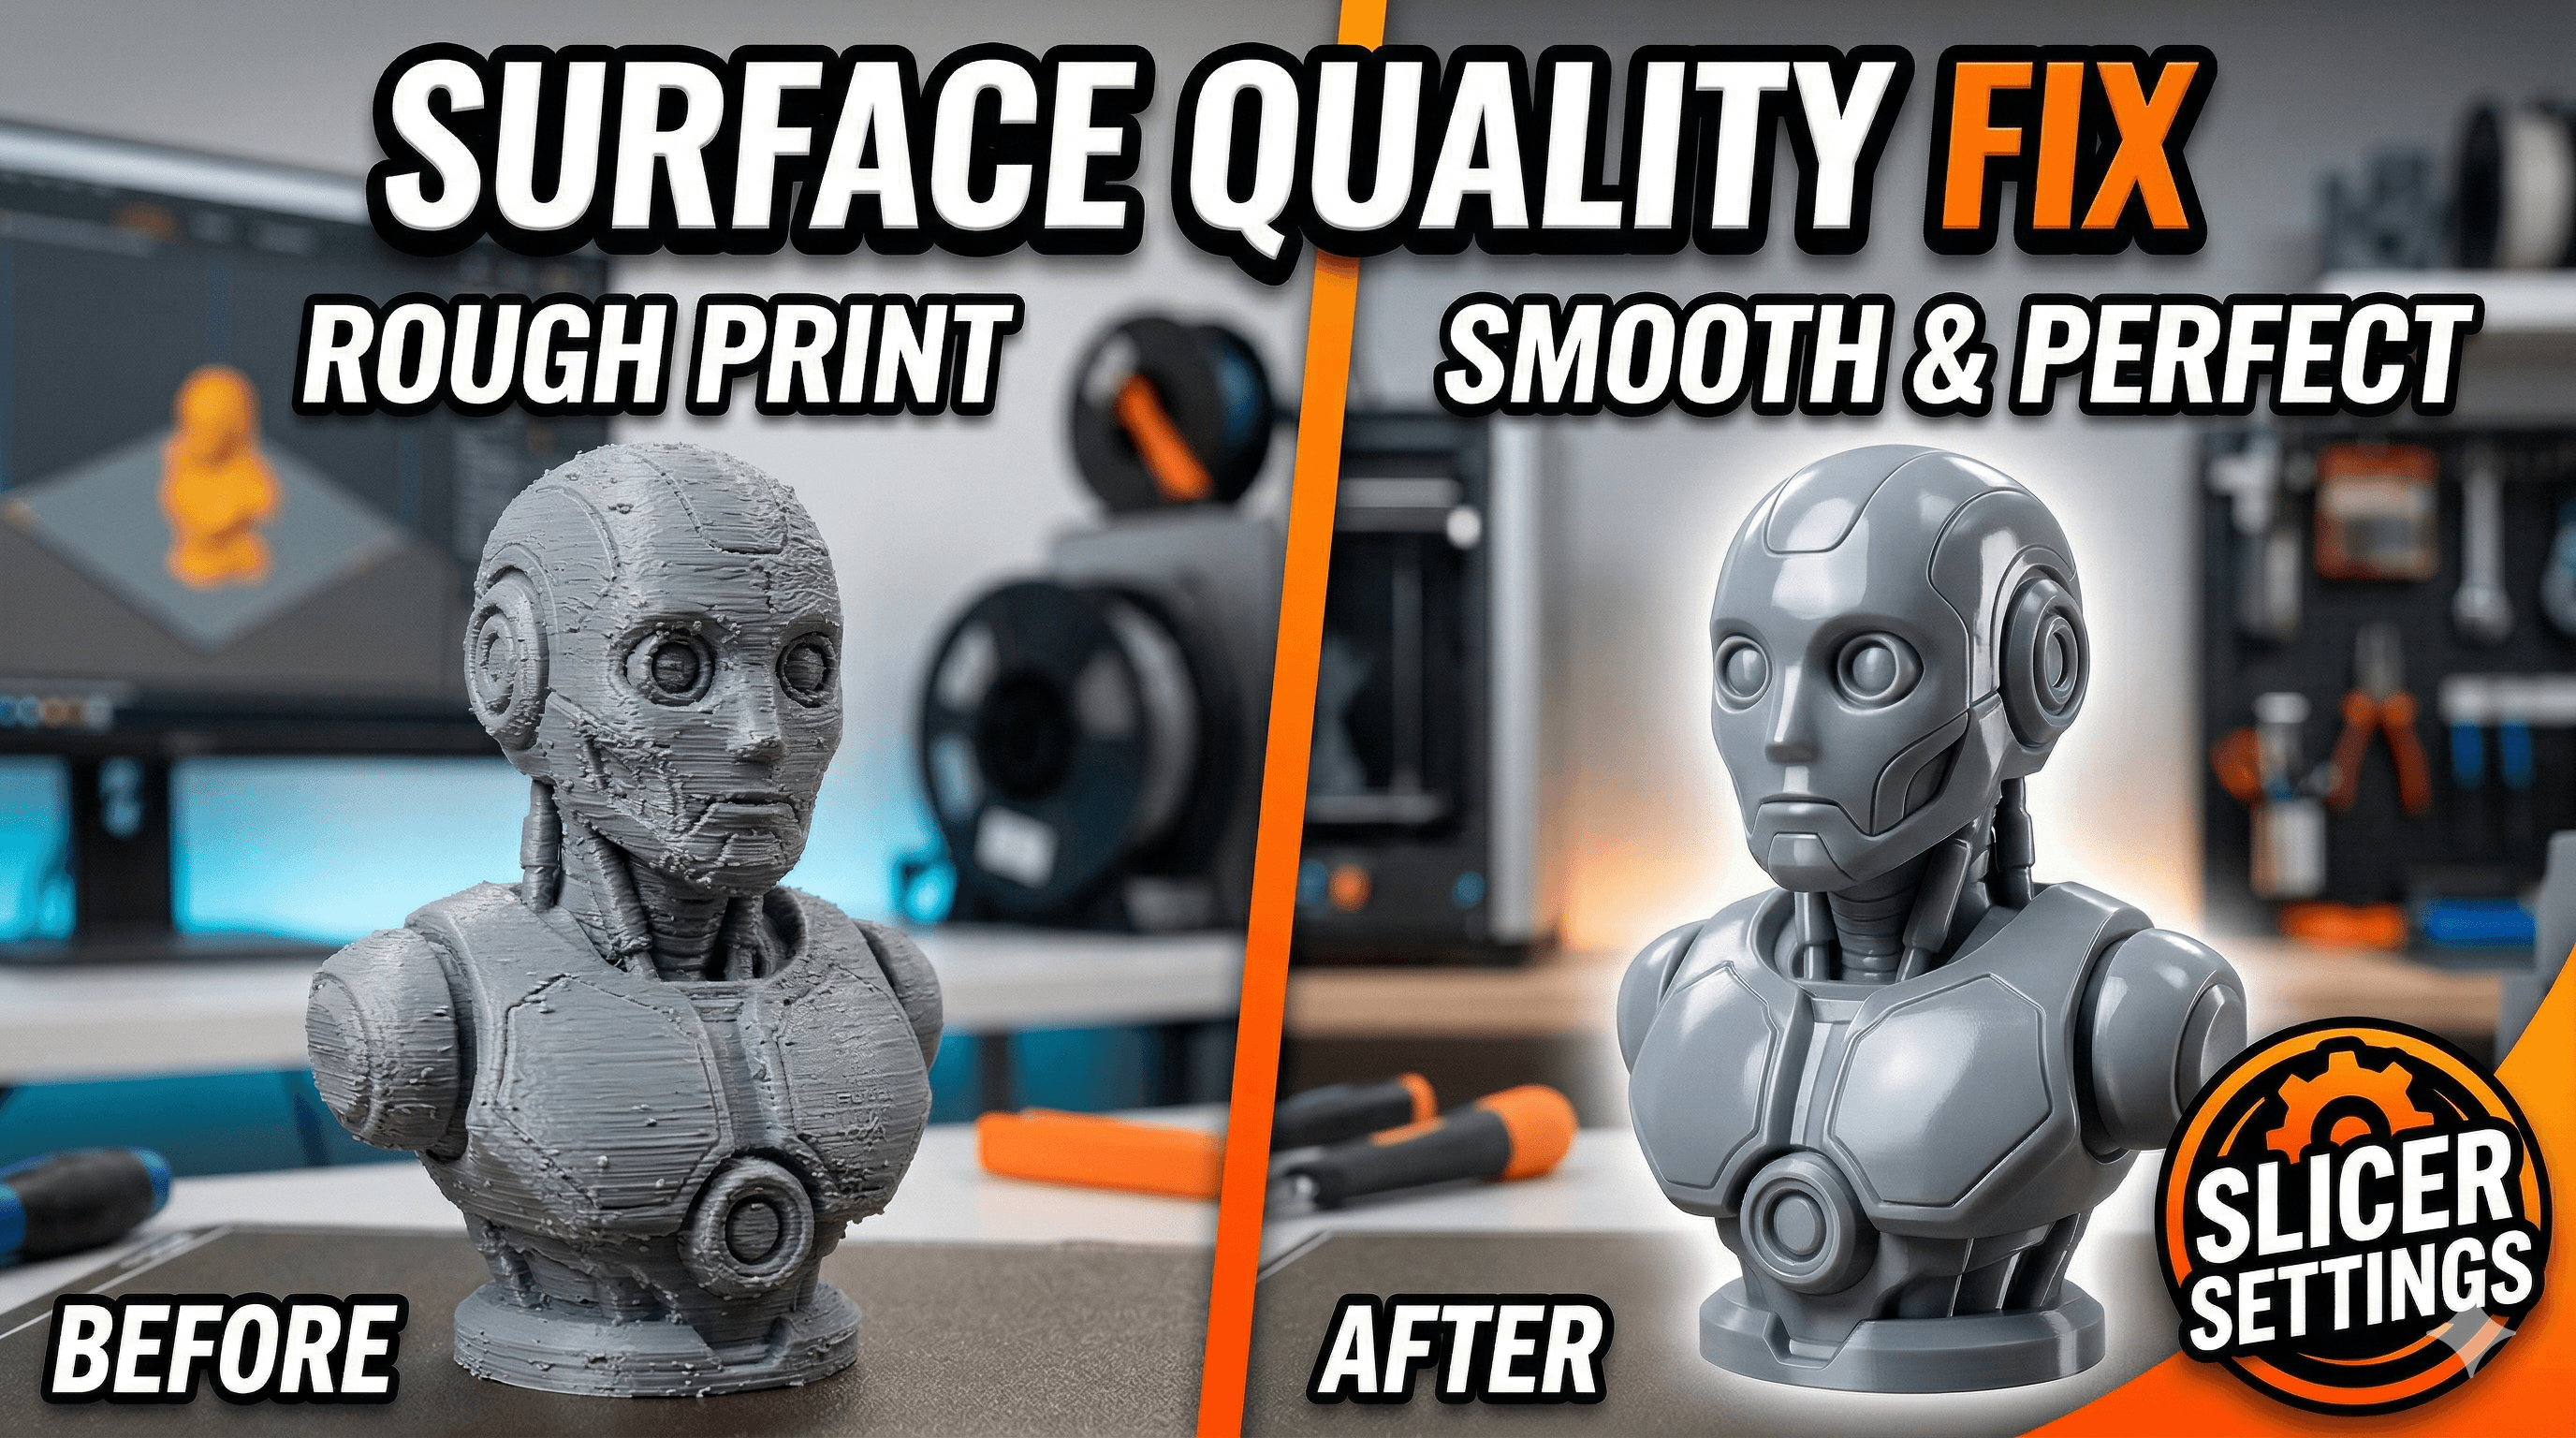
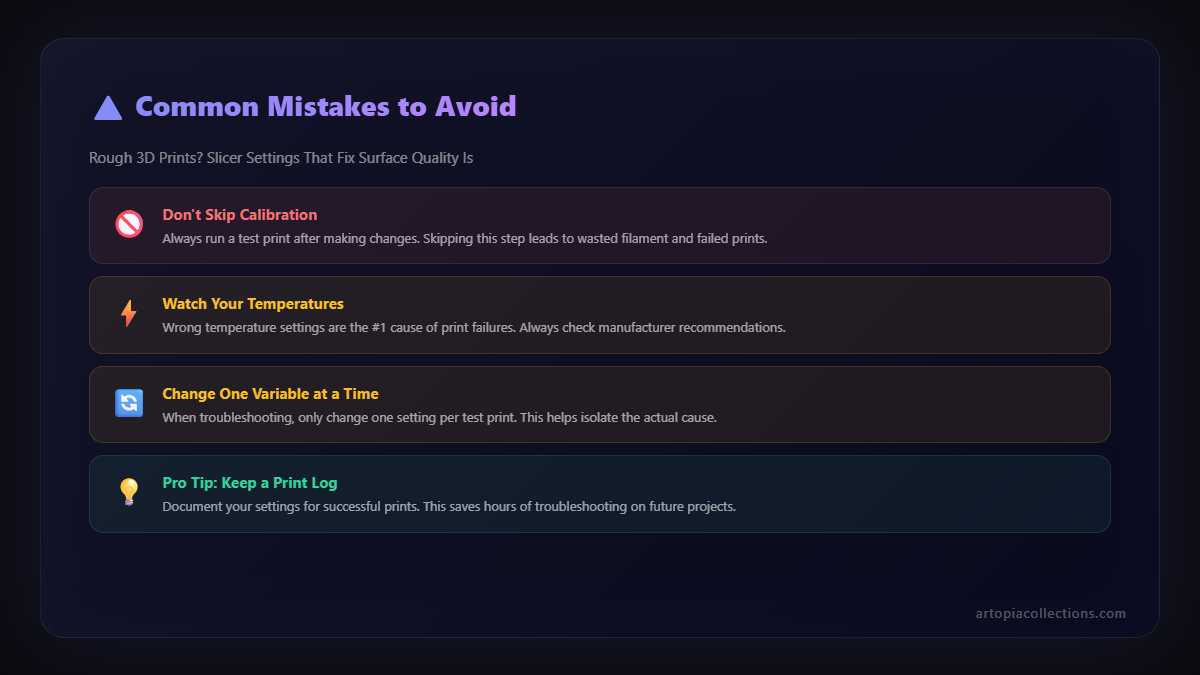
Rough 3D Prints? Slicer Settings That Fix Surface Quality Issues
Is your 3D print surface feeling rough and looking unprofessional? This guide dives deep into the common reasons behind rough textures and provides actionable solutions to help you achieve perfectly smooth finishes on every print.
Why Are My 3D Prints Rough and How to Get Smooth Surfaces â My Journey from Jagged to Jalebi-Smooth!
Oh, the agony! Youâve spent hours, maybe even days, designing something awesome, slicing it up just right, and watching your 3D printer hum away, layer by beautiful layer. You pull it off the print bed, full of anticipation, only to feel... well, let's just say it feels more like sandpaper than the smooth, polished masterpiece you envisioned. Sound familiar? Man, I've been there countless times, staring at a print that looked like it lost a fight with a cheese grater, thinking, "What on earth went wrong NOW?"
Honestly, this is one of the most common frustrations I hear from fellow makers, and trust me, itâs not just you. Even after years of running my little 3D printing business, ArtoPia Collections, right here in India, I still occasionally pull off a print that makes me scratch my head. But the thing is, those moments are fewer and farther between now, because Iâve learned a ton about why prints get rough and, more importantly, how to get them smooth. And today, Iâm going to share some of my hard-won wisdom, my chai-fueled experiments, and a few practical tips with you, my friend.
The "Why" â Unmasking the Culprits Behind Rough 3D Prints
Before we can fix anything, we gotta understand it, right? Think of your 3D printer as a meticulous chef trying to build a perfect cake, layer by layer. If any ingredient is off, or the oven isn't right, or the chef is rushing, the cake won't be perfect. Your printer is the same. There are so many variables, and just one tiny misstep can turn a potentially silky-smooth surface into something akin to a bad hair day for your print. Let's break down the usual suspects.

1. Nozzle Nightmares: Clogs, Wear, and Tear
This is a big one, guys. Your nozzle is the final gateway for your molten plastic. If it's partially clogged, old, or worn out, the plastic won't flow evenly. You'll get inconsistent extrusion, little blobs, or even gaps, all contributing to a rough surface. I personally try to keep a fresh nozzle in my Creality Ender 3 V2 or my Anycubic Kobra Go at least every few months, especially if Iâm printing a lot of abrasive filaments like carbon fiber PLA (which, by the way, absolutely chews through brass nozzles).
2. Bed Leveling Blunders: The Foundation Matters!
Seriously, a good first layer is non-negotiable for a good print. If your bed isn't perfectly leveled â or your Z-offset is off â your first layer will be either squished too much (leading to elephant's foot and rough edges) or not squished enough (leading to poor adhesion and stringy bits). And let me tell you, a bad first layer just compounds problems all the way up the print. It's like building a house on a wonky foundation; nothing above it will ever be truly straight or smooth.
3. Extrusion Errors: Too Much or Too Little Flow
Are you overextruding or underextruding? Overextrusion means your printer is pushing out too much plastic for the space, causing blobs, bulges, and a generally lumpy surface. Underextrusion, on the other hand, means not enough plastic, leading to gaps, weak layers, and a rough, almost porous texture. Itâs a delicate balance, my friends. And one that requires a bit of fine-tuning.
4. Temperature Troubles: Hot or Cold, It Matters
The temperature of your hotend is crucial. If it's too high, your filament can become too liquidy, potentially oozing out, stringing, and causing print artifacts that make surfaces rough. If it's too low, the plastic might not melt sufficiently, leading to poor layer adhesion and an uneven, "grainy" look. Each filament type and brand (like eSUN PLA+, or Overture PETG, which I use a lot) has its own sweet spot, and even colors within the same brand can behave differently, believe it or not!
5. Cooling Conundrums: Fan or Foe?
Proper part cooling is often overlooked. As each layer is extruded, it needs to cool down quickly enough to solidify before the next layer is laid down. If there's insufficient cooling, the plastic can sag, warp, or just generally not hold its shape well, especially on overhangs, resulting in a rough, droopy appearance. But then again, too much cooling, especially with materials like ABS, can cause cracking and warping too. It's a proper balancing act, isn't it?
6. Speed Demons: The Need for (Less) Speed
I get it, we all want our prints done yesterday. But printing too fast is a common reason for rough surfaces. When your printer is flying through layers, it doesn't give the plastic enough time to properly adhere and cool, leading to vibrations, ringing, ghosting, and just overall poor surface quality. Especially for detailed models or outer perimeters, slowing down can make a world of difference.
7. Filament Follies: Quality and Moisture
Look, not all filaments are created equal. Cheap, inconsistent filament can cause all sorts of headaches. But even good filament can go bad if it absorbs moisture from the humid Indian air. Wet filament will bubble and pop as it's extruded, creating tiny craters and bumps on your print surface. It looks rough, sounds rough, and makes you want to pull your hair out!
The "How" â My Go-To Strategies for Silky Smooth 3D Prints
Alright, so we know *why* things go wrong. Now, let's talk about how to make them go right! Getting truly smooth surfaces often involves a combination of pre-print calibration, optimal slicer settings, and sometimes, a little post-processing magic. It's an iterative process, but totally worth it for those buttery-smooth results.
1. Master Your Machine: Calibration is King!
Before you even think about printing that masterpiece, make sure your machine is singing its best tune.
- E-Steps Calibration: This tells your extruder how much filament to push out. If it's off, you'll either over- or underextrude. There are tons of guides online, but basically, you mark 120mm of filament, tell your printer to extrude 100mm, and then measure what's left. Adjust your E-steps accordingly. It's a game-changer!
- Flow Rate: After E-steps, dial in your flow rate in your slicer. Print a single-wall cube and measure its thickness. If it's not matching your nozzle diameter (e.g., 0.4mm), adjust the flow percentage. I usually aim for about 95-98% for most PLAs after E-steps are calibrated.
- Nozzle Health: Keep those nozzles clean! After every few prints, I run a cold pull or just push some cleaning filament through. And seriously, don't be afraid to change your nozzle. A pack of brass nozzles costs around â¹300-â¹500 for 10-20 pieces on Amazon â you can find good ones here. If you're using abrasive filaments, consider hardened steel nozzles, though theyâre pricier (around â¹800-â¹1500 each).
2. Perfecting Your Print Environment & Settings
This is where your slicer (Cura, PrusaSlicer, Simplify3D) becomes your best friend.
- Bed Leveling, Re-Re-Revisited: If you have an auto bed leveling (ABL) sensor like a CR Touch or BL Touch (which you can snag for about â¹3000-â¹5000), use it! Make sure your Z-offset is spot on. If you're manual leveling, do it before every important print. Trust me, it takes 2 minutes and saves hours of frustration.
- Temperature Towers & Retraction Towers: These are diagnostic prints that help you find the optimal temperature and retraction settings for your specific filament. They're super easy to print and incredibly informative. A good retraction setting minimizes stringing and blobs, leading to much cleaner surfaces.
- Optimized Cooling: For PLA, you generally want your part cooling fan running at 100% after the first few layers. For PETG, usually around 50-70%. ABS often needs minimal to no part cooling to prevent warping and cracking. Experiment! Some printers even benefit from fan upgrades for better airflow.
- Slower Speeds for Smoothness: For outer walls, I usually drop my speed down to 30-40mm/s, sometimes even 20mm/s for really intricate models. It takes longer, yes, but the surface quality improvement is usually dramatic. My inner walls can be faster, but those outer ones? Slow and steady wins the race.
- Filament Management: Store your filament in dry boxes with desiccant. If you suspect moisture, get a filament dryer. I use a basic one that cost me about â¹7000, but you can also make a DIY version with a food dehydrator. A dry filament is a happy filament, and a happy filament gives you smooth prints. Check out some options on Amazon.
- Z-Seam Placement: That line where each layer starts and ends? That's your Z-seam, and it can look pretty rough. In your slicer, you can usually choose to align it (e.g., "Sharpest Corner" or "User Specified") or make it random. For models where smoothness is key, aligning it to a less visible corner or a seam that will be sanded later is a good strategy.
- Layer Height: While not strictly about "roughness" in the sense of defects, a lower layer height (e.g., 0.12mm or 0.08mm instead of 0.2mm) will *feel* smoother because the individual layers are less pronounced. It takes longer to print, but the difference in tactility is huge.
3. Post-Processing Perfection: When Printing Isn't Enough
Sometimes, even with the best settings, you'll want to take your prints to the next level of smoothness. This is where post-processing comes in, and it's an art form in itself! (I actually enjoy this part sometimes, it's quite meditative).
- Sanding & Filling: This is the most common method. Start with a coarser grit sandpaper (like 150-220) to remove major imperfections, then progressively move to finer grits (400, 600, 800, 1000, 1500, even 2000 for a glass-like finish). Wet sanding works wonders and reduces dust. For deeper gouges or print lines, automotive body filler (like Bondo, available at most hardware stores for â¹400-â¹800) or even wood filler can be used, then sanded smooth.
- Priming & Painting: After sanding, a good coat of primer (spray primer, automotive primer works great) fills in tiny imperfections and gives you a uniform surface for painting. Once primed, you can use acrylics, spray paints, or even airbrush paints to get that final, flawless finish.
- XTC-3D Coating: This stuff is liquid magic for PLA and ABS prints. It's a self-leveling epoxy resin that you brush onto your print. It fills in all the layer lines and cures to a super smooth, glossy finish. A small kit costs around â¹3000-â¹5000, but it goes a long way. Just be careful with ventilation when using it.
- Vapor Smoothing (with extreme caution!): This is primarily for ABS and ASA filaments, using acetone vapor. The acetone dissolves the outer layer of the plastic, melting away layer lines and leaving an incredibly smooth, glossy finish. However, this method requires extreme caution, proper ventilation, and safety gear, as acetone fumes are highly flammable and toxic. I personally rarely use this method because of the risks, but it's an option for those who know what they're doing.
- Heat Guns/Lighters (Use Sparingly!): For small areas, a quick pass with a heat gun or even a lighter can melt away fine wisps of stringing or lightly smooth out a small imperfection. But seriously, be gentle! Too much heat will deform your print faster than you can say "Oops!"
My ArtoPia Journey: From Rough Edges to Artful Creations
Honestly, when I started ArtoPia Collections, the initial prints were, letâs just say, "characterful." I was constantly tweaking, reading forums, watching YouTube videos from makers around the world, and just plain experimenting. I burned through a lot of filament trying to get things right. But every rough print taught me something. Every failed calibration pushed me to understand my machines better. And now, the quality of prints I can offer my customers, whether it's a detailed figurine or a functional prototype, is something I'm truly proud of.
The journey from rough, jagged prints to jalebi-smooth surfaces is all about patience, practice, and a willingness to learn. Don't get disheartened by those less-than-perfect prints. Every one of them is an opportunity to learn and improve. Keep experimenting with your slicer settings, invest a little in good quality filament, and don't be afraid to get your hands dirty with some post-processing. You'll be amazed at the difference it makes.
So, go forth, my fellow maker! Tame those rough surfaces and create something truly beautiful. And hey, if you ever need inspiration or just want to chat about printing woes, feel free to drop a comment or check out what we're cooking up over at ArtoPia Collections. Happy printing!
For Indian Makers: In India's humid climate, filament moisture is a common cause of rough surfaces. Invest in a filament dryer (available on Amazon India for INR 2,500-4,000) and store filament in airtight containers with silica gel packets.